K (Minor fix.) |
K (General fixes.) |
||
| Zeile 1: | Zeile 1: | ||
| + | {{npc infobox | boxwidth = 30 |
||
| − | <includeonly><!-- |
||
| + | | type = Bossmonster |
||
| + | | knockback = 100% |
||
| + | | immune1 = Verwirrt |
||
| + | | money = {{gc|12}} |
||
| + | | Soul of Sight|Seele der Einsicht|20-40 / {{expert|25-40|icons=no}}|100% |
||
| + | | Greater Healing Potion|Großer Heiltrank|5-15|100% |
||
| + | | Hallowed Bar|Geheiligter Barren|15-30 / {{expert|20-35|icons=no}}|100% |
||
| + | | Twin Mask|Zwillingsmaske|1|14.29% |
||
| + | | Retinazer Trophy|Retinazertrophäe|1|10% |
||
| + | | Spazmatism Trophy|Spazmatismtrophäe|1|10% |
||
| + | | Horned God Boots|Horned God Boots|{{icon|old-gen}}|14.29% |
||
| + | | Treasure Bag (The Twins)|Schatzbeutel|1|{{expert|100%}} |
||
| + | | hardmode = yes |
||
| + | | allversions = yes |
||
| + | }} |
||
| + | [[Datei:Retinazer Trophy.png|25px]] <big>''„Das verspricht eine furchtbare Nacht zu werden…“''</big> [[Datei:Spazmatism Trophy.png|25px]] |
||
| + | '''Die Zwillinge''' sind ein Hardmode Boss der durch das [[Mechanisches Auge]] gerufen wird, dieser kann nur in der Nacht gerufen werden. Er ist die stärkere Version von dem [[Auge von Cthulhu]]. Die Zwillinge sind 2 Augen mit zusammen 24.000 Leben. |
||
| − | -->{{item/options|smallicons=y}}<!-- |
||
| − | -->{{eicons/options|small=y}}<!-- |
||
| + | == Tipps == |
||
| − | -->{{#dplvar:set<!-- |
||
| + | * Um '''die Zwillinge''' zu töten, sollten Sie am besten eine Arena bauen so 80 Blöcke lang um immer wieder den Attacken der Zwillinge ausweichen zu können. |
||
| − | -->|_npc_infobox:name|{{{name|{{{namede|{{ROOTPAGENAME}}}}}}}}<!-- German name; $namede should not be used anymore |
||
| + | * Es eignet sich auch noch die [[Automatiksturmwaffe]] die man von der [[Fleischwand]] bekommt zu nutzen und auf den Boss zu schießen, da dieser einen hohen Nahkampfschaden besitzt. |
||
| − | -->|_npc_infobox:nameen|<!-- English name, catches a few errors |
||
| + | * Die Hardmode – Waffe [[Kristallsturm]], die man craften kann, eignet sich noch besser gegen diesen Boss, ist aber Anfangs schwer zu bekommen. |
||
| − | -->{{#if:{{{nameen|}}}|<!-- |
||
| + | * Desweiteren ist es schwierig ohne eine [[Mithrilrüstung|Mithril-]]/ [[Adamanitrüstung]] gegen diesen Boss zu kämpfen. Heiltränke wären auch angebracht, bzw. Buff – Tränke. |
||
| − | -->{{{nameen}}}<!-- |
||
| − | -->|<!-- else ($nameen not specified) |
||
| − | -->{{#if:{{tr|{{{name|{{{namede|{{ROOTPAGENAME}}}}}}}}}}|<!-- check for entry in translation database |
||
| − | -->{{tr|{{{name|{{{namede|{{ROOTPAGENAME}}}}}}}}}}<!-- |
||
| − | -->|<!-- |
||
| − | -->{{{name|{{{namede|{{ROOTPAGENAME}}}}}}}}<!-- |
||
| − | -->}}<!-- |
||
| − | -->}}<!-- |
||
| − | -->}}<!-- |
||
| + | == Angriffe == |
||
| − | --><div class="infobox npc {{lc:{{{type|}}}}}" style="<!-- |
||
| + | Die Zwillinge greifen verschieden an, der eine mit Laserstrahlen, der andere mit Rammangriffen. Wie bei dem Auge von Cthulhu, werden die Zwillinge stärker, nachdem sie die Hälfte ihres Lebens verloren haben. |
||
| − | -->{{#if:{{{width|{{{boxwidth|}}}}}}|width:{{{width|{{{boxwidth|}}}}}}em;}}<!-- |
||
| − | -->{{#if:{{{float|}}}|float:{{{float|}}};}}<!-- |
||
| − | -->"><!-- |
||
| + | {{-}} |
||
| − | -->{{#if:{{{version|{{{variant|}}}}}}|<!-- |
||
| + | == Augen == |
||
| − | -->{{#if:{{#pos:{{lc:{{{version|}}}}}|desktop}}||<!-- |
||
| + | {{infobox wrapper|direction=row|float=left |
||
| − | --><div class="variant"><!-- |
||
| + | |{{npc infobox |
||
| − | -->{{#if:{{{version|}}}|<!-- |
||
| + | | name = Retinazer |
||
| − | -->{{#vardefine:d|{{#pos:{{lc:{{{version}}}}}|desktop}}}}<!-- |
||
| + | | namesub = Erste Form |
||
| − | -->{{#vardefine:c|{{#pos:{{lc:{{{version}}}}}|console}}}}<!-- |
||
| + | | id = 125 |
||
| − | -->{{#vardefine:o|{{#pos:{{lc:{{{version}}}}}|oldgen}}}}<!-- |
||
| + | | ai = Retinazer-KI |
||
| − | -->{{#vardefine:m|{{#pos:{{lc:{{{version}}}}}|mobile}}}}<!-- |
||
| + | | damage = 40 / {{expert|76}} (Augenlaser)<br />45 / {{expert|76}} (Kontakt) |
||
| − | -->{{#vardefine:3|{{#pos:{{lc:{{{version}}}}}|3ds}}}}<!-- |
||
| + | | knockback = 100% |
||
| − | -->{{#if:{{#var:d}}|{{icon|desktop|nl=y}}}} <!-- |
||
| + | | life = 20000 <br /> {{expert|30000}} |
||
| − | -->{{#if:{{#var:c}}|{{icon|console|nl=y}}}} <!-- |
||
| + | | defense = 10 |
||
| − | -->{{#if:{{#var:o}}|{{icon|old-gen|nl=y}}}} <!-- |
||
| + | | imageother = Map Icon Retinazer (first form).png |
||
| − | -->{{#if:{{#var:m}}|{{icon|mobile|nl=y}}}} <!-- |
||
| + | | imageothercaption = Kartensymbol |
||
| − | -->{{#if:{{#var:3}}|{{icon|3ds|nl=y|small=y}}}} <!-- |
||
| + | }} |
||
| − | -->{{#if:{{#var:d}}|[[Desktopversion|Desktop]]-}}<!-- |
||
| + | |{{npc infobox |
||
| − | -->{{#if:{{#var:c}}|[[Konsolenversion|Konsolen]]-}}<!-- |
||
| + | | name = Spazmatism |
||
| − | -->{{#if:{{#var:o}}|[[Old-gen-Konsolenversion|Old-Gen-Konsolen]]-}}<!-- |
||
| + | | namesub = Erste Form |
||
| − | -->{{#if:{{#var:m}}|{{#if:{{#var:c}}{{#var:o}}| / }}[[Mobilversion|Mobil]]-}}<!-- |
||
| + | | id = 126 |
||
| − | -->{{#if:{{#var:3}}|{{#if:{{#var:c}}{{#var:o}}{{#var:m}}| / }}[[3DS-Version|3DS]]-}}<!-- |
||
| + | | ai = Spazmatism-KI |
||
| − | -->|<!--else |
||
| + | | damage = 50 / {{expert|88}} (verfluchte Flamme)<br />50 / {{expert|85}} (Kontakt) |
||
| − | -->[[File:Old-Gen Console only.png|12px]] [[File:Mobile only.png|12px]] [[File:3DS logo.svg|48px]] [[Old-gen-Konsolenversion|Old-Gen-Konsolen]]- / [[Mobilversion|Mobil]]- / [[3DS-Version|3DS]]-<!-- |
||
| + | | knockback = 100% |
||
| − | -->}}<!-- |
||
| + | | life = 23000 <br /> {{expert|34500}} |
||
| − | -->Exklusive Variante</div><!-- |
||
| + | | defense = 10 |
||
| − | -->}}<!-- |
||
| + | | debuff = Verfluchtes Inferno |
||
| − | -->}}<!-- |
||
| + | | debuffen = Cursed Inferno |
||
| + | | debuffchance = 50% |
||
| + | | debuffduration = 16% für 8 Sekunden,<br /> dann 25% für 5 Sekunden,<br /> dann 50% für 3 Sekunden<br />{{expert|16, 10, 6 Sekunden}} |
||
| + | | debufftip = Leben geht verloren |
||
| + | | imageother = Map Icon Spazmatism (first form).png |
||
| + | | imageothercaption = Kartensymbol |
||
| + | }} |
||
| + | |{{npc infobox |
||
| + | | name = Retinazer |
||
| + | | namesub = Zweite Form |
||
| + | | image = Retinazer (Second Form).png |
||
| + | | ai = Retinazer-KI |
||
| + | | damage = 50 / {{expert|92}} (Todeslaser)<br />36 / {{expert|68}} (Schnellfeuer)<br />67 / {{expert|113}} (Kontakt) |
||
| + | | life = 8000/20000 <br /> {{expert|12000/30000}} |
||
| + | | defense = 20 |
||
| + | | imageother = Map Icon Retinazer (second form).png |
||
| + | | imageothercaption = Kartensymbol |
||
| + | }} |
||
| + | |{{npc infobox |
||
| + | | name = Spazmatism |
||
| + | | namesub = Zweite Form |
||
| + | | image = Spazmatism (Second Form).png |
||
| + | | ai = Spazmatism-KI |
||
| + | | damage = 60 / {{expert|108}} (Augenfeuer)<br />75 / {{expert|127}} (Kontakt) |
||
| + | | life = 9000/23000 <br /> {{expert|13500/34500}} |
||
| + | | defense = 28 |
||
| + | | debuff = Verfluchtes Inferno |
||
| + | | debuffen = Cursed Inferno |
||
| + | | debuffchance = 50% |
||
| + | | debuffduration = 16% für 8 Sekunden,<br /> dann 25% für 5 Sekunden,<br /> dann 50% für 3 Sekunden<br />{{expert|16, 10, 6 Sekunden}} |
||
| + | | debufftip = Leben geht verloren |
||
| + | | imageother = Map Icon Spazmatism (second form).png |
||
| + | | imageothercaption = Kartensymbol |
||
| + | }} |
||
| + | }} |
||
| + | {{-}} |
||
| − | --><div class="title">{{#dplvar:_npc_infobox:name}}{{#if:{{{namesub|}}}|<span>{{{namesub|}}}</span>}}</div><!-- |
||
| + | {{Mastervorlage Charaktere |
||
| + | | auf = ja |
||
| + | | boss-auf = ja |
||
| + | }} |
||
| + | [[en:The Twins]] |
||
| − | == main image(s) == |
||
| + | [[fr:Les Jumeaux]] |
||
| − | --><div class="section images"><!-- |
||
| + | [[ko:쌍둥이]] |
||
| − | init all vars |
||
| − | -->{{#dplvar:set<!-- |
||
| − | -->|image2|{{{image2|}}}<!-- |
||
| − | -->|image3|{{{image3|}}}<!-- |
||
| − | -->}}<!-- |
||
| − | try to auto discover: _(alt).png, _(alt).gif if needed |
||
| − | if($image2 === null) |
||
| − | -->{{#if:{{{image2|}}}||{{#if:{{{image2|null}}}|<!-- |
||
| − | -->{{#vardefine:old|{{#if:{{{image|}}}|{{#explode:{{{image}}}|.|0}}|{{#dplvar:_npc_infobox:name}}}}_(alt)}}<!-- |
||
| − | -->{{#dplvar:set|image2|<!-- |
||
| − | -->{{#ifexist:Medium:{{#var:old}}.png|<!-- |
||
| − | -->{{#var:old}}.png<!-- |
||
| − | -->|<!-- |
||
| − | -->{{#ifexist:Medium:{{#var:old}}.gif|{{#var:old}}.gif}}<!-- |
||
| − | -->}}<!-- |
||
| − | -->}}<!-- |
||
| − | -->}}}}<!-- |
||
| − | display: |
||
| − | imagealt will not be affected if it has a text field (if imagealt = [[File:someimage.png|hello]], it will display 'hello') |
||
| − | --><span>{{{imagealt|[[Datei:{{{image|<!-- |
||
| − | -->{{ifexists|Datei:{{#dplvar:_npc_infobox:name}}.png|<!-- |
||
| − | -->{{#dplvar:_npc_infobox:name}}<!-- |
||
| − | -->|<!-- |
||
| − | -->{{#if:{{#dplvar:_npc_infobox:nameen}}|<!-- |
||
| − | -->{{#dplvar:_npc_infobox:nameen}}<!-- |
||
| − | -->|<!-- |
||
| − | -->{{#dplvar:_npc_infobox:name}}<!-- |
||
| − | -->}}<!-- |
||
| − | -->}}.png}}}|link=]]}}}</span><!--First sprite now displayed |
||
| − | -->{{#if:{{{imageexpert|}}}|[[Datei:{{{imageexpert}}}|Variante des Experten-Modus|link=]]}}<!-- Expert Mode image displayed |
||
| − | -->{{#if:{{#dplvar:image2}}|<!-- Second sprite now displayed |
||
| − | -->[[Datei:{{#dplvar:image2}}]]<!-- |
||
| − | -->}}<!-- |
||
| − | -->{{#if:{{#dplvar:image3}}|<!-- Third sprite now displayed |
||
| − | -->[[Datei:{{#dplvar:image3}}]]<!-- |
||
| − | -->}}<!-- |
||
| − | |||
| − | --></div><!-- div.section.images |
||
| − | |||
| − | --><div class="section statistics"><!-- |
||
| − | --><div class="title">Eigenschaften</div><!-- |
||
| − | --><table class="stat"><!-- |
||
| − | -->{{#if:{{{type|Gegner}}}|<!-- |
||
| − | --><tr><!-- |
||
| − | --><th>Typ</th><!-- |
||
| − | --><td><!-- |
||
| − | -->{{ifexists|{{{type|Gegner}}}|[[{{{type|Gegner}}}]]|{{{type|Gegner}}}}}<!-- |
||
| − | -->{{#if:{{{type2|}}}|<!-- |
||
| − | --> – {{ifexists|{{{type2}}}|[[{{{type2}}}]]|{{{type2}}}}}<!-- |
||
| − | -->}}<!-- |
||
| − | -->{{#if:{{{type3|}}}|<!-- |
||
| − | --><br/>{{ifexists|{{{type3}}}|[[{{{type3}}}]]|{{{type3}}}}}<!-- |
||
| − | -->}}<!-- |
||
| − | --></td><!-- |
||
| − | --></tr><!-- |
||
| − | -->}}<!-- |
||
| − | -->{{#if:{{{environment|}}}|<!-- |
||
| − | --><tr><!-- |
||
| − | --><th>[[Umgebung]]</th><!-- |
||
| − | --><td>[[{{{environment}}}]]{{#if:{{{environment2|}}}| – [[{{{environment2}}}]]}}</td><!-- |
||
| − | --></tr><!-- |
||
| − | -->}}<!-- |
||
| − | -->{{#if:{{{aide|{{{ai|}}}}}}|<!-- aide is deprecated: should neither be used anymore, nor described in documentation (but still used on some pages) |
||
| − | --><tr><!-- |
||
| − | --><th>[[KI]]</th><!-- |
||
| − | --><td>{{{aide|{{{ai|}}}}}}</td><!-- |
||
| − | --></tr><!-- |
||
| − | -->}}<!-- |
||
| − | -->{{#if: {{{damage|}}}|<!-- |
||
| − | --><tr><!-- |
||
| − | --><th>Schaden</th><!-- |
||
| − | --><td>{{{damage|}}}</td><!-- |
||
| − | --></tr><!-- |
||
| − | -->}}<!-- |
||
| − | -->{{#if: {{{life|}}}|<!-- |
||
| − | --><tr><!-- |
||
| − | --><th>Max. Leben</th><!-- |
||
| − | --><td>{{{life|}}}</td><!-- |
||
| − | --></tr><!-- |
||
| − | -->}}<!-- |
||
| − | -->{{#if: {{{defense|}}}|<!-- |
||
| − | --><tr><!-- |
||
| − | --><th>[[Verteidigung]]</th><!-- |
||
| − | --><td>{{{defense|}}}</td><!-- |
||
| − | --></tr><!-- |
||
| − | -->}}<!-- |
||
| − | -->{{#if: {{{knockback|}}}|<!-- |
||
| − | --><tr><!-- |
||
| − | --><th>[[Rückstoß]]-<br/>Widerstand</th><!-- |
||
| − | --><td>{{{knockback|}}}{{#if:{{#pos:{{{knockback|}}}|%}}||%}}</td><!-- |
||
| − | --></tr><!-- |
||
| − | -->}}<!-- |
||
| − | -->{{#if:{{{buffen|}}}|<!-- |
||
| − | --><tr class="buff"><!-- |
||
| − | --><th>Verursacht<br/>[[Positive Statuseffekte|Statuseffekt]]</th><!-- |
||
| − | --><td>{{#ifeq:{{{bufflink|}}}|yes|{{item|{{{buffen}}}|{{{buff|{{{buffen}}}}}}}}|{{item|{{{buffen}}}|{{{buff|{{{buffen}}}}}}|link=}}}}</td><!-- |
||
| − | --></tr><!-- |
||
| − | -->}}<!-- |
||
| − | -->{{#if: {{{buffduration|}}}|<!-- |
||
| − | --><tr class="buff"><!-- |
||
| − | --><th>Dauer</th><!-- |
||
| − | --><td>{{{buffduration|}}}</td><!-- |
||
| − | --></tr><!-- |
||
| − | -->}}<!-- |
||
| − | -->{{#if: {{{bufftip|}}}|<!-- |
||
| − | --><tr class="buff"><!-- |
||
| − | --><th>[[Tooltips|Tooltip]] des<br/>Statuseffekts</th><!-- |
||
| − | --><td><i>{{{bufftip|}}}</i></td><!-- |
||
| − | --></tr><!-- |
||
| − | -->}}<!-- |
||
| − | -->{{#if: {{{debuffen|}}}|<!-- |
||
| − | --><tr class="buff"><!-- |
||
| − | --><th>Verursacht<br/>[[Negative Statuseffekte|Statuseffekt]]</th><!-- |
||
| − | --><td><!-- |
||
| − | -->{{#ifeq:{{{debufflink|}}}|no<!-- |
||
| − | -->|{{item|{{{debuffen}}}|{{{debuff|{{{debuffen}}}}}}|nolink=yes}}<!-- |
||
| − | -->|<!-- else: debufflink != no |
||
| − | -->{{ifexists|{{{debuff|}}}<!-- |
||
| − | -->|{{item|{{{debuffen}}}|{{{debuff|{{{debuffen}}}}}}|<!-- |
||
| − | -->note2={{#if:{{{debuffchance|}}}|<!-- |
||
| − | -->{{{debuffchance}}}{{#if:{{#pos:{{{debuffchance}}}|%}}||%}}<!-- |
||
| − | -->{{#ifexpr:{{{boxwidth|{{{width|23}}}}}}<22.5|<nowiki /> Wahrsch.|-ige Wahrscheinlichkeit}}<!-- |
||
| − | -->}}}}<!-- |
||
| − | -->|{{item|{{{debuffen}}}|{{{debuff|{{{debuffen}}}}}}|link=|<!-- |
||
| − | -->note2={{#if:{{{debuffchance|}}}|<!-- |
||
| − | -->{{{debuffchance}}}{{#if:{{#pos:{{{debuffchance}}}|%}}||%}}<!-- |
||
| − | -->{{#ifexpr:{{{boxwidth|{{{width|23}}}}}}<22.5|<nowiki /> Wahrsch.|-ige Wahrscheinlichkeit}}<!-- |
||
| − | -->}}}}}}<!-- |
||
| − | -->}}<!-- |
||
| − | --></td><!-- |
||
| − | --></tr><!-- |
||
| − | -->}}<!-- |
||
| − | -->{{#if: {{{debuffduration|}}}|<!-- |
||
| − | --><tr class="buff"><!-- |
||
| − | --><th>Dauer</th><!-- |
||
| − | --><td>{{{debuffduration|}}}</td><!-- |
||
| − | --></tr><!-- |
||
| − | -->}}<!-- |
||
| − | -->{{#if: {{{debufftip|}}}|<!-- |
||
| − | --><tr class="buff"><!-- |
||
| − | --><th>[[Tooltips|Tooltip]] des<br/>Statuseffekts</th><!-- |
||
| − | --><td><i>{{{debufftip|}}}</i></td><!-- |
||
| − | --></tr><!-- |
||
| − | -->}}<!-- |
||
| − | -->{{#if: {{{debuff2en|}}}|<!-- |
||
| − | --><tr class="buff"><!-- |
||
| − | --><th>Verursacht<br/>[[Negative Statuseffekte|Statuseffekt]]</th><!-- |
||
| − | --><td><!-- |
||
| − | -->{{#ifeq:{{{debufflink2|}}}|no<!-- |
||
| − | -->|{{item|{{{debuff2en}}}|{{{debuff2|{{{debuff2en}}}}}}|nolink=yes}}<!-- |
||
| − | -->|<!-- else: debufflink != yes |
||
| − | -->{{ifexists|{{{debuff2|}}}<!-- |
||
| − | -->|{{item|{{{debuff2en}}}|{{{debuff2|{{{debuff2en}}}}}}|<!-- |
||
| − | -->note2={{#if:{{{debuffchance2|}}}|<!-- |
||
| − | -->{{{debuffchance2}}}{{#if:{{#pos:{{{debuffchance2}}}|%}}||%}}<!-- |
||
| − | -->{{#ifexpr:{{{boxwidth|{{{width|23}}}}}}<22.5|<nowiki /> Wahrsch.|-ige Wahrscheinlichkeit}}<!-- |
||
| − | -->}}}}<!-- |
||
| − | -->|{{item|{{{debuff2en}}}|{{{debuff2|{{{debuff2en}}}}}}|link=|<!-- |
||
| − | -->note2={{#if:{{{debuffchance2|}}}|<!-- |
||
| − | -->{{{debuffchance2}}}{{#if:{{#pos:{{{debuffchance2}}}|%}}||%}}<!-- |
||
| − | -->{{#ifexpr:{{{boxwidth|{{{width|23}}}}}}<22.5|<nowiki /> Wahrsch.|-ige Wahrscheinlichkeit}}<!-- |
||
| − | -->}}}}}}<!-- |
||
| − | -->}}<!-- |
||
| − | --></td><!-- |
||
| − | --></tr><!-- |
||
| − | -->}}<!-- |
||
| − | -->{{#if: {{{debuffduration2|}}}|<!-- |
||
| − | --><tr class="buff"><!-- |
||
| − | --><th>Dauer</th><!-- |
||
| − | --><td>{{{debuffduration2|}}}</td><!-- |
||
| − | --></tr><!-- |
||
| − | -->}}<!-- |
||
| − | -->{{#if: {{{debufftip2|}}}|<!-- |
||
| − | --><tr class="buff"><!-- |
||
| − | --><th>[[Tooltips/de|Tooltip]] des<br/>Statuseffekts</th><!-- |
||
| − | --><td><i>{{{debufftip2|}}}</i></td><!-- |
||
| − | --></tr><!-- |
||
| − | -->}}<!-- |
||
| − | -->{{#if:{{{immune1|}}}{{{immune2|}}}{{{immune3|}}}{{{immune4|}}}{{{immune5|}}}{{{immune6|}}}{{{immune7|}}}{{{immune8|}}}{{{immune9|}}}{{{immune10|}}}{{{immuneall|}}}|<!-- |
||
| − | --><tr class="buff"><!-- |
||
| − | --><th>Immun gegen</th><!-- |
||
| − | --><td><!-- |
||
| − | -->{{#if:{{{immuneall|}}}|<!-- |
||
| − | -->'''alle [[Negative Statuseffekte|Statuseffekte]]'''<!-- |
||
| − | -->|<!-- |
||
| − | -->{{#if:{{{immune1|}}}|{{item|mode=image|{{{immune1}}}}}}}<!-- |
||
| − | -->{{#if:{{{immune2|}}}|{{item|mode=image|{{{immune2}}}}}}}<!-- |
||
| − | -->{{#if:{{{immune3|}}}|{{item|mode=image|{{{immune3}}}}}}}<!-- |
||
| − | -->{{#if:{{{immune4|}}}|{{item|mode=image|{{{immune4}}}}}}}<!-- |
||
| − | -->{{#if:{{{immune5|}}}|{{item|mode=image|{{{immune5}}}}}}}<!-- |
||
| − | -->{{#if:{{{immune6|}}}|{{item|mode=image|{{{immune6}}}}}}}<!-- |
||
| − | -->{{#if:{{{immune7|}}}|{{item|mode=image|{{{immune7}}}}}}}<!-- |
||
| − | -->{{#if:{{{immune8|}}}|{{item|mode=image|{{{immune8}}}}}}}<!-- |
||
| − | -->{{#if:{{{immune9|}}}|{{item|mode=image|{{{immune9}}}}}}}<!-- |
||
| − | -->{{#if:{{{immune10|}}}|{{item|mode=image|{{{immune10}}}}}}}<!-- |
||
| − | -->}}<!-- |
||
| − | --></td><!-- |
||
| − | --></tr><!-- |
||
| − | -->}}<!-- |
||
| − | -->{{#if: {{{banner|}}}|<!-- German banner name |
||
| − | --><tr><!-- |
||
| − | --><th>[[Banner (Gegner)|Banner]]</th><!-- |
||
| − | --><td>{{item|<!-- |
||
| − | -->{{#if:{{tr|{{{banner}}}}}|<!-- if German banner is in translation database |
||
| − | -->{{tr|{{{banner}}}}}<!-- then use it |
||
| − | -->|<!-- else |
||
| − | -->{{#dplvar:_npc_infobox:nameen}} Banner<!-- use default English name ... |
||
| − | -->}}<!-- |
||
| − | -->|<!-- {{item}} 2nd parameter |
||
| − | -->{{#if:{{tr|{{{banner}}}}}|<!-- |
||
| − | -->|<!-- |
||
| − | -->{{{banner}}}<!-- ... with custom German banner name |
||
| − | -->}}<!-- |
||
| − | -->|wrap=y}}</td><!-- |
||
| − | --></tr><!-- |
||
| − | -->}}<!-- |
||
| − | --></table><!-- |
||
| − | --></div><!-- div.section.statistics |
||
| − | --><div class="section drops"><!-- |
||
| − | -->{{#if:{{{money|}}}|<!-- |
||
| − | --><div class="title">Fallengelassene Gegenstände</div><!-- |
||
| − | --><table class="drops money"><!-- |
||
| − | --><tr><!-- |
||
| − | --><th>[[Fallengelassene Münzen|Münzen]]</th><!-- |
||
| − | --><td>{{{money|0 {{cc}}}}}</td><!-- |
||
| − | --></tr><!-- |
||
| − | --></table><!-- |
||
| − | -->}}<!-- |
||
| − | -->{{#if:{{{1|}}}|<!-- |
||
| − | --><ul class="drops items"><!-- |
||
| − | --><li><strong>Gegenstand <small>(Anzahl)</small></strong><strong>Chance</strong></li><!-- |
||
| − | -->{{#dplvar:set|_npc_infobox:group|0}}<!-- |
||
| − | //every 4 unnamed arguments form a group. |
||
| − | -->{{#dplvar:set<!-- |
||
| − | -->|_npc_infobox:group_arg_1|<!-- |
||
| − | -->|_npc_infobox:group_arg_2|<!-- |
||
| − | -->|_npc_infobox:group_arg_3|<!-- |
||
| − | -->}}<!-- |
||
| − | -->{{#fornumargs:i|v|<!-- |
||
| − | -->{{#switch:{{#expr:{{#var:i}} mod 4}}<!-- |
||
| − | -->|1={{#dplvar:set|_npc_infobox:group_arg_1|{{#var:v}}}}<!-- |
||
| − | -->|2={{#dplvar:set|_npc_infobox:group_arg_2|{{#var:v}}}}<!-- |
||
| − | -->|3={{#dplvar:set|_npc_infobox:group_arg_3|{{#var:v}}}}<!-- |
||
| − | -->|0={{npc infobox/drop|{{#dplvar:_npc_infobox:group_arg_1}}|{{#dplvar:_npc_infobox:group_arg_2}}|{{#dplvar:_npc_infobox:group_arg_3}}|{{#var:v}}}}<!-- |
||
| − | -->}}<!-- |
||
| − | -->}}<!-- |
||
| − | --></ul><!-- |
||
| − | -->}}<!-- |
||
| − | -->{{#if:{{{imageother|}}}|<!-- |
||
| − | --><div class="imageother"><!-- |
||
| − | -->[[Datei:{{{imageother|}}}|center|{{{imageother}}}|link=]]<!-- |
||
| − | -->{{#if:{{{imageothercaption|}}}|<b><i>{{{imageothercaption|}}}</i></b>}}<!-- |
||
| − | --></div><!-- |
||
| − | -->}}<!-- |
||
| − | --></div><!-- div.section.drops |
||
| − | -->{{#if:{{{id|}}}{{{idbuff|}}}|<!-- |
||
| − | --><div class="section ids"><ul><!-- |
||
| − | -->{{#if:{{{id|}}}|<!-- |
||
| − | --><li>Interne [[NSC-IDs|NSC-ID]]: '''{{{id}}}'''</li><!-- |
||
| − | -->}}<!-- |
||
| − | -->{{#if:{{{idbuff|}}}|<!-- |
||
| − | --><li>Interne [[Statuseffekt-IDs|Statuseffekt-ID]]: '''{{{idbuff}}}'''</li><!-- |
||
| − | -->}}<!-- |
||
| − | --></ul></div><!-- div.section.ids |
||
| − | -->}}<!-- |
||
| − | --></div><!--END div.infobox |
||
| − | -->{{item/options|reset}}<!-- |
||
| − | -->{{eicons/options|reset}}<!-- |
||
| − | |||
| − | -->{{#ifeq:{{NAMESPACE}}|{{ns:0}}|<!-- |
||
| − | //cate |
||
| − | -->{{#if:{{{type|}}}|<!-- |
||
| − | -->{{#switch:{{{type|}}}<!-- |
||
| − | -->|Gegner=[[Kategorie:Feindliche NSCs]]<!-- |
||
| − | -->|Hintergrundobjekt=[[Kategorie:Hintergrundobjekt-Gegenstände]]<!-- |
||
| − | -->|NSC=[[Kategorie:Stadt-NSCs]]<!-- |
||
| − | -->|#default=[[Kategorie:{{{type}}}-NSCs]]<!-- |
||
| − | -->}}<!-- |
||
| − | -->}}<!-- |
||
| − | -->{{#if:{{{type2|}}}|[[Kategorie:{{{type2}}}-NSCs]]}}<!-- |
||
| − | -->{{#if:{{{type3|}}}|[[Kategorie:{{{type3}}}-NSCs]]}}<!-- |
||
| − | -->{{#if:{{{environment|}}}|<!-- |
||
| − | -->{{#switch:{{{environment}}}<!-- grammar adaptations, add more if needed (don't forget to add at environment2, too) |
||
| − | -->|Wüste=[[Kategorie:Wüsten-NSCs]]<!-- |
||
| − | -->|Höhle=[[Kategorie:Höhlen-NSCs]]<!-- |
||
| − | -->|Oberfläche=[[Kategorie:Oberflächen-NSCs]]<!-- |
||
| − | -->|#default=[[Kategorie:{{{environment}}}-NSCs]]<!-- |
||
| − | -->}}<!-- |
||
| − | -->}}<!-- |
||
| − | -->{{#if:{{{environment2|}}}|<!-- |
||
| − | -->{{#switch:{{{environment2}}}<!-- grammar adaptations, add more if needed (don't forget to add at environment, too) |
||
| − | -->|Wüste=[[Kategorie:Wüsten-NSCs]]<!-- |
||
| − | -->|Höhle=[[Kategorie:Höhlen-NSCs]]<!-- |
||
| − | -->|Oberfläche=[[Kategorie:Oberflächen-NSCs]]<!-- |
||
| − | -->|#default=[[Kategorie:{{{environment2}}}-NSCs]]<!-- |
||
| − | -->}}<!-- |
||
| − | -->}}<!-- |
||
| − | -->{{#if:{{{aide|{{{ai|}}}}}}|<!-- |
||
| − | -->{{#switch:{{{aide|{{{ai|}}}}}}<!-- grammar adaptations, add more if needed |
||
| − | -->|keine KI=[[Kategorie:NSCs mit keiner KI]]<!-- |
||
| − | -->|Passive KI=[[Kategorie:NSCs mit Passiver KI]]<!-- |
||
| − | -->|#default=[[Kategorie:NSCs mit {{{aide|{{{ai|}}}}}}]]<!-- |
||
| − | -->}}<!-- |
||
| − | -->}}<!-- |
||
| − | -->{{#if:{{{listcat|}}}|[[Kategorie:{{{listcat}}}-NSCs]]}}<!-- |
||
| − | -->{{#if:{{{listcat2|}}}|[[Kategorie:{{{listcat2}}}-NSCs]]}}<!-- |
||
| − | -->{{#ifeq:{{{hardmode|}}}|yes|[[Kategorie:Hardmode-exklusive NSCs{{#switch:{{{type|}}}|NSC|Tier={{!}}*}}]]}}<!-- |
||
| − | -->{{#ifeq:{{{allversions|}}}|yes|{{all versions}}}}<!-- |
||
| − | -->}}<!-- |
||
| − | --></includeonly><noinclude>{{doc}}</noinclude> |
||
Version vom 2. August 2018, 15:26 Uhr
Die ZwillingeHardmode-exklusiv
Eigenschaften
| Typ | |
|---|---|
| Rückstoß- Widerstand | 100 % |
Fallen gelassene Gegenstände
| Münzen | 12 |
|---|
- Gegenstand (Anzahl)Rate
 Seele der Einsicht (Seele der Einsicht)20-40 / 25-40 %
- 100%100% (Greater Healing Potion)Großer Heiltrank %
- 5-155-15 (100%)Hallowed Bar %
- Geheiligter BarrenGeheiligter Barren (15-30 / 20-35 )100 %
- Zwillingsmaske (Zwillingsmaske)100 %
- 14.29%14.29% (Retinazer Trophy)Retinazertrophäe %
- 11 (10%)Spazmatism Trophy %
- SpazmatismtrophäeSpazmatismtrophäe10 %
- Horned God Boots (Horned God Boots)
- 14.29%14.29% (Treasure Bag (The Twins))Schatzbeutel %
Geräusche
![]() „Das verspricht eine furchtbare Nacht zu werden…“
„Das verspricht eine furchtbare Nacht zu werden…“ ![]()
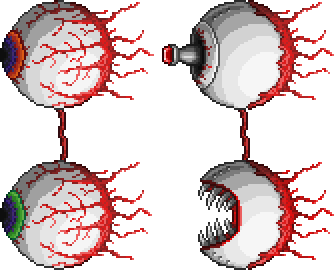
Die Zwillinge sind ein Hardmode Boss der durch das Mechanisches Auge gerufen wird, dieser kann nur in der Nacht gerufen werden. Er ist die stärkere Version von dem Auge von Cthulhu. Die Zwillinge sind 2 Augen mit zusammen 24.000 Leben.
Tipps
- Um die Zwillinge zu töten, sollten Sie am besten eine Arena bauen so 80 Blöcke lang um immer wieder den Attacken der Zwillinge ausweichen zu können.
- Es eignet sich auch noch die Automatiksturmwaffe die man von der Fleischwand bekommt zu nutzen und auf den Boss zu schießen, da dieser einen hohen Nahkampfschaden besitzt.
- Die Hardmode – Waffe Kristallsturm, die man craften kann, eignet sich noch besser gegen diesen Boss, ist aber Anfangs schwer zu bekommen.
- Desweiteren ist es schwierig ohne eine Mithril-/ Adamanitrüstung gegen diesen Boss zu kämpfen. Heiltränke wären auch angebracht, bzw. Buff – Tränke.
Angriffe
Die Zwillinge greifen verschieden an, der eine mit Laserstrahlen, der andere mit Rammangriffen. Wie bei dem Auge von Cthulhu, werden die Zwillinge stärker, nachdem sie die Hälfte ihres Lebens verloren haben.
Augen


SpazmatismErste Form


Kartensymbol
Eigenschaften
| Typ | |
|---|---|
| KI-Typ | Spazmatism-KI |
| Schaden | 50 / 88 (verfluchte Flamme) 50 / 85 (Kontakt) |
| Max. Leben | 23000 34500 |
| Abwehr | 10 |
| Rückstoß- Widerstand | 100 % |
| Statuseffekt | Verfluchtes InfernoVerfluchtes Inferno |
|---|---|
| Tooltip | Leben geht verloren |
| Wahrsch. | 50 % |
| Dauer | 16% für 8 Sekunden, dann 25% für 5 Sekunden, dann 50% für 3 Sekunden 16, 10, 6 Sekunden |
Geräusche
- Interne NPC-ID: 126


SpazmatismZweite Form


Kartensymbol
Eigenschaften
| Typ | |
|---|---|
| KI-Typ | Spazmatism-KI |
| Schaden | 60 / 108 (Augenfeuer) 75 / 127 (Kontakt) |
| Max. Leben | 9000/23000 13500/34500 |
| Abwehr | 28 |
| Statuseffekt | Verfluchtes InfernoVerfluchtes Inferno |
|---|---|
| Tooltip | Leben geht verloren |
| Wahrsch. | 50 % |
| Dauer | 16% für 8 Sekunden, dann 25% für 5 Sekunden, dann 50% für 3 Sekunden 16, 10, 6 Sekunden |
Geräusche