The world is filled to the brim with the most outlandish kinds of fish!
— Риболов
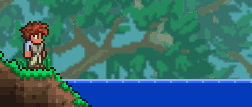
Fishing in action.
Риболовля is an activity accomplished by using a Fishing Pole at a body of liquid (water, honey, or lava) while having bait in the player's inventory. While near the body of liquid, pressing the ⚒ Викоористовувати / Атакувати button at a point over the liquid will cast a line into the liquid. Pressing the button again when the bobber moves up and down will reel in the line and often an item will come up with the line. The Angler NPC provides daily fishing quests and rewards their completion with an assortment of equipment, coins, potions, and vanity items.
Fishing provides an assortment of game resources: Crafting materials for potions and food, a variety of very useful items such as mobility improvements like a Frog Leg or Balloon Pufferfish, and even a pet Zephyr Fish. Through crates, fishing also provides an alternative source for ores, coins, many chest items (Sailfish Boots can replace Hermes or Flurry Boots) and some specialties such as the powerful Falcon Blade.
While fishing is not strictly necessary for game progression, some of the Angler's quest rewards (the Fish Finder components) are required to complete the Cell Phone. Fishing is also required to fight the boss Duke Fishron. To summon the boss, a Truffle Worm must be used as fishing bait in an Ocean biome.
For pre-Hardmode players, fishing can be a good way of getting money and equipment; by mid-Hardmode, it is less competitive with other money-making options, enemy drops, and advancing equipment.
Requirements[ | ]
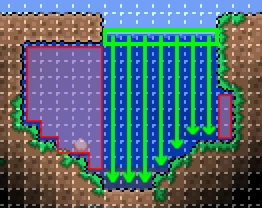
Surface width is determined first (green rectangle), then the depth below those tiles (arrows). Tiles falling outside the originally calculated surface width are not counted (red areas).
75 connected tiles of liquid are required (1,001 for Oceans, 50 for honey) in order for fishing to work, and 300 or more tiles to be optimal (1,001 for Oceans, 200 for honey). The width of the top row of continuous liquid tiles (the row where the fishing bobber sits) determines the calculated pond width, and then the depth directly below those is counted. If the pond becomes wider at lower depths, that additional width is not counted. The player may successfully fish in a 1-tile-wide pond, as long as it's 75 tiles deep. The distance of the bobber to the shoreline does not matter.
It is not possible to fish when the player is submerged in liquid, even partially, and even within a completely disconnected body of water. Fishing can, however, be done while moving, flying, while grappled to blocks, sitting on a chair, while floating on water with the Slime Mount, or while standing on top of the water, e.g. using Water Walking Boots.
Fishing can be done in Lava, but will only work with the Hotline Fishing Hook, a Lavaproof Tackle Bag, a Lavaproof Fishing Hook, or by using a Magma Snail, Lavafly, or Hell Butterfly (which can be caught using a Lavaproof Bug Net or Golden Bug Net). It can take much longer to get a bite in lava, but the chances increase with at least two of these sources; see the Catch Frequency section below for details.
Fishing quests[ | ]
Catching a quest fish for the Angler NPC requires fishing in the proper biome, and height for the day's current quest, which can be determined by talking to the Angler. Quest fish cannot be caught if the player already has that particular quest fish in their inventory, or if the quest fish was already turned in that day. However, if the player puts the Quest fish in a safe/bank then they may catch another Quest Fish. The player can then transfer the Quest Fish to a chest if they wish. The Angler gives out special rewards when a proper quest fish is turned in. The player does not need to speak with him beforehand, nor have even encountered him, but the chances of finding the correct area to fish for a quest are much lower without speaking to him first. Each day, the angler will change his quest at 4:30AM.
Factors[ | ]
Given the prerequisites for fishing are fulfilled, some factors influence the quality/rarity of the caught item. There is a variety of relevant equipment:
- Seven accessories are useful. All but one are quest rewards from the Angler (The quest rewards are combined into just two, at the Tinkerer's Workshop.)
- Three potions help with fishing, all of which can be crafted or received from the Angler.
- Fishing Poles can be crafted, received as Angler rewards, bought from other NPCs or found in chests.
- Bait comes from multiple sources: Captured Critters, Angler rewards, Crates, and even crafting.
- Chum Buckets can be dropped by enemies spawned by Blood Moon fishing.
All the factors are combined into a total Fishing Power that determines the chances of higher-quality catches. Fishing Power is calculated by starting with adding these three basic factors:
- The Fishing Power of the Fishing Pole used.
- The Bait Power of the Bait used.[fb 1]
- Equipped items and Potions.
After the above three kinds of factors are added, bonuses (or penalties) are applied, as follows:
- The time the player is fishing, as a multiplicative percentage applied to the previous factors.
- The number of Chum Buckets used on the water's surface, as a flat bonus.
- The size of the lake. Lakes with fewer than 300 tiles incur a Fishing Power penalty, as a multiplicative percentage applied to the previous factors.
- When fishing without the High Test Fishing Line, Lavaproof Tackle Bag, or Angler Tackle Bag, there is always a
14.29*1/7 (14,29%) chance that the fishing line will break on reel-in, forfeiting the caught item. Chances of consuming bait remain the same even if the line breaks. With the High Test Fishing Line equipped, the line never breaks.
Amounts in the tables below that influence fishing power are marked green or red. Because some of the bonus factors are percentages, the fishing power amounts given by any of the three basic factors can seem to vary depending on e.g. time of day or weather. (For example, when fishing during rain, the Angler Earring can appear to provide more than just +10 Fishing Power.)
|
|
- ↑ % Bait Power also means % Fishing Power, and is combined with all other Fishing Power factors, such as the Fishing Pole's power and the Time factor, etc. Bait Power additionally determines the chances that the Bait item will be consumed from the player's inventory. Items with higher Bait Powers will tend to last through more fishing attempts: Higher Bait Power means lower chance of consumption.
- ↑ Chum Bucket bonuses are determined by how many are present on the water at once. One bucket used will give +11, two for +17 and three for a max of +20. These bonuses are not affected by previous factors (i.e. armor, accessories, potions, bait, pole, time, or weather), and are only affected by lake size. Also note that reeling in nothing or having the line break counts towards one of the 10 uses.
- ↑ This stacks with the Rain bonus, which means the Fishing Power bonus is more than +20% during raining due to the cloudiness.
- ↑ On
 ПК,
ПК,  Консольне видання, and
  Мобільне видання, fishing during a Blood Moon has a significant chance of spawning any of several exclusive and difficult enemies. See the relevant section in this article for more details.
- ↑ Lake sizes listed here are example numbers to illustrate the lake size effect, and are not thresholds. The penalty is actually determined by the equation
(tiles / n) × Fishing Powerwhere n = 300 for water and 200 for honey. Any increase or decrease in total tiles between 75 and 300 will alter the lake size penalty.
Hidden factors[ | ]
There are two factors which affect Fishing Power that are hidden from the player (e.g. they never affect the numbers displayed in the UI by the Fisherman's Pocket Guide or related accessories):
- The first is Luck. If the player has bad (negative) Luck, there is a chance (determined once every catch attempt) that their Fishing Power will be reduced. Similarly, good (positive) Luck gives a chance of increasing their Fishing Power.
- If a player has total Luck less than zero, then there is a (−100 × Luck)% chance per catch attempt that the player's Fishing Power will be reduced by −10% to −40%.
- If a player total Luck greater than zero, then there is a (100 × Luck)% chance per catch attempt that the player's Fishing Power will be increased by +10% to +40%.
- Actual fishing rewards are not influenced by Luck beyond fishing power.
- The chance of catching Crates is not affected by Luck, although which kind of crate is caught is affected. This is because crates have a flat percentage chance of being caught, which is not affected by Fishing Power or Luck, but if a crate is caught, the kind of crate is determined by Fishing Power. See the Crate Mechanics section below for further details.[1][2]
- The second is Fishing Power Scaling. This mechanic reduces high Fishing Powers, such that increasing the player's Fishing Power past a certain limit has a decreasing effect. The following table shows the effects of Fishing Power Scaling on a player's Fishing Power. Each row represents a reduction equation that is applied to the player's fishing power if it is over a given threshold:
- The first column indicates the threshold that your Fishing Power must be greater than in order for the reduction to apply.
- The second column gives the reduction rate that is used - the amount of Fishing Power above the threshold is reduced by this percentage. (For example: Under the first rule, 65 Fishing Power becomes 50 + (65 − 50) × 0.95 = 64 Fishing Power.)
- The full equation for each rule is given in the third column.
- The fourth column gives the equivalent minimum displayed Fishing Power to which the rule applies. That is, if the player's displayed Fishing Power is at least the value in the fourth column, then that rule applies to their FP.
- Note that each of these reductions are applied sequentially[hfp 1] - e.g. if the player's Fishing Power is displayed as 100, both of the first two reductions will be applied.
| FP Threshold | Reduction % | Full Reduction Equation[hfp 1] |
Minimum Displayed FP[hfp 1] |
|---|---|---|---|
| 50 | −5% | FP = 50 + (FP − 50) × 0.95 | 51 |
| 75 | −10% | FP = 75 + (FP − 75) × 0.9 | 78 |
| 100 | −15% | FP = 100 + (FP − 100) × 0.85 | 107 |
| 125 | −20% | FP = 125 + (FP − 125) × 0.8 | 143 |
| 150 | −25% | FP = 150 + (FP − 150) × 0.75 | 187 |
| 175 | −30% | FP = 175 + (FP − 175) × 0.7 | 244 |
| 200 | −35% | FP = 200 + (FP − 200) × 0.65 | 329 |
Вудки[ | ]
Вудки are used with bait for fishing. Some are craftable, while others are either sold by NPCs, found in Chests, or are awarded by the Angler.
| ||||||||||||||||||||||||||||||||||||||||||||||||||||||||||||||||||||||||||||||||||||||||||||||||||||||||||||||||||||||||
Наживка[ | ]
If the player has multiple bait items in their inventory, they are used in order from the top down, then left to right. Bait can be placed in ammo slots, and bait placed there will be used first / used last . To have the best results from fishing in lava, lavaproof bait should be placed before other bait.
For more information, see Bait.
| ||||||||||||||||
Catches[ | ]
Fish[ | ]
These items can be caught at any time. Most can serve as crafting material for Food (Cooked Fish) and other Potions. Some can also craft other item types. Jellyfish can be used as bait. Most can be sold to NPCs. Note that the height requirements are mostly split between "Surface and above", versus "Underground and below". Of these items, only three items cannot be caught in either the Surface or Underground layers: The Damselfish (Sky only), and the Blue or Green Jellyfish (Cavern or Underworld only).
Quest fish[ | ]
Quest fish are items that can be caught only when their particular quest is active and serve no purpose other than acquiring quest rewards. The player can determine the day's quest by speaking to the Angler NPC. There are 41 distinctive variants of quest fish.
Usable items[ | ]
These items can be used directly without further crafting. Most are Tools or Weapons, many of which are best-in-class for large parts of the game. There are also a couple of Accessories offering jump boosts, an improvement on Healing Potions, a Pet, and in Hardmode a mount summon. The Angler's rewards fill out the set somewhat, with an early mount, a top-tier (Pre-Hardmode) Hook, and several items to help with fishing.
Crates[ | ]
Crates are stackable grab-bag type items that each contain random loot including potions, bait, useful items, coins, metal bars, and even ores. They can be right-clicked from within the player's inventory, which will unload their contents. Rarer Crate types contain more valuable loot. The biome crates can provide items otherwise found only in the matching biome chests, including Crimson Hearts/Shadow Orbs and the items found in Dungeon chests. (Not all biomes or special chests have matching crates.) Crates are one of the major sources for "alternate" metals and ores.
Сміття[ | ]
Ці предмети не мають жодної цінності чи використання. Кожен з них може бути складений до 99 в одному слоті інвентарю. Гравець буде «ловити» їх, лише якщо озеро замале або якщо його рибальська сила занадто мала. Коли озеро має розмір принаймні 300 плиток (200 для меду) або загальна рибальська сила гравця становить принаймні 50, гравець більше не буде ловити мотлох.
| Тип | Value | Rarity | Height | Biome |
|---|---|---|---|---|
|
Внутрішній ID предмета: 2337
|
0 | −1 | Any | Any |
|
Внутрішній ID предмета: 2338
|
0 | −1 | Any | Any |
|
Внутрішній ID предмета: 2339
|
0 | −1 | Any | Any |
Зауважте, що непотрібний предмет водоростей не слід плутати з предметом виклику домашнього улюбленця ![]() Seaweed Морські водорості, який можна знайти в ящиках джунглів і ящиках з ожиною, виловлених у джунглях, а також у святилищах джунглів і Живі багацтва червоного дерева.
Seaweed Морські водорості, який можна знайти в ящиках джунглів і ящиках з ожиною, виловлених у джунглях, а також у святилищах джунглів і Живі багацтва червоного дерева.
Enemies[ | ]
During a Blood Moon event, fishing in water can cause several Blood Moon themed enemies to spawn. These enemies are:
 Wandering Eye Fish
- Zombie Merman
- Hemogoblin Shark
- Blood Eel
- Dreadnautilus

.gif)
Upon retracting the line during a Blood Moon, there is a 16.67*1/6 (16,67%) chance (33.33*1/3 (33,33%) with the Chum Caster) that one of these enemies will spawn. Note that fishing power has no effect on this mechanic, nor does the use of Chum Buckets.
If the player is using a Sonar Potion, the spawn will be shown with the enemy's name in red giving players a second or two to prepare for the oncoming attack. In pre-Hardmode, the only enemies that can appear are the Zombie Merman and the Wandering Eye Fish, with an equal chance of each. In Hardmode, the Dreadnautilus has a 10*1/10 (10%) chance of appearing, and the other four enemies have equal remaining chances of appearing (22.5*9/40 (22,5%)).
Each of these enemies have a chance to drop Chum Buckets used to further increase fishing power. They also can drop several special items:
- Zombie Merman or Wandering Eye Fish: (separate 12.5% chance for each)
- Blood Rain Bow: A bow which converts arrows into streams of blood raining from the sky (similar to the Daedalus Stormbow).
- Chum Caster: A fishing pole (25% fishing power) which doubles the chance of catching enemies during a Blood Moon.
- Vampire Frog Staff: A minion -- even without a ranged attack or flight, this can be quite powerful early in the game, and can be had well before the Hornet Staff.
- Hemoglobin Shark:
- Haemorrhaxe (powerful hamaxe, nearly equal to the Luminite tools).
- Blood Thorn (magic weapon, can target enemies almost anywhere on screen).
- Blood Eel:
- Haemorrhaxe (again).
- Drippler Crippler (strong flail).
- Dreadnautilus:
- Sanguine Staff: Very mobile and responsive minion.
- Bloody Moon Monolith: Cosmetic; provides the appearance of a Blood Moon without the hazards (or rewards).
Crafting[ | ]
Used in[ | ]
| Результат | Інгредієнти | Робоче місце |
|---|
Mechanics[ | ]
Catch frequency[ | ]
When fishing, there is a hidden catch counter which tracks the player's progress toward making a catch. The counter normally starts at 0 and increases over time. When it exceeds 660, there is a ((75 + fishing power) / 2) % chance that a fish will bite, capping out at 125 fishing power. The counter then resets to 0, regardless of whether or not there was a bite.
When fishing in lava with at least two of lava-proof bait, a Hotline Fishing Hook or one of the two lava-proof accessories (Lavaproof Fishing Hook or Lavaproof Tackle Bag), the counter resets to 240 instead (if there was no bite). Using all three has the same effect as using only two[4].
The catch counter increases every tick (there are 60 ticks per second) according to these factors:
- 1-2 points by default (average 1.5 points per tick)
- A 1 in 60 chance of 60 points (average 1 point per tick)
- Fishing power / 30 points per tick (e.g. 1.667 points per tick at 50 fishing power)
- A (fishing power / 3) % chance of increasing an additional 1-2 points (1.5 × fishing power / 300 points per tick)
Therefore, a formula for the average catch rate would look like this:
 or simply:
 For example, with a fishing power of 125, the player can expect to catch a fish around once every 1.5 seconds:

Biomes[ | ]
A player can be eligible for catching fish from multiple biomes at once; however, certain biomes take priority over others. The priority order is:
| Biome | Standard Priority | Crate Priority | ||
|---|---|---|---|---|
| 1 | 1 | 1 | - | |
| 2 | 2 | - | - | |
| Dungeon | 3 | - | 2 | 4 |
| Corruption | 4 [bp 1] | 3 [bp 1] | 4 | 1 |
| Crimson | 4 [bp 1] | 3 [bp 1] | 5 | 2 |
| Hallow | 5 | 4 | 6 | 3 |
| Snow | 6 | 5 | 8 | 6 |
| Jungle | 7 | 6 | 7 | 5 |
| Glowing Mushroom | 8 | 7 | - | - |
| Ocean | 9 | 8 | 3 | - |
| Desert (Oasis) | 10 | - [bp 2] | 9 | - [bp 2] |
| Sky (Forest) | 11 | 9 | 10 | 7 |
| Underground/Cavern (Forest) | 12 | 10 | - | - |
| Surface (Forest) | 13 | 11 | - [bp 3] | - [bp 3] |
- ↑ 1,0 1,1 1,2 1,3 When in both Corruption and Crimson, there is a 50% chance of each (except for crates, where Corruption has higher priority).
- ↑ 2,0 2,1 No fish or crate is caught solely or especially in the Desert.
- ↑ 3,0 3,1 No crate is caught solely or especially in the Forest biome, however, there are crates which can be caught in any biome (including Forest). See the Crate Mechanics section below for further details.
Notes[ | ]

The player can "borrow" the Forest lake for the mushroom biome.
- The background and music playing have a different priority order, and will not necessarily match which biome is used for generating fish; for example, if Jungle music is playing but there is enough Snow nearby, the player will not be able to find Jungle quest fish and will get Snow catches instead.
- Additionally, Mushroom Biome catches require 200 mushroom tiles nearby, which is more than is needed to display the mushroom biome background and music.
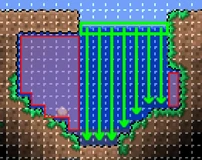
- A lake can be shared between multiple biomes; what matters is what biome(s) the player is in. Remember that the lake size is figured from the bobber's row of liquid, downwards. In the image, the single top row of water makes the Forest lake fishable from the Mushroom biome. The fishing-shack across the lake is in the Forest biome, but is just where the sky starts to darken from the nearby Mushroom biome.
- If a player is in multiple biomes but the higher priority biome does not generate a fish, the game will proceed to check for fish in subsequent biomes. The exceptions are that Corruption and Crimson biomes will skip over Hallow in subsequent checks, and also on the ПК, Консольне видання, and Мобільне видання, Ocean and Desert (Oasis) biomes will skip all other biomes in subsequent checks. This also does not apply to fishing in Lava or Honey, where the player will only catch the fish listed for that fluid. Because of these exceptions, some fish (e.g. Bass) can never be caught in Lava or Honey, nor at the Ocean or Desert.
Layers[ | ]
The height requirement (Sky/Surface/Underground/Cavern) is set by the height of the surface of the water, not by the position of the player. This can be taken advantage of by creating two adjacent pools of water on different layers. This allows the player to fish in either while standing at the same spot.
There are five height zones for fishing (see Layers):
| Zone | Height |
|---|---|
| Sky | Fishing Surface > ~50% above Surface Level to the top of the world |
| Surface | Surface Level < Fishing Surface ≤ ~50% above Surface Level |
| Underground | Cavern layer < Fishing Surface ≤ Surface Level |
| Caverns | 300 feet above world bottom < Fishing Surface ≤ Cavern layer |
| Underworld | Fishing Surface ≤ 300 feet from the world bottom |
Catch quality[ | ]

Chance of successful roll for each catch quality slot at a given displayed Fishing Power, for versions before 1.4.0.1 or starting with 1.4.1. Sharp changes are due to integer rounding.

Chance of successful roll for each catch quality slot at a given displayed Fishing Power, for versions between 1.4.0.1 and 1.4.0.5. Assumes Luck modifiers have already been applied (or Luck = 0). Sharp changes are due to integer rounding.
There are 6 different catch quality slots for catches, each with its own associated probability:
| Catch Quality | Probability | Chance at 100 FP[cq 1] | Chance at 300 FP[cq 1] | ||
|---|---|---|---|---|---|
| Plentiful | Default catch | ||||
| Common | fishing power / 150, capped at |
||||
| Uncommon | fishing power / 300, capped at |
||||
| Rare | fishing power / 1050, capped at |
||||
| Very Rare | fishing power / 2250, capped at |
||||
| Extremely Rare | fishing power / 4500, capped at |
||||
The denominators are rounded down. A fishing power of 85, for example, would have a 1.92*1/52 (1,92%) chance of an Extremely Rare catch.
When a new fish is generated, each different catch quality is checked for success, separately from one another. For example, the Uncommon, Rare, and Very Rare rolls might all succeed, while the Common and Extremely Rare rolls fail. Then, depending on which roll(s) succeed as well as factors such as height and biome, the game will generate a fish.
With some exceptions, the highest catch quality roll that succeeded will take priority over lower catch quality slots in determining which fish a player receives. However, not every catch quality slot will contain a fish that can be caught; in that case, the game will move on to checking lower catch qualities. Success at the higher catch quality roll will not carry down to lower quality slots. For example, if the Rare roll succeeded but there is no Rare fish available to be caught, the game will move on to checking whether or not the Uncommon roll succeeded; if the Uncommon roll failed, it will move on to checking Common.
Each biome has a list of available biome-specific fish that can be caught there, based on the catch quality rolls and other factors. If no biome-specific fish is generated, the game will move on to checking subsequent, lower priority biomes. Many of the fish available in catch quality slots vary based on randomness, so succeeding at a catch quality roll in a specific biome does not guarantee that the player will get a specific fish of that quality, or any fish of that quality at all. If no fish is selected for the slot, the game will proceed to check more common slots instead and move on to subsequent biomes if and only if none of those slots contain fish either.
When fishing in the water, a successful Extremely Rare roll will always check for a special catch first (Frog Leg, Balloon Pufferfish, and Zephyr Fish, in that order). If none of these checks succeed, the game will then check for biome-specific fish.
All quest fish occupy the Uncommon slot, except the Mirage Fish and Pixiefish, which are Rare. All quest fish are Uncommon.
There are only four Plentiful fish: Bass, Trout, Flounder, and Rock Lobster. If all other checks fail and the player is fishing in the water, they will catch one of these by default: Trout if fishing in the Ocean, Flounder or Rock Lobster if fishing in the Пустеля or Oasis on ![]() ПК and
ПК and ![]() Мобільне видання (with Rock Lobster being half as common as Flounder), and Bass otherwise.
Мобільне видання (with Rock Lobster being half as common as Flounder), and Bass otherwise.
Crate mechanics[ | ]
There is a separate roll to determine if a Crate is caught, defaulting to 10% (or 20% with a Crate Potion active). An Extremely Rare or Very Rare catch will generate a Golden Crate, a Rare catch will generate a biome-specific crate (if applicable, otherwise it will generate an Iron Crate), an Uncommon catch will generate an Iron Crate, and a Wooden Crate otherwise. In Hardmode on the ![]() ПК,
ПК, ![]() Консольне видання, and
Консольне видання, and ![]() Мобільне видання, the crate will be the Hardmode-equivalent crate.
Мобільне видання, the crate will be the Hardmode-equivalent crate.
Fishing in honey will never generate a crate. Fishing in lava can only generate crates on the ![]() ПК and
ПК and ![]() Мобільне видання, and those crates will be either Obsidian Crates or Hellstone Crates.
Мобільне видання, and those crates will be either Obsidian Crates or Hellstone Crates.
Stack sizes[ | ]
Stackable fish (i.e. Bomb Fish and Frost Daggerfish) generate in stacks that vary based on the player's fishing power. These can vary significantly, with higher fishing power levels generating higher minimum stack sizes as well as significantly higher maximum stack sizes.
Notes[ | ]
- Fishing for Scaly Truffles remains a decent money-maker into Hardmode, and even after getting or beating all the fishable equipment, the player may still need to restock potion ingredients and (via crates) ores/metals.
- There are a total of 16 different fishing locations that can yield distinct catches.
- There is no overlap between "fishable" fish and critters or enemies: The player may fish up a Golden Carp or Tropical Barracuda, but never a goldfish or piranha. Even if the player can see a goldfish in the water, they need a Bug Net rather than a fishing rod to capture it.
- The bobber will move two or three times per bite, after which the fish will go away, but the line will remain cast. As long as the reel-in occurs before this animation ends, the timing of the click doesn't affect the quality of the catch.
- It is possible to catch a day's quest fish without having asked the Angler about it.
- Time must pass naturally from 04:29 to 04:30 (the start of a new day) before another quest begins.
- Sleeping, by clicking a Bed's pillow will make time accelerate. This will make completing more quests easier.
- However, with an Enchanted Sundial, the player can get a new quest immediately.
- Crate contents are determined upon opening them. Crates caught in pre-Hardmode can, therefore, yield Hardmode items after defeating Wall of Flesh. Stocking up on crates before Hardmode can let the player get an early supply of Hardmode ores without breaking altars.
- Ocean-only catches, including quest fish, cannot be caught from a Hallowed or Corrupted Ocean shoreline. They may be catchable further out towards the map edge, where Corrupted or Hallowed sand is farther from the water surface. When the Ocean Biome music plays, Ocean fish can be caught.
- On the -видання, the player can catch many different fish in the Ocean Biome, even those not native to it.
- The minimum height for Sky fishing in all world sizes is higher than that for generating floating lakes. Because of this, a floating lake can be generated too low to be counted as Sky, and will only yield surface fish and crates.
- Fishing can be done on reverse gravity (using the Gravitation Potion or the Gravity Globe); the bobber would fall "upwards" into the water, and fish can be caught as usual.
- Weapons and accessories obtained through fishing will never generate with Modifiers.
Досягнення[ | ]

Поради[ | ]
General[ | ]
- Make sure the Truffle Worm is not the upper-leftmost bait item! (Unless the player is actually trying to summon Duke Fishron at the Ocean.) Bait is used from top-left to bottom-right, meaning that the Truffle Worm should be in the bottom-right square for regular fishing, or the top-left square to summon Duke Fishron. Having the Truffle Worm anywhere else will prevent the player from using any bait that follows it in the inventory lineup, leaving them unable to fish.
- The player can defend themselves while fishing without breaking the line using any of the following; a Shield of Cthulhu, any Summon (as long as they are summoned before the player throws out their line), Solar Flare Armor's Solar Radiance, or any thorns effect such as a Thorns Potion.
- Considering the difficulty of obtaining Chum Buckets early on and the lowered bonus given by the second and third buckets, using a single bucket might be preferable early game.
- Sonar Potions allow players to reel in only their chosen catches.
- For honey or lava, this is hardly worth it, as the player only has a few possibilities, and all of them useful and saleable.
- Otherwise, Using Sonar Potions can be more bait-efficient, but slower: The additional time spent waiting for undesirable catches to change (with a Sonar Potion) can be longer than the time between bites (without a Sonar Potion).
- If a player is well-stocked on bait and is interested in catching more than just a specific few possibilities, it could be significantly faster (especially with high Fishing Power) to forego Sonar Potions.
- Alternatively, a player can respond to an unwanted catch by quickly switching to another hotbar slot and back. This quickly rejects the catch without risking the bait.
- On the other hand, bait is only consumed on whichever catches the player actually want, and the player doesn't use inventory space on low-value fish.
Angler Quests[ | ]
The Angler gives six different accessories as rewards, but with the Tinkerer's Workshop those can be combined into one functional and one informational accessory:
- The Tackle Box, High Test Fishing Line, and Angler Earring combine into the Angler Tackle Bag.
- The Angler Tackle Bag can later be upgraded to a Lavaproof Tackle Bag, by combining it with a Lavaproof Fishing Hook.
- The Angler Tackle Bag’s fishing power bonus will stack with another Angler Earring, and/or a Lavaproof Tackle Bag. All three items together will give a total bonus of 30%.
- The Fisherman's Pocket Guide, Weather Radio, and Sextant combine into the Fish Finder.
- The Fish Finder later combines with other items to make a Cell Phone.
A quest fish cannot be fished or picked up when the player already has one in inventory, but it is easy enough to stash the fish in a Chest, Piggy Bank, or even the trash slot (though you can easily lose the fish this way) and collect multiples.
- Saved quest fish can be turned in the next time that quest fish comes up.
- Similarly, the same daily quest fish will be asked of all players on a world, so one player can supply the day's quest fish for the others. However, if a player of the same name as one who has already turned in a quest tries to turn in a quest, they will be rejected.
- Note that quest fish do not stack, but 3 chests will suffice to hold 3 copies of each quest fish.
- A player cannot catch more of a quest fish after having turned one in for the day.
Session Timing[ | ]
Fishing in long stretches can be tedious, and is also not very efficient. It is better to fish in smaller stretches, and cherry-pick the times (moon, weather, luck) when the player has bonuses:
Any time 3 AM or 3PM approaches. the player should check conditions: With overcast/rain, a full moon, or a lucky event (ladybug swarm or Lantern Night), if the other two factors are at least neutral, then it's worth trying for a fishing session.
Even if the player isn't primarily fishing for crates, the 3-minute duration of a Crate Potion makes a good benchmark. Even one potion will usually give more than enough time to collect several crates, and several copies of a quest fish if one is available.
Starting a fishing session between 3:00-4:30 AM or 4:30-6:00 PM will allow the Crate potion's duration to cover one of the "prime times" noted above, while avoiding the following "dead time". If conditions are still good when the first potion runs out, a second potion may be worthwhile even if it runs into dead time, and it may even be worth finishing out the Sonar potion's duration.
A portable storage item allows a quick-change into and out of fishing gear, including swapping armor for the Fishing set.
Lava Fishing[ | ]
Lava fishing can begin pre-Hardmode, but can get easier in Hardmode. The player needs at least one out of three factors (bait, pole, accessory), and having two of them will drastically speed up catches:
- In Hardmode, the Angler can award the Hotline Fishing Hook, a fishing pole which allows lava fishing with any bait.
- Even before Hardmode, Hellbait can be caught in the Underworld. If the player does not have a Golden Bug Net, they will need to make a Lavaproof Bug Net.
- Either of the above will allow catching Obsidian Crates (Hellstone Crates in Hardmode), in search of a Lavaproof Fishing Hook. This accessory will allow using any bait and rod to fish in lava. There will also be other useful and/or saleable items caught and found in the crates; if the player has no Shadow Key, they can save the Obsidian Lock boxes until they get one (from the Dungeon). As noted above, the fishing hook can be combined with an Angler Tackle Bag to make a Lavaproof Tackle Bag.
- Again, having any two of the three (Hellbait, Hotline rod, or Lavaproof accessory), will produce catches much faster. This will be especially useful when fishing for the rare Lava Charm.
Maximum Fishing Power[ | ]
The maximum possible Fishing Power is 322 / 303.
Equipment bonuses add to 160:
- 50% for Golden Fishing Rod
- 50% for Bait
- 15% for Fishing Potion
- 15% for Angler armor
- 5% for Angler Hat
- 5% for Angler Vest
- 5% for Angler Pants
- 10% for Angler Earring
- 10% for Angler Tackle Bag
- 10% for Lavaproof Tackle Bag
The weather and Moon phase bonuses multiply that:
- 30% for time-of-day: 160 × 1.3 = 208
- 20% for Rain: 208 × 1.2 = 249.6
- 10% for cloudiness: 249.6 × 1.1 = 274.56
- 10% for Full moon: 274.56 × 1.1 = 302 - Rounded from 302.016
The Chum Bucket adds further bonuses:
- +11 for the first bucket: 302 + 11 = 313
- +6 for the second bucket: 313 + 6 = 319
- +3 for the third bucket: 319 + 3 = 322
Luck has the potential to further increase Fishing Power: With +1.4 luck, 322 Fishing Power can randomly become up to 451 Fishing Power for any given cast. However, on ![]() Консолі and
Консолі and ![]() Мобільне, scaling is reduced to 424 Fishing Power.
Мобільне, scaling is reduced to 424 Fishing Power.
When to stop fishing[ | ]
Once a player has their Golden Bug Net, Golden Fishing Rod, Fish Finder, and an Angler Tackle Bag (or even two Tackle Bags, and/or a spare Angler Earring), the Angler can give them little else until Hardmode. Fishing without the Angler can still be profitable, notably by collecting crates and other special catches.
Angler reward chances generally rise over time, but after the 150th Angler quest, most of the reward chances go back to their initial odds and stay there. Once the player has gotten the important pre-Hardmode rewards, they should leave off Angler quests until Hardmode, and hopefully avoid hitting the deadline before getting the Hardmode rewards. Before 1.4, it is also helpful to stockpile crates before Hardmode, which can be opened in Hardmode for an early source of Hardmode ores and metals.
After Hardmode, there are only a couple more weapons and a mount to catch (Toxikarp or Bladetongue, Crystal Serpent, Scaly Truffle), and a few more useful Angler rewards: The Bottomless Water Bucket and Super Absorbant Sponge for water handling, and the Hotline Fishing Hook (a misnamed pole) for fishing in lava. Once a player has all that, they're done with the Angler Quests. Fishing can still provide potion resupply, metals (especially the alternates), and money (the Scaly Truffle is a good target), but no new items after this point.
Trivia[ | ]
- The Golden Carp has no use, aside from its coin value of . In particular, it cannot be cooked.
- The Neon Tetra has no use, aside from its coin value of .
- The Double Cod is required to make an Ammo Reservation Potion, possibly a reference to the acronym for the first-person shooter video game franchise Call of Duty.
Хронологія[ | ]
- Desktop 1.4.1:
- Removed decreasing returns on Fishing Power at high levels.
- Adjusted Mirage Fish and Pixiefish to be "uncommon" instead of "rare", to match other quest fish.
- Desktop 1.4.0.5:
- Ammo slots are now prioritized when selecting bait to use.
- Dungeon fishing now prioritizes Dungeon loot over overlapping biomes.
- Desktop 1.4.0.1:
- Added Desert (including Oasis) as a fishing biome.
- Added Blood Moon fishing: 5 new enemies can now be fished in water during a Blood Moon.
- Added Flounder and Rock Lobster.
- Added Chum Caster and Scarab Fishing Rod.
- Added Water Strider, Gold Water Strider, Maggot, Ladybug, Gold Ladybug, Magma Snail, Lavafly, Hell Butterfly, Black Dragonfly, Blue Dragonfly, Green Dragonfly, Orange Dragonfly, Red Dragonfly, Yellow Dragonfly, and Gold Dragonfly as baits.
- Added Frozen Crate, Oasis Crate, Obsidian Crate, and Ocean Crate along with Hardmode variants to all the crates.
- Added Chum Bucket.
- Added two additional ways to fish in lava: Lavaproof Fishing Hook and Underworld bait.
- Pre-Hardmode crates no longer give Hardmode ores.
- Angler quest rewards no longer drop off after 150 quests.
- Fishing Power is now affected by Luck.
- Very high Fishing Power now gives decreasing returns.
- Desktop 1.3.0.5: Fixed a bug where the Seedler could be obtained through fishing.
- Desktop 1.3.0.4: Loot from fishing is now properly highlighted in the new items highlight system.
- Desktop 1.3.0.1:
- Added Jungle Crate, Sky Crate, Corrupt Crate, Crimson Crate, Hallowed Crate, and Dungeon Crate.
- Sky Quest Fish can no longer be caught on the Surface.
- Reduced the number of water tiles needed to fish successfully in the sky.
- Desktop 1.2.4.1:
- Fixed bug where repeated clicks after your line broke would nevertheless produce a catch.
- Fixed bug causing Seaweed (junk) to turn into Seaweed (pet item) if in the inventory of a dying Mediumcore character (the Seaweed now simply disappears).
- Desktop 1.2.4: Introduced.
- Console 1.0.933.1: Made changes from PS4’s 1.0.750.0 update. ()
- Console 1.0.750.0: ()
- Added Jungle, Sky, Corrupt, Crimson, Hallowed, and Dungeon Crates.
- Sky Quest Fish can no longer be caught on the Surface.
- Reduced the number of water tiles needed to fish successfully in the sky.
- Console 1.07: Introduced.
- Switch 1.0.711.6: Introduced.
- Mobile 1.3.0.7:
- Bobber mechanics updated to match Desktop 1.3.0.1.
- Added Jungle, Sky, Corrupt, Crimson, Hallowed, and Dungeon Crates.
- Sky Quest Fish can no longer be caught on the Surface.
- Reduced the number of water tiles needed to fish successfully in the sky.
- Mobile 1.2.11212: Introduced, with different bobber mechanics.
- 3DS-Release: Introduced.
References[ | ]
- ↑ Інформація взята з початкового коду гри версії 1.4.2.3 ( ПК-видання), method
FishingCheck_RollDropLevels()Terraria.Projectile.cs - ↑ Інформація взята з початкового коду гри версії 1.4.2.3 ( ПК-видання), method
FishingCheck_RollItemDrop()Terraria.Projectile.cs - ↑ Інформація взята з початкового коду гри версії 1.4.0.5 ( ПК-видання), method
FishingCheck()Terraria.Projectile.cs - ↑ Інформація взята з початкового коду гри версії 1.4.2.3 ( ПК-видання), method
FishingCheck()Terraria.Projectile.cs