Awesomee132 (talk | contribs) (→Trivia) |
(→Bosses: Added links to diffrent pages for easier navigation :D) Tags: Mobile edit Mobile web edit |
||
| Line 1: | Line 1: | ||
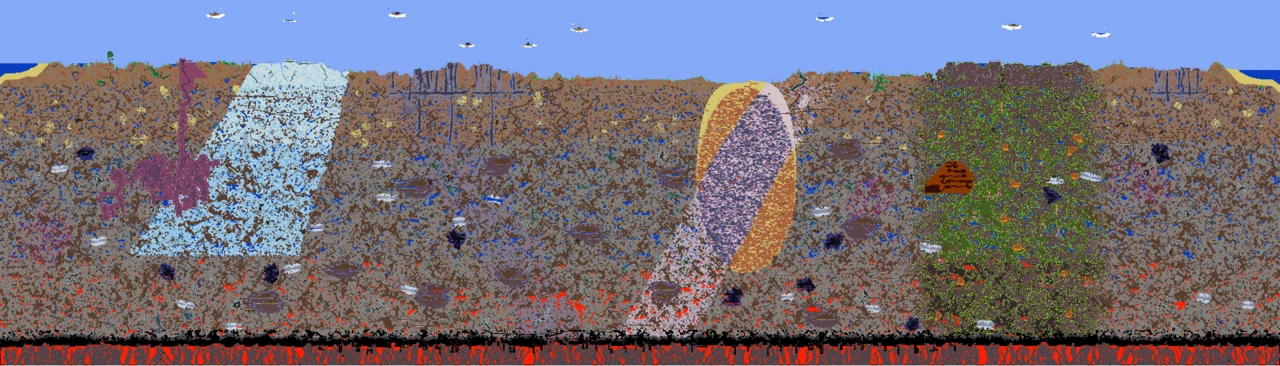
| + | [[File:Initial Hardmode map.png|400px|thumb|right|Initial Hardmode map of a small Desktop-version world. Notice the "V" made of the new outburst of [[Corruption]] (dark purple) and [[Hallow]] (pale pink) biomes, which each replace existing world blocks upon the defeat of the [[Wall of Flesh]].]] |
||
| − | {{npc infobox |
||
| + | {{About|the world mode|the player character mode|Hardcore}} |
||
| − | | type = Boss |
||
| + | <big>''"The ancient spirits of light and dark have been released..."''</big> |
||
| − | | knockback = 100 |
||
| − | | money = {{gc|10}} |
||
| − | | Soul of Sight|20-40| 100% |
||
| − | | Greater Healing Potion|5-15|100% |
||
| − | | Hallowed Bar|15-30|100% |
||
| − | | Twin Mask|1|14.29% |
||
| − | | Retinazer Trophy|1|10% |
||
| − | | Spazmatism Trophy|1|10% |
||
| − | }} |
||
| − | {{dablink|For strategies on how to defeat The Twins, see [[:Guide:The Twins Strategies]]}}. |
||
| + | [[Hardmode]] is essentially a harder version of the initial world. A world permanently converts to Hardmode after the player successfully defeats the [[Wall of Flesh]] [[boss]] for the first time in that world. Hardmode grants players new challenges and gives them access to much more content for them to explore (in the current world). |
||
| − | <big>''"This is going to be a terrible night..."''</big> |
||
| + | Hardmode adds new [[biome]]s to the world that will appear and function upon converting: the [[Underground Corruption]], the [[Underground Crimson]], and [[The Hallow]]. Corruption, Crimson and Hallow will spread continuously and at a steady pace in Hardmode, and can eventually overtake an entire map if not dealt with properly. |
||
| − | '''The Twins''' are one of the three [[Mechanical Boss]]es, and the [[Hardmode]] version(s) of the [[Eye of Cthulhu]]. They can only be summoned at night with the [[Mechanical Eye]] and must be defeated before sunrise, otherwise they disappear. Similar to the Eye of Cthulhu, they have a chance of spawning when night falls once Hardmode is enabled, displaying the message "This is going to be a terrible night..." at dusk. |
||
| + | [[Demon Altars]] and [[Crimson Altar]]s can be broken with the [[Pwnhammer]] at this point (which drops from the Wall of Flesh), and upon doing so, new [[ore]]s become available to start the player off in Hardmode. |
||
| − | Both eyes have their own individual life meter and both must be killed in order for the Twins to be defeated. The eye with the red iris, '''Retinazer''', fires purple eye lasers while hovering above and to one side of the player. The one with the green iris, '''Spazmatism''', shoots balls made of [[Cursed Flame]]s, while hovering parallel to the player. Both alternate between their signature attacks and a charging attack, much like [[Eye of Cthulhu]]. Note that Retinazer's charge dash is faster and covers a bit more distance than Spazmatism's charge dash. |
||
| + | Along with all regular [[enemies]], Hardmode contains new enemies that are more difficult, some of which are "upgraded" versions of pre-Hardmode enemies. In addition, [[coin]] drops and item prices both rise. |
||
| − | Just like the [[Eye of Cthulhu]], they both have a second phase, but as of 1.2.3 they no longer transform to their 2nd phase immediately at half health, rather Retinazer transforms at 8000HP and Spazmatism transforms at 9000HP. Retinazer becomes a mechanical eye with a laser turret in its pupil, while Spazmatism becomes a mechanical mouth. Notice that Spazmatism's second form looks like the [[Eye of Cthulhu]] in his second form. Retinazer will start firing lasers more quickly and for more damage, and gains the ability to shoot a quick barrage of lasers. It alternates between harrassing the player with periodic fire and slowing down for rapid-fire. The more damaged Retinazer is, the faster it will shoot lasers during its rapid-fire stage. Spazmatism will begin actively chasing the players and constantly spewing Cursed Flames from its mouth, in a manner similar to the [[Flamethrower]]; the flames can inflict the [[Cursed Inferno]] [[debuff]] upon players and deal high damage. It alternates its flamethrower attack with a much more aggressive charge/dash that has more speed and range. |
||
| + | Hardmode also makes new [[armor]] sets, [[weapon]]s, [[accessories]], and other various items available that will bring aid to the player's side, and are sometimes essential in dealing with new Hardmode challenges. Some of these become available for purchase from [[NPCs]], as drops from enemies, or are craftable using new Hardmode [[crafting material]]s and [[crafting station]]s. |
||
| − | {| |
||
| − | |-style="vertical-align:bottom" |
||
| − | |{{npc infobox |
||
| − | | name = Retinazer (First Form) |
||
| − | | id = 125 |
||
| − | | image = Retinazer.png |
||
| − | | ai = Retinazer AI |
||
| − | | damage = 20 eye laser<br>45 melee |
||
| − | | life = 20000 |
||
| − | | defense = 10 |
||
| − | }} |
||
| − | |{{npc infobox |
||
| − | | name = Spazmatism (First Form) |
||
| − | | id = 126 |
||
| − | | image = Spazmatism.png |
||
| − | | ai = Spazmatism AI |
||
| − | | damage = 25 cursed flame<br>50 melee |
||
| − | | life = 23000 |
||
| − | | defense = 10 |
||
| − | }} |
||
| − | |-style="vertical-align:bottom" |
||
| − | |{{npc infobox |
||
| − | | name = Retinazer (Second Form) |
||
| − | | ai = Retinazer AI |
||
| − | | damage = 25 death laser<br>20 death laser (rapid fire)<br>45 melee |
||
| − | | life = 8000/20000 |
||
| − | | defense = 25 |
||
| − | }} |
||
| − | |{{npc infobox |
||
| − | | name = Spazmatism (Second Form) |
||
| − | | ai = Spazmatism AI |
||
| − | | damage = 30 eye fire<br><br>50 melee |
||
| − | | life = 9000/23000 |
||
| − | | defense = 35 |
||
| − | }} |
||
| − | |} |
||
| + | On the {{Mobile version}}, when the [[Wall of Flesh]] is defeated, a pop-up box will appear briefly describing Hardmode. |
||
| − | == Notes == |
||
| − | * The Twins will disappear if the player(s) are too far away. |
||
| − | * Unlike the Eye of Cthulhu, the twins gain defense when they take on their second form. This defense boost occurs only after the transformation has completely finished however, so take advantage of its weaker and immobile state while you can. |
||
| − | * In [[Crimson]] worlds, Spazmatism is the only natural source of [[Cursed Inferno|cursed fire]]. |
||
| − | * In his first form, Spazmatism's flame shots often miss, even if the player isn't moving, the same goes for Retanizer's laser bolts in his second form. |
||
| − | * Both of the Twins are vulnerable to the [[Frostburn]] debuff. |
||
| − | * The Cursed Flames fired by Spazmatism travel slower in honey. |
||
| − | * While considered the mid-tier hardmode [[Boss|boss]] before the 1.2 update, the Twins are now widely considered the hardest mechanical boss. |
||
| − | *If The Twins are summoned with a mechanical eye on a night where The Twins naturally spawn both pairs will appear and all four eyes will be connected. |
||
| + | {{tocright}} |
||
| − | == Trivia == |
||
| − | * Retinazer's name is a portmanteau of retina, a part of the eye, and laser. Spazmatism's name is a portmanteau of astigmatism, an eye disorder, and spasm, meaning to twitch uncontrollably. |
||
| − | * The rope connecting the twins is similar to the rope connecting [[The Hungry]] to the [[Wall of Flesh]]. |
||
| − | *Spazmatism's second form is much similar to the Eye Of Cthulhus except when it is hit by a weapon it makes a metal 'clanging' sound much like anything made of metal. |
||
| − | {{Bug| Occasionally, when summoned with the Mechanical Eye, both may not appear. This is confirmed to happen in Multiplayer and Singleplayer.}} |
||
| − | {{Bug|If the Twins are too far apart, the tendril connecting them may randomly disappear, only returning when the twins get closer to each other.}} |
||
| − | {{Bug| On the Mobile version, Retinazer and Spazmatism's sprites are broken, making them invisible and only distinguishable by their nametags and the tendon connecting them.}} |
||
| − | {{Bug| If you summon The Twins and teleport far enough, one of the eyes can disappear, leaving one eye to fight. A similar effect can be found in [[Skeletron Prime]]}} |
||
| − | {{Bug| Sometimes if the twins are not defeated before dawn after they run away they will get stuck around the area become invisible and both will fire lasers at you, only known fix is to reload your world.}} |
||
| − | {{Bug| Rarely, when the player dies one of the eyes will disappear mid-fight.}} |
||
| − | {{Bug| If you're using the [[Gravitation Potion]] you can make them despawn if you go too far away.}} |
||
| − | {{Bug| After you have defeated The Destroyer, the body of it can get attached to either one of the eyes.}} |
||
| − | {{Bug| Sometimes, both twins can drop [[Souls of Sight]], resulting in the player getting twice the amount of Souls.}} |
||
| − | {{Bug| On rare occasions, one of the Twins will disappear instead of changing forms.}} |
||
| − | {{Bug| Sometimes, when "It's going to be a terrible night..." appears, The Twins may not spawn, but if you summon [[Eye of Cthulhu]] with the [[Suspicious Looking Eye]] and then defeat it, The Twins will spawn immediately after with the message "The Twins have awoken." This could be a way to save minor resources that go into crafting the [[Mechanical Eye]].}} |
||
| − | {{bug| Sometimes, The Twins will not go in to second form, instead at lower health.}} |
||
| − | {{Bug| Sometimes, Retinazer will disappear after you die and spawn far away, then you only have to fight Spazmatism. After he is killed the Twins will be defeated and you will get all the loot, only reported on Xbox.}} |
||
| − | {{bug| Sometimes when Retinazer is killed just before dawn and Spazmatism is not it will give both the message it has been defeated and fled but will only drop hallowed bars.}} |
||
| − | {{bug| Sometimes you will not get Souls of Sight from defeating The Twins. (Only reported on PC)| [[1.2.3.1]]}} |
||
| − | == |
+ | == Biomes == |
| + | [[File:The Hallow.png|300px|thumb|right|[[The Hallow]]'s surface during the [[Day]], showing a [[Unicorn]] and four [[Pixie]]s.]] |
||
| − | {{history|1.2.3|Spazmatism increased health to 23000, decreased damage for both. |
||
| + | Defeating the Wall of Flesh triggers the announcement, '''"The ancient spirits of light and dark have been released."''' This refers to the creation of the [[biomes]] that become released into the world. Immediately, two diagonal stripes of the new biomes generate, replacing large sections of the world in a "V" pattern that extends from the center of [[The Underworld]] all the way to the [[surface]]. The biomes created are: |
||
| − | **Spazmatism now transforms at 9000HP and Retinazer now transforms at 8000HP, instead of at half HP. |
||
| − | **Now only drops 15-30 [[Hallowed Bar]]s.}} |
||
| − | {{History|1.2| |
||
| − | **Now have a chance to spawn during hardmode with the message: "This is going to be a terrible night...". |
||
| − | **Will now drop 20-40 [[Soul of Sight|Souls of Sight]], instead of 20-30. |
||
| − | **Health and damage reduced from 24000 and 50 to 20000 and 40 respectively.}} |
||
| + | * [[The Hallow]] and [[Underground Hallow]], which generate in the world. |
||
| − | {{History|1.1|Introduced.}} |
||
| + | * The [[Underground Corruption]] generates as the second new biome in worlds that initially contain [[Corruption]] biomes. |
||
| + | * The [[Underground Crimson]] generates as the second new biome in worlds that initially contain [[Crimson]] biomes. |
||
| + | === Underground Corruption / Crimson === |
||
| + | The Underground Corruption and Underground Crimson primarily replace [[stone]], [[sand]], [[ice]], and [[silt]] (which is treated like sand, but only during the "burst" of corruption) that lie within the "V"-shaped path with their respective corrupted versions immediately upon conversion, while also being present even before Hardmode begins. [[Underground Jungle]] biomes do not generally contain these specific blocks in significant amounts, and in turn are not replaced. The [[mud block]]s in an Underground Jungle, however, will slowly be converted to [[dirt]] upon contact with the corrupted blocks of the Underground Corruption or the Underground Crimson. |
||
| + | The Underground Corruption and Underground Crimson looks similar to the surface Corruption/Crimson in terms of atmosphere and enemy appearance, though these biomes contain several new Corruption/Crimson-themed [[enemies]] that are restricted to that area only, as well as a noticeable change of background music. |
||
| − | {{bosses}} |
||
| + | === Hallow / Underground Hallow === |
||
| − | [[ko:쌍둥이]] |
||
| + | The Hallow represents a brand-new theme, distinguished by its pastel-colored fairytale imagery. Rainbows make up the surface's background image, its [[tree]]s are puffy and multicolored, and enemies look similarly whimsical, such as the [[Unicorn]] and [[Pixie]]. However, this proves to be misleading, as Hallow enemies are quick, resilient, and deadly, and their [[spawn rate]]s are high, so players must proceed with caution. |
||
| + | |||
| + | The Underground Hallow acts similar to the surface Hallow, in that enemies of similar caliber appear here as well. There are, however, special enemies that only appear down here, as well as a change in background music, that set it apart from the surface Hallow. |
||
| + | |||
| + | === Spread === |
||
| + | Corruption, Crimson and Hallow spread actively in Hardmode: |
||
| + | |||
| + | * Corruption, Crimson and Hallow will spread to [[stone]], [[sand]], [[ice]], and [[grass]] that are up to three tiles away. |
||
| + | * Corruption, Crimson, and Hallow [[vines]] (which grow downward from grass blocks) can spread Corruption, Crimson, and Hallow when they come in contact with corruptible blocks below (regardless of distance). |
||
| + | * [[Mud]] will slow the spread of Corruption and Crimson, but not stop it, since Corruption and Crimson can convert mud blocks into [[dirt]] over time (in the [[Layers#Surface|Surface layer]], grass can spread to exposed dirt blocks). Mud blocks containing [[mushroom grass]] are not affected. Hallow cannot convert mud at all. |
||
| + | * Hallow and Corruption/Crimson cannot convert each other. |
||
| + | * On the {{Mobile version}}, if you put a [[Sunflower]] next to the Corruption, Crimson, or Hallow, it won't spread. |
||
| + | These new properties mean that Hallow and Corruption/Crimson will now continuously spread, and can reach your home base, given enough time. It is advisable to take steps to protect any areas you want to invest time in keeping around, which can be done by mining away a four tile wide frame surrounding the area, then sealing it in with [[Wood]] or [[Clay]]. A [[Sky City]] and building on top of the [[Dungeon]] are other options. |
||
| + | |||
| + | == Ores and Bars == |
||
| + | === Initial Hardmode Ores === |
||
| + | The [[Wall of Flesh]] always drops the [[Pwnhammer]] upon its defeat. Players are encouraged to destroy [[Demon Altar|Demon]]/[[Crimson Altar|Crimson Altars]] at this point in order to begin progress into Hardmode (note that bringing the Pwnhammer into a pre-Hardmode world will not allow you to destroy any Altars there). The first three Altars destroyed will trigger the creation of three new [[ore]]s, in the following order: |
||
| + | |||
| + | * The first destroyed [[Demon Altar]] or [[Crimson Altar]] will trigger the creation of either [[Cobalt Ore]] or [[Palladium Ore]]. |
||
| + | * The second destroyed [[Demon Altar]] or [[Crimson Altar]] will trigger the creation of either [[Mythril Ore]] or [[Orichalcum Ore]]. |
||
| + | * The third destroyed [[Demon Altar]] or [[Crimson Altar]] will trigger the creation of either [[Adamantite Ore]] or [[Titanium Ore]]. |
||
| + | |||
| + | '''Please note that for every Demon/Crimson Altar you break, 1-3 [[Wraiths]] will spawn immediately within the vicinity of the Altars you broke.''' |
||
| + | |||
| + | Players will be able to find these new ores scattered across the Underground [[layer]] to near-Underworld levels, with them replacing any blocks created during world generation. They will spawn at random locations in varying chunks, in places explored and not explored alike. |
||
| + | |||
| + | Subsequent Altars destroyed will begin the cycle again, though the fourth to sixth altars will drop half as much ore as the first ones, the seventh to ninth will drop only one third of the ore of the first ones, and so forth. This "multiplier" can be calculated with the formula ''1/(ceiling(n/3) + 1 - sgn(n))'' where ''n'' is the number of altars destroyed. So, destroying the 19th altar would yield one-seventh of [[Cobalt Ore]] or [[Palladium Ore]] compared to the first altar. |
||
| + | |||
| + | Each time a Demon Altar is destroyed, there is also a chance that a single random tile of rock in the world will be converted into [[Ebonstone]]/[[Crimstone]] or [[Pearlstone]], which will likely grow to become a new underground [[Hallow]] or [[Corruption]]/[[Crimson]] given enough time. |
||
| + | |||
| + | No matter how many Altars are destroyed, ore rarity remains set with Cobalt/Palladium being the most common, followed by Mythril/Orichalcum, then Adamantite/Titanium as the rarest. |
||
| + | |||
| + | === Hallowed Bars === |
||
| + | Hallowed Bars are bars solely dropped by the three [[Mechanical Boss]]es. They provide the player with options for armor and weapons statistically better than those made from the initial six Hardmode ores. It is recommended for players to attempt and gather enough bars to craft a set of armor, as it can prove to be useful. |
||
| + | |||
| + | === Chlorophyte === |
||
| + | Chlorophyte is a special ore that first appears in the [[Underground Jungle]] when Hardmode begins. It cannot be retrieved until the player has gathered at least one soul from each Mechanical Boss and enough Hallowed Bars to craft the [[Drax]] or the [[Pickaxe Axe]]; only then can players mine it. It opens a new window for players by providing more opportunities for weapons and armor choices. |
||
| + | |||
| + | Unlike other ores, Chlorophyte is special in that it can grow to adjacent Mud Blocks, and chunks can become rather large. This means that players can be able to farm Chlorophyte. |
||
| + | |||
| + | === Mining and crafting === |
||
| + | * Mining [[Cobalt Ore]] or [[Palladium Ore]] requires at least the [[Molten Pickaxe]] or the [[Reaver Shark]]. |
||
| + | * Mining [[Mythril Ore]] or [[Orichalcum Ore]] requires at least the [[Cobalt Drill]], [[Cobalt Pickaxe]], [[Palladium Drill]], or the [[Palladium Pickaxe]]. Crafting many higher-tier Hardmode items will require a [[Mythril Anvil]] or [[Orichalcum Anvil]], which is crafted from 10 [[Mythril Bar|Mythril]] or 12 [[Orichalcum Bar]]s. |
||
| + | * Mining [[Adamantite Ore]] or [[Titanium Ore]] requires at least the [[Mythril Drill]], [[Mythril Pickaxe]], [[Orichalcum Drill]], or [[Orichalcum Pickaxe]], however on the {{Console version}} you may use [[Palladium Drill]] or [[Palladium Pickaxe]], but not the [[Cobalt Pickaxe]] or [[Cobalt Drill]]. Crafting [[Adamantite Bar]]s or [[Titanium Bar]]s will require an [[Adamantite Forge]] or a [[Titanium Forge]], which is crafted from a [[Hellforge]] and 30 Adamantite/Titanium Ore. |
||
| + | * Mining [[Chlorophyte]] requires at least the [[Drax]] or the [[Pickaxe Axe]]. |
||
| + | |||
| + | == [[Boss|Bosses]] == |
||
| + | === [[Mechanical Bosses]] === |
||
| + | The three [[Mechanical Bosses]] are essentially much stronger versions of their respective pre-[[Hardmode]] [[boss]]. These [[boss|bosses]] include: |
||
| + | * [[The Destroyer]] acts as the [[Hardmode]] version of the [[Eater of Worlds]], and can be manually summoned by using the [[Mechanical Worm]] at [[night]]. Despite being a direct upgrade of the [[Eater of Worlds]], a [[Corruption]]-themed [[boss]], it can be summoned in any world, even those with [[Crimson]]. Unlike the [[Eater of Worlds]], however, [[The Destroyer]] will not split into multiple segments, and instead the whole body shares one health bar. [[The Destroyer]] will periodically release [[Probe]]s from its body as it takes damage, and both can fire lasers continually. |
||
| + | * [[The Twins]] are the Hardmode version of the [[Eye of Cthulhu]], and can be manually summoned by using the [[Mechanical Eye]] at [[night]]. The boss itself is actually two eyes, each performing different attacks. Unlike the other [[Mechanical Bosses]], [[The Twins]] have a second stage, where they turn out to become more mechanical and have newer attack patterns. |
||
| + | * [[Skeletron Prime]] is the [[Hardmode]] version of [[Skeletron]], and can be manually summoned by using the [[Mechanical Skull]] at [[night]]. Being very similar to [[Skeletron]], its defining features are its four limbs, each being topped with a different weapon: a saw, a vice, a laser, and a bomb launcher. This wide array of weapons deem this boss to be much more challenging and diverse in attack style. |
||
| + | |||
| + | Once a world enters [[Hardmode]], there is a chance every night that one of these [[Mechanical Bosses]] will spawn, just as long as they haven't been killed in that world before. |
||
| + | |||
| + | There is currently no [[Mechanical Boss]] upgrade to the [[Brain of Cthulhu]]. [[The Destroyer]] will still be available to battle in worlds that contain [[Crimson]]. |
||
| + | |||
| + | === [[Plantera]]=== |
||
| + | After all three Mechanical Bosses are defeated, a message will appear saying: '''"The jungle grows restless..."''' This means that [[Plantera]] is now available for summoning: |
||
| + | * [[Plantera]] is a giant plant-like boss that is summoned by destroying [[Plantera's Bulb]] found within the [[Underground Jungle]]. It traverses the terrain using three claws that grab and hold to surfaces. Plantera's first phase consists of it simply traversing terrain and firing little seeds and thorn balls. After it reaches a certain point, it will enter phase two, unleashing many tentacle minions around its body and proceed to use a more intense attack pattern. |
||
| + | |||
| + | === [[Golem]] === |
||
| + | After Plantera is defeated, it will always drop a [[Temple Key]]. This unlocks the [[Lihzahrd Temple]], and inside, the [[Golem]] becomes available to fight: |
||
| + | * [[Golem]] is a boss that can initially be fought in the last chamber of the Jungle Temple, where the [[Lihzahrd Altar]] rests. Players must use [[Lihzahrd Power Cell]]s at the altar to summon it. There are three vulnerable spots on its body in its first phase: the head and the two fists. The fists will spring outward to try and hit the player, and its head will occasionally spew fireballs, and eventually lasers as it gets low on health. Once its second phase gets initiated, the head will blast off and fly around the player, becoming invincible at this point and firing lasers. The only vulnerable spot, presuming the player already destroyed the fists, will be the body. Destroying the body will cause Golem to be defeated. |
||
| + | |||
| + | === [[Duke Fishron]] === |
||
| + | There are no prerequisites to fighting [[Duke Fishron]] other than the fact that the world must be in [[Hardmode]], and that the players must have the materials needed to summon it. |
||
| + | * [[Duke Fishron]] is a horrid pig-fish-dragon hybrid that spawns by [[fishing]] in [[Ocean|the Ocean]] while a [[Truffle Worm]] is handy. He attacks mainly by lunging at the player in short bursts, occasionally firing [[Detonating Bubble]]s and summoning "Sharknadoes" that fire [[Sharkron]]s. Once it enters its second stage, his attack are detonating bubbles that spew from his body and "Cthulunadoes" that shoot "Sharkrons". |
||
| + | |||
| + | === [[Lunatic Cultist]] {{pc icon}} === |
||
| + | * The [[Lunatic Cultist]] becomes available as four cultists appear in the entrance of the [[Dungeon]] after defeating [[Golem]]. The Lunatic Cultist spawns after these cultists are defeated. Defeating him subsequently triggers the [[Lunar Events]]. |
||
| + | |||
| + | === [[Moon Lord]] {{pc icon}} === |
||
| + | * The [[Moon Lord]] becomes available after beating the [[Lunar Events]]. When the Lunar Events are completed, the Moon Lord will spawn automatically after a short delay; or it can be summoned without fighting the Lunatic Cultist or Lunar Events by using a [[Celestial Sigil]]. |
||
| + | |||
| + | ''' Please note that all pre-Hardmode bosses can still be summoned in [[Hardmode]].''' |
||
| + | |||
| + | === Post-[[Plantera]] === |
||
| + | When all of the [[Mechanical Bosses]] have been defeated, the world undergoes its first minor transformation. This allows [[Plantera's Bulb]]s to spawn randomly across the [[Underground Jungle]], giving players access to fight [[Plantera]] |
||
| + | |||
| + | Once Plantera has been defeated, the world undergoes its second minor transformation, allowing access to various events. |
||
| + | |||
| + | * Newer and more difficult enemies begin spawning within the [[Dungeon]], with their uprising being introduced with the message: '''"Screams are echoing from the dungeon."''' |
||
| + | * The spread of the [[Hallow]], [[Corruption]], and [[Crimson]] is slowed. |
||
| + | * The [[Cyborg]] [[NPC]] becomes available. |
||
| + | * The [[Truffle]] [[NPC]] begins selling the [[Autohammer]], which is solely used to craft [[Shroomite Bar]]s. |
||
| + | * The [[Jungle Temple]] can now be opened using the [[Temple Key]], and the [[Golem]] [[boss]] can be fought. |
||
| + | * The [[Pumpkin Moon]] and [[Frost Moon]] [[events]] can now be initiated via the [[Pumpkin Moon Medallion]] and [[Naughty Present]], respectively. Crafting these requires [[Ectoplasm]] that the new [[Dungeon Spirit]]s drop. |
||
| + | * [[Biome Chest]]s within the Dungeon can now be opened using their respective [[Biome Key]]s. |
||
| + | |||
| + | == [[Enemies]] == |
||
| + | ''See [[Forest]], [[Underground]], [[Desert]], [[Underground Desert]], [[Tundra]], [[Underground Tundra]], [[The Hallow]], [[Underground Hallow]], [[Corruption]], [[Underground Corruption]], [[Crimson]], [[Underground Crimson]], [[Jungle]], [[Underground Jungle]], [[Dungeon]], and [[The Underworld]] for the complete lists of enemies that spawn in those biomes during Hardmode.'' |
||
| + | |||
| + | Most of these enemies are significantly harder, doing more damage and having higher health and defense than pre-Hardmode enemies. Most pre-[[Hardmode]] weapons can prove ineffective, and until a player can obtain new Hardmode gear, they may be forced to avoid enemy swarms and/or play more strategically. Slow-hitting powerful weapons are generally preferable over fast weapons with low base damage because many hardmode enemies have high defense. |
||
| + | |||
| + | In [[Expert Mode]], most pre-hardmode enemies receive significant stat buffs (for example a blue slime will have 287 HP). Expert mode also renders most hardmode enemies much more dangerous to the point where 5-6 hits can kill a player. One must be extremely careful as one mistake is all it takes to be killed. |
||
| + | |||
| + | However not all biomes are immediately buffed with more powerful mobs. [[The Underworld]] does not receive any stronger mobs until after a mechanical boss is defeated and the [[Dungeon]] doesn't receive any mobs either until after [[Plantera]] is defeated. |
||
| + | |||
| + | == [[NPCs|NPC]] == |
||
| + | Several new [[NPC]]s become available in Hardmode: |
||
| + | * The [[Wizard]] can be found in nearly any open area underground, initially bound, and speaking to him frees him (similar to the [[Mechanic]] and the [[Goblin Tinkerer]]). He will then respawn as long as a vacant [[House]] is available. The Wizard sells magic-related items. |
||
| + | * [[Santa Claus]] appears between December 15th and 31st (based on your computer's time setting), after the defeat of the [[Frost Legion]], so long as a vacant House is available. In mobile, he stays until he is killed or you destroy his home. He sells the [[Santa costume]], [[Red Light|Red]]/[[Green Light|Green]]/[[Blue Light|Blue]] lights, the [[Christmas Tree]], and decorations for it. {{Mobile icon}}Hardmode is not required for Santa to appear. |
||
| + | * The [[Steampunker]] appears after defeating one [[Mechanical Boss]], and if a vacant House is available. She sells [[Teleporter]]s and other steampunk themed items. |
||
| + | * The [[Truffle]] appears once you make a house in a mushroom biome above ground when your world is in hardmode. He sells useful mushroom themed items and the [[Autohammer]]. |
||
| + | * The [[Cyborg]] appears once you have defeated [[Plantera]], so long as a vacant house is available. He sells rockets and other mechanical items. At night he sells more advanced items such as upgraded rockets. |
||
| + | * The [[Pirate]] appears once you have defeated a [[Pirate Invasion]], and sells a vanity set as well as other pirate themed items. |
||
| + | * {{pc icon}} The [[Tax Collector]] becomes available by throwing [[Purification Powder]] on a [[Tortured Soul]] in The [[Underworld]]. He gathers money over time and grants it to the player if they request it. |
||
| + | |||
| + | == Events == |
||
| + | There are several new [[event]]s in Hardmode: |
||
| + | * The [[Frost Legion]] is triggered only by the [[Snow Globe]], never invading on its own. The Snow Globe can be used to summon the Frost Legion in non-Hardmode worlds, but the Snow Globe itself can only be acquired from [[Present]]s that are obtained during the Christmas season on a Hardmode world. |
||
| + | * [[Pirate Invasion]]s are triggered by the [[Pirate Map]], or can appear randomly at the start of the day. |
||
| + | * The [[Solar Eclipse]] behaves like the Blood Moon, only it happens during the day, and can appear after any Hardmode [[boss]] is defeated. During a Solar Eclipse, unique and powerful monsters will spawn in vast numbers and drop a variety of exclusive items. |
||
| + | * The [[Pumpkin Moon]] is the one of the most challenging Hardmode events. It can only be started at night by the player using a [[Pumpkin Moon Medallion]], which is crafted with 30 [[Pumpkin]]s, 5 [[Ectoplasm]], and 10 [[Hallowed Bar]]s. This turns the moon into a scary pumpkin face. The event has 15 waves, with each wave requiring a progressively higher score to progress to the next. Enemies that spawn are [[Scarecrow]]s, [[Splinterling]]s, [[Hellhound]]s, [[Poltergeist]]s, [[Headless Horseman]], a mini-boss [[Mourning Wood]], and a boss [[Pumpking]]. More and harder enemies will spawn at higher waves, and there can be several Mourning Woods and Pumpkings attacking at once. The event ends at the end of the night or when all 15 waves have been completed. |
||
| + | * The [[Frost Moon]] is an [[invasion]]-like event similar to the Pumpkin Moon, though being a step up on the difficulty. It is started by using the [[Naughty Present]] at night. Featuring some of the hardest enemies in the game and 20 total waves, it is one of the hardest events in the game. |
||
| + | * {{pc icon}} [[Martian Madness]] is an [[invasion]]-like event similar to those before it, and is considered to be the most difficult invasion-style event in ''Terraria''. It is triggered when a [[Martian Probe]], found only on the outer edges of the world, is activated and escapes. It features incredibly difficult enemies and will be a challenge to all but the most prepared players. |
||
| + | |||
| + | In Hardmode worlds, [[Goblin Invasion|Goblin Armies]] do still invade, and [[Meteorite (biome)|Meteorite]]s still land, each at their regular rates. [[Blood Moon]]s, [[Rain]], and [[Slime Rain]] also occur just as frequently as they did pre-Hardmode, though sometimes feature Hardmode-exclusive content. |
||
| + | |||
| + | == Items == |
||
| + | Several new [[Tools]], [[Weapons]], [[Accessories]], [[Armor]]s, and crafting materials become available in Hardmode, as enemy drops, sold from NPCs, or via crafting. [[Drill]]s, [[Chainsaw]]s, and [[Repeater]]s are variations of [[Pickaxe]]s, [[Axe]]s, and [[Bow]]s, respectively, which can be obtained once in Hardmode. |
||
| + | |||
| + | === Equipment === |
||
| + | Each of the many hardmode Ores have their own complete item set, including [[Armor]], [[Drill]], [[Chainsaw]], [[Sword]], [[Spear]], and [[Repeater]]. In addition, [[Hallowed Armor]] and associated tools and weapons become available: the [[Drax]], [[Excalibur]], [[Gungnir]], and [[Hallowed Repeater]]. Crafting Hallow-tier items required creating the item sets for what was then all the hardmode ores and defeating the Mechanical Bosses introduced with hardmode for set-specific boss souls. As of 1.2, their crafting recipes were simplified to need only [[Hallowed Bar]]s, which dropped when the mechanical bosses were killed. |
||
| + | |||
| + | Many of the hardmode Armor sets have three different options for the Helmet slot, which each benefit players that use either [[Magic Weapons]], [[Melee Weapons]], or [[Ranged Weapons]]. [[Shroomite Armor]] is an exception - its helmet choices benefit ranged weapons in all cases, although only specific ones (see the article for details). |
||
| + | |||
| + | '''''Note:''' See [[The Hallow]], [[Underground Hallow]], [[Corruption]], [[Underground Corruption]], [[Crimson]], and [[Underground Crimson]] for complete item drop lists.'' |
||
| + | |||
| + | == Notes == |
||
| + | * Hardmode should not be confused with [[hardcore]] mode, which is for the character, not the world. |
||
| + | * [[Clown]]s have a chance to appear during [[Blood Moon]]s. |
||
| + | * [[Demonite Ore]] and [[Crimtane Ore]] do ''not'' spread the [[Corruption]] and [[Crimson]] during hardmode. |
||
| + | * It's actually ''possible'' for the 2 stripes of biomes to be quarantined completely or not even generate, that is, if the player have mined for monumental amount of time and no altars have been broken. The [[Drill Containment Unit]] is the best choice for this purpose, though it is only available in the end-game. |
||
| + | * Hardmode ''enemies'' will begin spawning as soon as the Wall of Flesh is defeated. The stripes of corruption/crimson and hallow, however, will not spawn until the message "The ancient spirits of light and dark have been released." appears. |
||
| + | == Tips == |
||
| + | === Corruption/Crimson and Hallow spread === |
||
| + | * [[Corruption]] or [[Crimson]] which gets too close to NPC housing will render them invalid. It should be a priority to craft [[Holy Water]] or place [[Hallowed]] blocks to aid in its conversion near the edges of any farms or biomes of this type and contain them as soon as possible. |
||
| + | * Once you get the [[Steampunker]], you might want to buy the [[Clentaminator]] for 2 platinum, along with its ammunition, named [[Solution]]. It is a quick and handy way of cleaning/destroying/creating biomes. |
||
| + | * Corruption/Crimson can completely devour the [[Jungle]]. To farm [[Plantera]], [[Chlorophyte Ore]], or other jungle enemies, consider sealing off the underground jungle with [[Hallow]], as this will prevent the conversion of jungle grass and mud blocks. |
||
| + | |||
| + | === Difficulty === |
||
| + | * When beginning Hardmode, a player can easily become overwhelmed by the difficult new enemies, which have Health and Damage many times greater than regular-mode enemies. It is advisable to start by identifying your most damaging weapons and investing [[money]] in [[Reforge|Reforging]] them to acquire high damage bonuses, as well as reforging your [[Accessories]] to add high defense bonuses. Low-tier [[Hardmode weapons]] begin at around 35 damage, so viable regular-mode weapons of use will be the [[Sunfury]] and [[Night's Edge]] as melee options, the [[Molten Fury]] and [[Flamarang]] as semi-ranged, and the [[Flower of Fire]] and [[Demon Scythe]] as magical. Reforging these and making use of other damage boosts from Accessories or Armor bonuses can easily push these weapons into damage ranges that will make Hardmode fights relatively balanced. |
||
| + | * Because hardmode relies more upon drops than treasure chests (which don't suddenly respawn with more loot), players will need to kill large numbers of these tougher enemies for items like [[Souls]] or [[Pixie Dust]]. Consider building mini-bases with [[Guide:Base_defense_and_precautions|proper protections]] that involve shallow lava pits above small access tunnels that run between Underground Hallow and Corruption/Crimson biomes. Use [[Active Stone Block]]s to make the "doors" that let you jump up and grab floating souls. Place walls to prevent spawns inside your mini-base. You will still need to fight off the occasional [[Cursed Hammer]], but it's a much easier job to farm these enemies when you reduce the threats to a few at a time. Eventually, they will drop either a good weapon, or the resources needed to craft one. |
||
| + | * Mechanical bosses and invasions can take the player off guard. It's best to leave and rejoin if you are ill prepared. |
||
| + | |||
| + | === Resources === |
||
| + | * Don't throw away your [[Iron Ore]]/[[Iron Bar|Bars]], [[Lead Ore]]/[[Lead Bar|Bars]], [[Bone]]s, [[Lens]]es, [[Vertebrae]], and [[Rotten Chunk]]s, as these are used for crafting [[Boss]]-summoning items in Hardmode. If you need to collect more, it may be easier to create a new non-Hardmode world and collect them there, along with any other pre-Hardmode materials you find yourself needing. |
||
| + | * The [[Eater of Worlds]] and [[Eye of Cthulhu]] are commonly used by players as a good source of [[money]], and this is still useful during the beginning stages of Hardmode. However, summoning them in Hardmode can be more difficult: eg. you've probably destroyed any close [[Demon Altar]]s (needed to craft the [[Worm Food]] and [[Suspicious Looking Eye]]), you may have demolished your nearby Corruption farm or [[Arena]], and trips to the naturally-occurring Corruption are now more hazardous (Eater of Worlds must be summoned and fought within Corruption). It is much easier to simply create a new non-Hardmode world to farm these bosses, then use the funds collected from them in your Hardmode world. The [[Wall of Flesh]] can be farmed and drops about {{gc|8}}, and items which each sell for approximately {{gc|3}}. |
||
| + | * One way to farm money in Hardmode once you become reasonably able to traverse the Underground Hallow (aside from using [[Guide:Making money#Useful Glitches|a glitch]]) is to collect [[Crystal Shards]], which are common and sell for {{pc|1}} {{gc|59}} {{sc|84}} for a full stack of 999 (each one sells for {{sc|16}}). Since they grow naturally on any [[pearlstone]] surface facing air, you can mine away stripes of pearlstone in areas you visit often to farm crystals more readily. |
||
| + | * Farming the [[Destroyer]] once you can beat it is another way to make a considerable amount of money, since you can farm it without too much additional effort. Because it is relatively easy to kill quickly and can easily be meleed to death (avoiding spending any money on ammunition), the Hallowed Bars it drops can be crafted into [[Light Disc]]s, together with the [[Souls of Might]] it also drops, and with [[Souls of Light]] which can be obtained in the Underground Hallow. Each Light Disc sells for {{gc|10}}. As it drops 15-30 Hallowed Bars and 20-40 Souls of Might per kill, that is typically 3-7 Light Discs per run (if you have enough Souls of Light, that is). The Souls of Might it drops may also be sold for additional money, {{sc|80}} each, which is another 16-32 {{gc}} per run if you don't spend the souls on Light Discs, in addition to the {{gc|12}} the boss drops. In total, you net 42-82 {{gc}}, and due to the ease of crafting the [[Mechanical Worm|Mechanical Worm]] and the relative quickness with which you can dispatch the boss, you can fight it multiple times in a single in-game night. |
||
| + | * Wait to open [[Crates]] until Hardmode so as to be able to immediately get some hardmode ores and bars without even smashing any altars or mining. The Enchanted Sundial can also be salvaged from crates; it is an immensely useful item as it allows you to skip a day every week. Even [[Souls]] and [[Ichor]]/[[Cursed Flames]]/[[Crystal Shards]] can be looted from crates without even visiting the [[Hallow]]/[[Crimson]]/[[Corruption]]. |
||
| + | |||
| + | == History == |
||
| + | {{history|1.2.1|Added messages to help the player progress in hardmode.}} |
||
| + | {{History|1.2| |
||
| + | **[[Jungle]], [[Dungeon]], [[Crimson]] and [[Snow Biome|Snow]] biomes are all affected by hardmode now. |
||
| + | **[[Cobalt Drill|Cobalt]]/[[Palladium Drill]] can not mine [[Adamantite]] and [[Titanium]]. |
||
| + | **There are 2 new hardmode events. |
||
| + | **A massive amount of Hardmode items/monsters added. |
||
| + | **Early hardmode enemies now do less damage and have less health/defense. |
||
| + | **Hardmode bosses have a chance to spawn on their own to help players progress through the game. |
||
| + | **Current hardmode bosses now do slightly less damage and have had their health decreased.}} |
||
| + | {{History|1.1|Introduced.}} |
||
| + | {{translation project}} |
||
Revision as of 07:18, 13 May 2016
Initial Hardmode map of a small Desktop-version world. Notice the "V" made of the new outburst of Corruption (dark purple) and Hallow (pale pink) biomes, which each replace existing world blocks upon the defeat of the Wall of Flesh.
"The ancient spirits of light and dark have been released..."
Hardmode is essentially a harder version of the initial world. A world permanently converts to Hardmode after the player successfully defeats the Wall of Flesh boss for the first time in that world. Hardmode grants players new challenges and gives them access to much more content for them to explore (in the current world).
Hardmode adds new biomes to the world that will appear and function upon converting: the Underground Corruption, the Underground Crimson, and The Hallow. Corruption, Crimson and Hallow will spread continuously and at a steady pace in Hardmode, and can eventually overtake an entire map if not dealt with properly.
Demon Altars and Crimson Altars can be broken with the Pwnhammer at this point (which drops from the Wall of Flesh), and upon doing so, new ores become available to start the player off in Hardmode.
Along with all regular enemies, Hardmode contains new enemies that are more difficult, some of which are "upgraded" versions of pre-Hardmode enemies. In addition, coin drops and item prices both rise.
Hardmode also makes new armor sets, weapons, accessories, and other various items available that will bring aid to the player's side, and are sometimes essential in dealing with new Hardmode challenges. Some of these become available for purchase from NPCs, as drops from enemies, or are craftable using new Hardmode crafting materials and crafting stations.
On the ![]() Mobile version, when the Wall of Flesh is defeated, a pop-up box will appear briefly describing Hardmode.
Mobile version, when the Wall of Flesh is defeated, a pop-up box will appear briefly describing Hardmode.
Quick Answers

What are the names of the two entities that make up The Twins in Terraria?

How can The Twins be summoned in Terraria?
What does 'This is going to be a terrible night' signify for The Twins in Terraria?
What are the attack patterns of Retinazer and Spazmatism in Terraria?
What is the connection between The Twins and the Eye of Cthulhu in Terraria?
Biomes

The Hallow's surface during the Day, showing a Unicorn and four Pixies.
Defeating the Wall of Flesh triggers the announcement, "The ancient spirits of light and dark have been released." This refers to the creation of the biomes that become released into the world. Immediately, two diagonal stripes of the new biomes generate, replacing large sections of the world in a "V" pattern that extends from the center of The Underworld all the way to the surface. The biomes created are:
- The Hallow and Underground Hallow, which generate in the world.
- The Underground Corruption generates as the second new biome in worlds that initially contain Corruption biomes.
- The Underground Crimson generates as the second new biome in worlds that initially contain Crimson biomes.
Underground Corruption / Crimson
The Underground Corruption and Underground Crimson primarily replace stone, sand, ice, and silt (which is treated like sand, but only during the "burst" of corruption) that lie within the "V"-shaped path with their respective corrupted versions immediately upon conversion, while also being present even before Hardmode begins. Underground Jungle biomes do not generally contain these specific blocks in significant amounts, and in turn are not replaced. The mud blocks in an Underground Jungle, however, will slowly be converted to dirt upon contact with the corrupted blocks of the Underground Corruption or the Underground Crimson.
The Underground Corruption and Underground Crimson looks similar to the surface Corruption/Crimson in terms of atmosphere and enemy appearance, though these biomes contain several new Corruption/Crimson-themed enemies that are restricted to that area only, as well as a noticeable change of background music.
Hallow / Underground Hallow
The Hallow represents a brand-new theme, distinguished by its pastel-colored fairytale imagery. Rainbows make up the surface's background image, its trees are puffy and multicolored, and enemies look similarly whimsical, such as the Unicorn and Pixie. However, this proves to be misleading, as Hallow enemies are quick, resilient, and deadly, and their spawn rates are high, so players must proceed with caution.
The Underground Hallow acts similar to the surface Hallow, in that enemies of similar caliber appear here as well. There are, however, special enemies that only appear down here, as well as a change in background music, that set it apart from the surface Hallow.
Spread
Corruption, Crimson and Hallow spread actively in Hardmode:
- Corruption, Crimson and Hallow will spread to stone, sand, ice, and grass that are up to three tiles away.
- Corruption, Crimson, and Hallow vines (which grow downward from grass blocks) can spread Corruption, Crimson, and Hallow when they come in contact with corruptible blocks below (regardless of distance).
- Mud will slow the spread of Corruption and Crimson, but not stop it, since Corruption and Crimson can convert mud blocks into dirt over time (in the Surface layer, grass can spread to exposed dirt blocks). Mud blocks containing mushroom grass are not affected. Hallow cannot convert mud at all.
- Hallow and Corruption/Crimson cannot convert each other.
- On the
 Mobile version, if you put a Sunflower next to the Corruption, Crimson, or Hallow, it won't spread.
These new properties mean that Hallow and Corruption/Crimson will now continuously spread, and can reach your home base, given enough time. It is advisable to take steps to protect any areas you want to invest time in keeping around, which can be done by mining away a four tile wide frame surrounding the area, then sealing it in with Wood or Clay. A Sky City and building on top of the Dungeon are other options.
Ores and Bars
Initial Hardmode Ores
The Wall of Flesh always drops the Pwnhammer upon its defeat. Players are encouraged to destroy Demon/Crimson Altars at this point in order to begin progress into Hardmode (note that bringing the Pwnhammer into a pre-Hardmode world will not allow you to destroy any Altars there). The first three Altars destroyed will trigger the creation of three new ores, in the following order:
- The first destroyed Demon Altar or Crimson Altar will trigger the creation of either Cobalt Ore or Palladium Ore.
- The second destroyed Demon Altar or Crimson Altar will trigger the creation of either Mythril Ore or Orichalcum Ore.
- The third destroyed Demon Altar or Crimson Altar will trigger the creation of either Adamantite Ore or Titanium Ore.
Please note that for every Demon/Crimson Altar you break, 1-3 Wraiths will spawn immediately within the vicinity of the Altars you broke.
Players will be able to find these new ores scattered across the Underground layer to near-Underworld levels, with them replacing any blocks created during world generation. They will spawn at random locations in varying chunks, in places explored and not explored alike.
Subsequent Altars destroyed will begin the cycle again, though the fourth to sixth altars will drop half as much ore as the first ones, the seventh to ninth will drop only one third of the ore of the first ones, and so forth. This "multiplier" can be calculated with the formula 1/(ceiling(n/3) + 1 - sgn(n)) where n is the number of altars destroyed. So, destroying the 19th altar would yield one-seventh of Cobalt Ore or Palladium Ore compared to the first altar.
Each time a Demon Altar is destroyed, there is also a chance that a single random tile of rock in the world will be converted into Ebonstone/Crimstone or Pearlstone, which will likely grow to become a new underground Hallow or Corruption/Crimson given enough time.
No matter how many Altars are destroyed, ore rarity remains set with Cobalt/Palladium being the most common, followed by Mythril/Orichalcum, then Adamantite/Titanium as the rarest.
Hallowed Bars
Hallowed Bars are bars solely dropped by the three Mechanical Bosses. They provide the player with options for armor and weapons statistically better than those made from the initial six Hardmode ores. It is recommended for players to attempt and gather enough bars to craft a set of armor, as it can prove to be useful.
Chlorophyte
Chlorophyte is a special ore that first appears in the Underground Jungle when Hardmode begins. It cannot be retrieved until the player has gathered at least one soul from each Mechanical Boss and enough Hallowed Bars to craft the Drax or the Pickaxe Axe; only then can players mine it. It opens a new window for players by providing more opportunities for weapons and armor choices.
Unlike other ores, Chlorophyte is special in that it can grow to adjacent Mud Blocks, and chunks can become rather large. This means that players can be able to farm Chlorophyte.
Mining and crafting
- Mining Cobalt Ore or Palladium Ore requires at least the Molten Pickaxe or the Reaver Shark.
- Mining Mythril Ore or Orichalcum Ore requires at least the Cobalt Drill, Cobalt Pickaxe, Palladium Drill, or the Palladium Pickaxe. Crafting many higher-tier Hardmode items will require a Mythril Anvil or Orichalcum Anvil, which is crafted from 10 Mythril or 12 Orichalcum Bars.
- Mining Adamantite Ore or Titanium Ore requires at least the Mythril Drill, Mythril Pickaxe, Orichalcum Drill, or Orichalcum Pickaxe, however on the Console version you may use Palladium Drill or Palladium Pickaxe, but not the Cobalt Pickaxe or Cobalt Drill. Crafting Adamantite Bars or Titanium Bars will require an Adamantite Forge or a Titanium Forge, which is crafted from a Hellforge and 30 Adamantite/Titanium Ore.
- Mining Chlorophyte requires at least the Drax or the Pickaxe Axe.
Bosses
Mechanical Bosses
The three Mechanical Bosses are essentially much stronger versions of their respective pre-Hardmode boss. These bosses include:
- The Destroyer acts as the Hardmode version of the Eater of Worlds, and can be manually summoned by using the Mechanical Worm at night. Despite being a direct upgrade of the Eater of Worlds, a Corruption-themed boss, it can be summoned in any world, even those with Crimson. Unlike the Eater of Worlds, however, The Destroyer will not split into multiple segments, and instead the whole body shares one health bar. The Destroyer will periodically release Probes from its body as it takes damage, and both can fire lasers continually.
- The Twins are the Hardmode version of the Eye of Cthulhu, and can be manually summoned by using the Mechanical Eye at night. The boss itself is actually two eyes, each performing different attacks. Unlike the other Mechanical Bosses, The Twins have a second stage, where they turn out to become more mechanical and have newer attack patterns.
- Skeletron Prime is the Hardmode version of Skeletron, and can be manually summoned by using the Mechanical Skull at night. Being very similar to Skeletron, its defining features are its four limbs, each being topped with a different weapon: a saw, a vice, a laser, and a bomb launcher. This wide array of weapons deem this boss to be much more challenging and diverse in attack style.
Once a world enters Hardmode, there is a chance every night that one of these Mechanical Bosses will spawn, just as long as they haven't been killed in that world before.
There is currently no Mechanical Boss upgrade to the Brain of Cthulhu. The Destroyer will still be available to battle in worlds that contain Crimson.
Plantera
After all three Mechanical Bosses are defeated, a message will appear saying: "The jungle grows restless..." This means that Plantera is now available for summoning:
- Plantera is a giant plant-like boss that is summoned by destroying Plantera's Bulb found within the Underground Jungle. It traverses the terrain using three claws that grab and hold to surfaces. Plantera's first phase consists of it simply traversing terrain and firing little seeds and thorn balls. After it reaches a certain point, it will enter phase two, unleashing many tentacle minions around its body and proceed to use a more intense attack pattern.
Golem
After Plantera is defeated, it will always drop a Temple Key. This unlocks the Lihzahrd Temple, and inside, the Golem becomes available to fight:
- Golem is a boss that can initially be fought in the last chamber of the Jungle Temple, where the Lihzahrd Altar rests. Players must use Lihzahrd Power Cells at the altar to summon it. There are three vulnerable spots on its body in its first phase: the head and the two fists. The fists will spring outward to try and hit the player, and its head will occasionally spew fireballs, and eventually lasers as it gets low on health. Once its second phase gets initiated, the head will blast off and fly around the player, becoming invincible at this point and firing lasers. The only vulnerable spot, presuming the player already destroyed the fists, will be the body. Destroying the body will cause Golem to be defeated.
Duke Fishron
There are no prerequisites to fighting Duke Fishron other than the fact that the world must be in Hardmode, and that the players must have the materials needed to summon it.
- Duke Fishron is a horrid pig-fish-dragon hybrid that spawns by fishing in the Ocean while a Truffle Worm is handy. He attacks mainly by lunging at the player in short bursts, occasionally firing Detonating Bubbles and summoning "Sharknadoes" that fire Sharkrons. Once it enters its second stage, his attack are detonating bubbles that spew from his body and "Cthulunadoes" that shoot "Sharkrons".
Lunatic Cultist Template:Pc icon
- The Lunatic Cultist becomes available as four cultists appear in the entrance of the Dungeon after defeating Golem. The Lunatic Cultist spawns after these cultists are defeated. Defeating him subsequently triggers the Lunar Events.
Moon Lord Template:Pc icon
- The Moon Lord becomes available after beating the Lunar Events. When the Lunar Events are completed, the Moon Lord will spawn automatically after a short delay; or it can be summoned without fighting the Lunatic Cultist or Lunar Events by using a Celestial Sigil.
Please note that all pre-Hardmode bosses can still be summoned in Hardmode.
Post-Plantera
When all of the Mechanical Bosses have been defeated, the world undergoes its first minor transformation. This allows Plantera's Bulbs to spawn randomly across the Underground Jungle, giving players access to fight Plantera
Once Plantera has been defeated, the world undergoes its second minor transformation, allowing access to various events.
- Newer and more difficult enemies begin spawning within the Dungeon, with their uprising being introduced with the message: "Screams are echoing from the dungeon."
- The spread of the Hallow, Corruption, and Crimson is slowed.
- The Cyborg NPC becomes available.
- The Truffle NPC begins selling the Autohammer, which is solely used to craft Shroomite Bars.
- The Jungle Temple can now be opened using the Temple Key, and the Golem boss can be fought.
- The Pumpkin Moon and Frost Moon events can now be initiated via the Pumpkin Moon Medallion and Naughty Present, respectively. Crafting these requires Ectoplasm that the new Dungeon Spirits drop.
- Biome Chests within the Dungeon can now be opened using their respective Biome Keys.
Enemies
See Forest, Underground, Desert, Underground Desert, Tundra, Underground Tundra, The Hallow, Underground Hallow, Corruption, Underground Corruption, Crimson, Underground Crimson, Jungle, Underground Jungle, Dungeon, and The Underworld for the complete lists of enemies that spawn in those biomes during Hardmode.
Most of these enemies are significantly harder, doing more damage and having higher health and defense than pre-Hardmode enemies. Most pre-Hardmode weapons can prove ineffective, and until a player can obtain new Hardmode gear, they may be forced to avoid enemy swarms and/or play more strategically. Slow-hitting powerful weapons are generally preferable over fast weapons with low base damage because many hardmode enemies have high defense.
In Expert Mode, most pre-hardmode enemies receive significant stat buffs (for example a blue slime will have 287 HP). Expert mode also renders most hardmode enemies much more dangerous to the point where 5-6 hits can kill a player. One must be extremely careful as one mistake is all it takes to be killed.
However not all biomes are immediately buffed with more powerful mobs. The Underworld does not receive any stronger mobs until after a mechanical boss is defeated and the Dungeon doesn't receive any mobs either until after Plantera is defeated.
NPC
Several new NPCs become available in Hardmode:
- The Wizard can be found in nearly any open area underground, initially bound, and speaking to him frees him (similar to the Mechanic and the Goblin Tinkerer). He will then respawn as long as a vacant House is available. The Wizard sells magic-related items.
- Santa Claus appears between December 15th and 31st (based on your computer's time setting), after the defeat of the Frost Legion, so long as a vacant House is available. In mobile, he stays until he is killed or you destroy his home. He sells the Santa costume, Red/Green/Blue lights, the Christmas Tree, and decorations for it. Template:Mobile iconHardmode is not required for Santa to appear.
- The Steampunker appears after defeating one Mechanical Boss, and if a vacant House is available. She sells Teleporters and other steampunk themed items.
- The Truffle appears once you make a house in a mushroom biome above ground when your world is in hardmode. He sells useful mushroom themed items and the Autohammer.
- The Cyborg appears once you have defeated Plantera, so long as a vacant house is available. He sells rockets and other mechanical items. At night he sells more advanced items such as upgraded rockets.
- The Pirate appears once you have defeated a Pirate Invasion, and sells a vanity set as well as other pirate themed items.
- Template:Pc icon The Tax Collector becomes available by throwing Purification Powder on a Tortured Soul in The Underworld. He gathers money over time and grants it to the player if they request it.
Events
There are several new events in Hardmode:
- The Frost Legion is triggered only by the Snow Globe, never invading on its own. The Snow Globe can be used to summon the Frost Legion in non-Hardmode worlds, but the Snow Globe itself can only be acquired from Presents that are obtained during the Christmas season on a Hardmode world.
- Pirate Invasions are triggered by the Pirate Map, or can appear randomly at the start of the day.
- The Solar Eclipse behaves like the Blood Moon, only it happens during the day, and can appear after any Hardmode boss is defeated. During a Solar Eclipse, unique and powerful monsters will spawn in vast numbers and drop a variety of exclusive items.
- The Pumpkin Moon is the one of the most challenging Hardmode events. It can only be started at night by the player using a Pumpkin Moon Medallion, which is crafted with 30 Pumpkins, 5 Ectoplasm, and 10 Hallowed Bars. This turns the moon into a scary pumpkin face. The event has 15 waves, with each wave requiring a progressively higher score to progress to the next. Enemies that spawn are Scarecrows, Splinterlings, Hellhounds, Poltergeists, Headless Horseman, a mini-boss Mourning Wood, and a boss Pumpking. More and harder enemies will spawn at higher waves, and there can be several Mourning Woods and Pumpkings attacking at once. The event ends at the end of the night or when all 15 waves have been completed.
- The Frost Moon is an invasion-like event similar to the Pumpkin Moon, though being a step up on the difficulty. It is started by using the Naughty Present at night. Featuring some of the hardest enemies in the game and 20 total waves, it is one of the hardest events in the game.
- Template:Pc icon Martian Madness is an invasion-like event similar to those before it, and is considered to be the most difficult invasion-style event in Terraria. It is triggered when a Martian Probe, found only on the outer edges of the world, is activated and escapes. It features incredibly difficult enemies and will be a challenge to all but the most prepared players.
In Hardmode worlds, Goblin Armies do still invade, and Meteorites still land, each at their regular rates. Blood Moons, Rain, and Slime Rain also occur just as frequently as they did pre-Hardmode, though sometimes feature Hardmode-exclusive content.
Items
Several new Tools, Weapons, Accessories, Armors, and crafting materials become available in Hardmode, as enemy drops, sold from NPCs, or via crafting. Drills, Chainsaws, and Repeaters are variations of Pickaxes, Axes, and Bows, respectively, which can be obtained once in Hardmode.
Equipment
Each of the many hardmode Ores have their own complete item set, including Armor, Drill, Chainsaw, Sword, Spear, and Repeater. In addition, Hallowed Armor and associated tools and weapons become available: the Drax, Excalibur, Gungnir, and Hallowed Repeater. Crafting Hallow-tier items required creating the item sets for what was then all the hardmode ores and defeating the Mechanical Bosses introduced with hardmode for set-specific boss souls. As of 1.2, their crafting recipes were simplified to need only Hallowed Bars, which dropped when the mechanical bosses were killed.
Many of the hardmode Armor sets have three different options for the Helmet slot, which each benefit players that use either Magic Weapons, Melee Weapons, or Ranged Weapons. Shroomite Armor is an exception - its helmet choices benefit ranged weapons in all cases, although only specific ones (see the article for details).
Note: See The Hallow, Underground Hallow, Corruption, Underground Corruption, Crimson, and Underground Crimson for complete item drop lists.
Notes
- Hardmode should not be confused with hardcore mode, which is for the character, not the world.
- Clowns have a chance to appear during Blood Moons.
- Demonite Ore and Crimtane Ore do not spread the Corruption and Crimson during hardmode.
- It's actually possible for the 2 stripes of biomes to be quarantined completely or not even generate, that is, if the player have mined for monumental amount of time and no altars have been broken. The Drill Containment Unit is the best choice for this purpose, though it is only available in the end-game.
- Hardmode enemies will begin spawning as soon as the Wall of Flesh is defeated. The stripes of corruption/crimson and hallow, however, will not spawn until the message "The ancient spirits of light and dark have been released." appears.
Tips
Corruption/Crimson and Hallow spread
- Corruption or Crimson which gets too close to NPC housing will render them invalid. It should be a priority to craft Holy Water or place Hallowed blocks to aid in its conversion near the edges of any farms or biomes of this type and contain them as soon as possible.
- Once you get the Steampunker, you might want to buy the Clentaminator for 2 platinum, along with its ammunition, named Solution. It is a quick and handy way of cleaning/destroying/creating biomes.
- Corruption/Crimson can completely devour the Jungle. To farm Plantera, Chlorophyte Ore, or other jungle enemies, consider sealing off the underground jungle with Hallow, as this will prevent the conversion of jungle grass and mud blocks.
Difficulty
- When beginning Hardmode, a player can easily become overwhelmed by the difficult new enemies, which have Health and Damage many times greater than regular-mode enemies. It is advisable to start by identifying your most damaging weapons and investing money in Reforging them to acquire high damage bonuses, as well as reforging your Accessories to add high defense bonuses. Low-tier Hardmode weapons begin at around 35 damage, so viable regular-mode weapons of use will be the Sunfury and Night's Edge as melee options, the Molten Fury and Flamarang as semi-ranged, and the Flower of Fire and Demon Scythe as magical. Reforging these and making use of other damage boosts from Accessories or Armor bonuses can easily push these weapons into damage ranges that will make Hardmode fights relatively balanced.
- Because hardmode relies more upon drops than treasure chests (which don't suddenly respawn with more loot), players will need to kill large numbers of these tougher enemies for items like Souls or Pixie Dust. Consider building mini-bases with proper protections that involve shallow lava pits above small access tunnels that run between Underground Hallow and Corruption/Crimson biomes. Use Active Stone Blocks to make the "doors" that let you jump up and grab floating souls. Place walls to prevent spawns inside your mini-base. You will still need to fight off the occasional Cursed Hammer, but it's a much easier job to farm these enemies when you reduce the threats to a few at a time. Eventually, they will drop either a good weapon, or the resources needed to craft one.
- Mechanical bosses and invasions can take the player off guard. It's best to leave and rejoin if you are ill prepared.
Resources
- Don't throw away your Iron Ore/Bars, Lead Ore/Bars, Bones, Lenses, Vertebrae, and Rotten Chunks, as these are used for crafting Boss-summoning items in Hardmode. If you need to collect more, it may be easier to create a new non-Hardmode world and collect them there, along with any other pre-Hardmode materials you find yourself needing.
- The Eater of Worlds and Eye of Cthulhu are commonly used by players as a good source of money, and this is still useful during the beginning stages of Hardmode. However, summoning them in Hardmode can be more difficult: eg. you've probably destroyed any close Demon Altars (needed to craft the Worm Food and Suspicious Looking Eye), you may have demolished your nearby Corruption farm or Arena, and trips to the naturally-occurring Corruption are now more hazardous (Eater of Worlds must be summoned and fought within Corruption). It is much easier to simply create a new non-Hardmode world to farm these bosses, then use the funds collected from them in your Hardmode world. The Wall of Flesh can be farmed and drops about 8, and items which each sell for approximately 3.
- One way to farm money in Hardmode once you become reasonably able to traverse the Underground Hallow (aside from using a glitch) is to collect Crystal Shards, which are common and sell for 1 59 84 for a full stack of 999 (each one sells for 16). Since they grow naturally on any pearlstone surface facing air, you can mine away stripes of pearlstone in areas you visit often to farm crystals more readily.
- Farming the Destroyer once you can beat it is another way to make a considerable amount of money, since you can farm it without too much additional effort. Because it is relatively easy to kill quickly and can easily be meleed to death (avoiding spending any money on ammunition), the Hallowed Bars it drops can be crafted into Light Discs, together with the Souls of Might it also drops, and with Souls of Light which can be obtained in the Underground Hallow. Each Light Disc sells for 10. As it drops 15-30 Hallowed Bars and 20-40 Souls of Might per kill, that is typically 3-7 Light Discs per run (if you have enough Souls of Light, that is). The Souls of Might it drops may also be sold for additional money, 80 each, which is another 16-32 per run if you don't spend the souls on Light Discs, in addition to the 12 the boss drops. In total, you net 42-82 , and due to the ease of crafting the Mechanical Worm and the relative quickness with which you can dispatch the boss, you can fight it multiple times in a single in-game night.
- Wait to open Crates until Hardmode so as to be able to immediately get some hardmode ores and bars without even smashing any altars or mining. The Enchanted Sundial can also be salvaged from crates; it is an immensely useful item as it allows you to skip a day every week. Even Souls and Ichor/Cursed Flames/Crystal Shards can be looted from crates without even visiting the Hallow/Crimson/Corruption.
History
- 1.2.1: Added messages to help the player progress in hardmode.
- 1.2:
- Jungle, Dungeon, Crimson and Snow biomes are all affected by hardmode now.
- Cobalt/Palladium Drill can not mine Adamantite and Titanium.
- There are 2 new hardmode events.
- A massive amount of Hardmode items/monsters added.
- Early hardmode enemies now do less damage and have less health/defense.
- Hardmode bosses have a chance to spawn on their own to help players progress through the game.
- Current hardmode bosses now do slightly less damage and have had their health decreased.
- 1.1: Introduced.
Template:Translation project