EquazcionBot (talk | contribs) m (replaced: Master mode → Master Mode (2)) |
Tag: Visual edit |
||
| (44 intermediate revisions by 25 users not shown) | |||
| Line 1: | Line 1: | ||
| − | {{ |
+ | {{guide header|2 |
| + | |issue1=Page is bloated: there seems to be a lot of info that new players shouldn't care (notably, summoning weapons). Additionally, some lines create too large spaces and these are caused by icons being too large. Please remove these if applicable, or replace them with smaller ones (map icons for example). |
||
| − | |issue1=Most likely outdated since {{eil|1.4}}. ''Remember '''not to delete pre-1.4 content'''; use {{tl|eicons}} and {{tl|eversions}}!'' |
||
| + | }} |
||
| − | }}{{guide header}} |
||
The [[Eye of Cthulhu]] is one of the first [[bosses]] a player will encounter. The following are some hints, tips, and strategies to help defeat it. |
The [[Eye of Cthulhu]] is one of the first [[bosses]] a player will encounter. The following are some hints, tips, and strategies to help defeat it. |
||
| Line 8: | Line 8: | ||
== Spawn Condition == |
== Spawn Condition == |
||
Eye of Cthulhu can be spawned by fulfilling one of these conditions: |
Eye of Cthulhu can be spawned by fulfilling one of these conditions: |
||
| − | * Have at least {{hp|200}} (200) Health, 10 Defense and at least 3 {{item|NPC|s|image=Guide.png|size=20px}}: it will then have a 33% chance of spawning at the start of the night. Note that this only works when it has yet to be defeated; |
+ | * Have at least {{hp|200|small=1}} (200) Health, 10 Defense and at least 3 {{item|NPC|s|image=Guide.png|size=20px}}: it will then have a 33% chance of spawning at the start of the night. Note that this only works when it has yet to be defeated; |
* Use {{item|Suspicious Looking Eye}} during night. |
* Use {{item|Suspicious Looking Eye}} during night. |
||
| Line 26: | Line 26: | ||
=== Second Phase === |
=== Second Phase === |
||
| − | For the last half of the fight, the boss sheds its iris to reveal a fanged mouth. Make sure to take advantage of its transformation sequence as much as possible, since it just spins in place for a few moments and you can still damage it. It moves slightly faster and deals more damage when it hits you but it also has no defense. It will not be summoning any more servants, so this time it will simply keep rushing at you. When it does so, do not try to attack it - concentrate on dodging. It'll charge you 3 times, and then pause for a few seconds during which you can attack freely. Try to hit it with your strongest weapon |
+ | For the last half of the fight, the boss sheds its iris to reveal a fanged mouth. Make sure to take advantage of its transformation sequence as much as possible, since it just spins in place for a few moments and you can still damage it. It moves slightly faster and deals more damage when it hits you but it also has no defense. It will not be summoning any more servants, so this time it will simply keep rushing at you. When it does so, do not try to attack it - concentrate on dodging. It'll charge you 3 times, and then pause for a few seconds during which you can attack freely. Try to hit it with your strongest weapon. |
| − | For this phase, {{item|Hermes Boots|scale=0.6}} or a variant of them is an asset. With a wide enough [[arena]], running in a straight line while the Eye of Cthulhu does his quick charge is fast enough to avoid any damage |
+ | For this phase, {{item|Hermes Boots|scale=0.6}} or a variant of them is an asset. With a wide enough [[arena]], running in a straight line while the Eye of Cthulhu does his quick charge is fast enough to avoid any damage. |
| − | ==== Expert Mode ==== |
+ | ==== Expert and Master Mode ==== |
In the first phase of the fight it is more aggressive, acting very similarly to first phase it spawns servants while floating around the player, and will occasionally make a few lunges. It also enters the second phase at 65% health instead of 50%, spawning a lot of servants in that process. A piercing weapon is recommended for eliminating the servants. |
In the first phase of the fight it is more aggressive, acting very similarly to first phase it spawns servants while floating around the player, and will occasionally make a few lunges. It also enters the second phase at 65% health instead of 50%, spawning a lot of servants in that process. A piercing weapon is recommended for eliminating the servants. |
||
In this part of the fight, after the 3 normal charges it will perform a brief series of extremely quick dashes at a steeper angle. As its health goes down, the Eye will use this ability more frequently, until its only action is to dart haphazardly back and forth, making it rather hard to hit. To avoid the charges, [[Hermes Boots]] should be used at the bare minimum. |
In this part of the fight, after the 3 normal charges it will perform a brief series of extremely quick dashes at a steeper angle. As its health goes down, the Eye will use this ability more frequently, until its only action is to dart haphazardly back and forth, making it rather hard to hit. To avoid the charges, [[Hermes Boots]] should be used at the bare minimum. |
||
| − | |||
| − | ==== Master Mode ==== |
||
| − | In the first phase of the fight is almost identical to expert mode, it spawns several servants at a time while floating around the player, and will occasionally make a few lunges. It also enters the second phase at 65% to 70% health instead of 50%, spawning a lot of servants in that process. A piercing weapon is recommended for eliminating the servants. |
||
| − | |||
| − | In this part of the fight, after the 3 normal charges it will perform a brief series of extremely quick dashes at a steeper angle. As its health goes down, the Eye will use this ability more frequently, until its only action is to dart haphazardly back and forth, this normally occur's around 60% to 50%, making it rather hard to hit. To avoid the charges, [[Hermes Boots]] with a {{item|Swiftness Potion|scale=0.6}} should be used at the bare minimum. |
||
== General Strategies == |
== General Strategies == |
||
=== General Tips === |
=== General Tips === |
||
| − | {{transclude|Guide:Practical |
+ | {{transclude|Guide:Practical tips#Combat}} |
=== Terrain preparation === |
=== Terrain preparation === |
||
| Line 48: | Line 43: | ||
An arena for the Eye of Cthulhu should be large enough to dodge and maneuver around in. The recommended size is just about the size of the screen, as the boss does not require a lot of mobility. |
An arena for the Eye of Cthulhu should be large enough to dodge and maneuver around in. The recommended size is just about the size of the screen, as the boss does not require a lot of mobility. |
||
| − | The simplest arena design consists of multiple rows of wooden [[platform]]s to have more room to jump and dodge. As the fight will be at night, add [[torch]]es to improve visibility. Remember to adjust the distance between platforms depending on your jump height (this is 6 tiles at minimum, depending on which accessories you have), and consider placing some ladders (with platforms or [[rope]]) to aid your vertical movement. |
+ | The simplest arena design consists of multiple rows of wooden [[platform]]s to have more room to jump and dodge. As the fight will be at night, add [[torch]]es to improve visibility. Remember to adjust the distance between platforms depending on your jump height (this is 6 tiles at minimum, depending on which accessories you have), and consider placing some ladders (with platforms or [[rope]]) to aid your vertical movement. |
| − | Another design is a long, completely flat surface. This allows you to dodge the Eye by running to the left or the right with Swiftness Potions or Hermes Boots. |
+ | Another design is a long, completely flat surface. This allows you to dodge the Eye by running to the left or the right with Swiftness Potions or Hermes Boots. |
| + | |||
| + | One of the easiest ways to defeat the Eye is a long, stretch of sand paired with [[Dunerider Boots]]. Due to the speed boost gained on sand, it can be used as a surefire way to make dodging the Eye incredibly easy, making the fight trivial itself.<section end="eocarenas" /> |
||
=== Gearing up === |
=== Gearing up === |
||
==== Armor ==== |
==== Armor ==== |
||
| − | The best armor to have at this point would be [https://terraria.gamepedia.com/index.php?search=Ancient%20Shadow%20armor&title=Special%3ASearch Ancient Shadow Armor], {{item|Gold Helmet|Gold Armor|scale=0.6}} or {{item|Platinum Helmet|Platinum armor|scale=0.6}}, although they can be difficult to obtain. Consider using these sets if you are having trouble beating the boss with weaker armors. |
||
| − | |||
| ⚫ | A full set of {{item|Silver Helmet|Silver Armor|scale=0.6}} or {{item|Tungsten Helmet|Tungsten Armor|scale=0.6}} is easier to get at this point, and it is a good choice for this fight |
||
| − | In {{eversions|1. |
+ | In {{eversions|1.4.1}}, the {{item|Ninja Hood|Ninja Armor|scale=0.6}} provides critical hit and speed boosts which benefit all classes. While it has less defense than ore armors, it will end the fight faster and help you to dodge. In {{eversions|1.3.0.1|short|desktop=n}} versions, it enhances the combat potential of throwing items, which are extremely effective against the boss. In all versions, it requires defeating [[King Slime]], who can be farmed by creating [[Slime Crown]]s. |
| ⚫ | For defense, the best armor to have at this point would be {{item|Gold Helmet|Gold Armor|scale=0.6}} or {{item|Platinum Helmet|Platinum armor|scale=0.6}}, although they can be difficult to obtain. A full set of {{item|Silver Helmet|Silver Armor|scale=0.6}} or {{item|Tungsten Helmet|Tungsten Armor|scale=0.6}} is easier to get at this point, and it is a good choice for this fight. On the {{3DS version}}, the {{item|Boots of Ostara|scale=0.6}} can be paired with [[Silver armor]] to complete the set bonus while increasing jump abilities, although using it with [[Tungsten armor]] will not grant the set bonus. |
||
| − | The weaker {{item|Iron Helmet|Iron Armor|scale=0.6}} or {{item|Lead Helmet|Lead Armor|scale=0.6}} sets can be used, but caution must be taken, especially in the second phase, and should only be used if you are a good dodger. |
||
If using magic weapons, you can use the {{item|Wizard Hat|Wizard set|link=Wizard set|scale=0.6}}, which provides big buffs to magic weapon's stats. |
If using magic weapons, you can use the {{item|Wizard Hat|Wizard set|link=Wizard set|scale=0.6}}, which provides big buffs to magic weapon's stats. |
||
If using ranged (or throwing in the {{eversions|Fossil armor|not=1.4.0.1|short=y}}) weapons, the {{item|Fossil Helmet|Fossil armor's|scale=0.6}} set bonus can aid in defeating the boss quickly. |
If using ranged (or throwing in the {{eversions|Fossil armor|not=1.4.0.1|short=y}}) weapons, the {{item|Fossil Helmet|Fossil armor's|scale=0.6}} set bonus can aid in defeating the boss quickly. |
||
| + | |||
| + | On the {{3DS version}}, bones drop from skeletons, so [[Necro armor]] can be used here. |
||
| + | |||
| + | The only choice for summoners at this point is the {{item|Flinx Fur Coat|scale=0.6}}. |
||
==== Weapons ==== |
==== Weapons ==== |
||
In general, long-range piercing weapons are recommended, as they are able to take out Servants and hit the boss. |
In general, long-range piercing weapons are recommended, as they are able to take out Servants and hit the boss. |
||
| − | ; For Melee Users |
+ | ; For Melee Users |
| + | |||
Melee's options are fairly limited at this point, and mostly serve as a way to take out the low-hp [[Servant of Cthulhu|Servants of Cthulhu]]. Certain melee weapons are able to launch projectiles, but may be difficult to come across. |
Melee's options are fairly limited at this point, and mostly serve as a way to take out the low-hp [[Servant of Cthulhu|Servants of Cthulhu]]. Certain melee weapons are able to launch projectiles, but may be difficult to come across. |
||
| − | * [[Swords]] aren't very helpful against the boss itself, but can make short work of the Servants of Cthulhu without the need to aim. You should aim for a |
+ | * [[Swords]] aren't very helpful against the boss itself, but can make short work of the Servants of Cthulhu without the need to aim. You should aim for a {{item|Gold Broadsword|scale=0.6}} or a {{item|Platinum Broadsword|scale=0.6}} at this point, but if you've been lucky and found enough {{item|Demonite Ore|Demonite|scale=0.6}} or {{item|Crimtane Ore|scale=0.6}}, you can craft a {{item|Light's Bane|scale=0.6}} or a {{item|Blood Butcherer|scale=0.6}}, which will perform even better. |
| ⚫ | * Using projectile-launching broadswords instead of regular broadswords is highly recommended, as their sword slash can take out nearby servants and their projectile can hit the boss itself. Their only downside is that they can be rather difficult to come across compared to regular broadswords. The three projectile swords available at this point are the {{item|Enchanted Sword|scale=0.6}} found rarely throughout the world, in [[Enchanted Sword Shrines]], or in [[Golden Crate]]s {{eicons|1.4.0.1}}, the {{item|Ice Blade|scale=0.6}} found in [[Frozen Chest]]s in the [[Ice biome]], and the {{item|Starfury|scale=0.6}} found on [[Floating Island]]s. |
||
| + | *A flail weapon such as the {{item|Flaming Mace|scale=0.6}} or {{item|Ball O' Hurt|scale=0.6}} can be useful due to their high speed and the ability to use the throw attack to deal high damage. |
||
| ⚫ | * [[Spears]] can be helpful, hitting both the boss itself ''and'' the servants with the same hit. Most spears available at this point are lacking in range, so consider using a more ranged weapon when the boss is in motion. The recommended spear at this point is {{item|The Rotted Fork|scale=0.6}}, otherwise the {{item|Trident|scale=0.6}} found in [[Water Chest]]s should suffice. In {{eversions|1.4.0.1}}, the {{item|Storm Spear|scale=0.6}}, obtainable in the [[Underground Desert]], has a ranged projectile that allows the player to keep their distance during the fight. |
||
| ⚫ | * [[File: Enchanted Boomerang.png|12px]] [[Boomerangs]] can be of great use due to their long range, but missing with a boomerang can leave the player open for a moment. An {{item|Enchanted Boomerang|Enchanted|scale=0.6}} or {{item|Ice Boomerang|scale=0.6}} would be preferred. A {{item|Wooden Boomerang|scale=0.6}} is not recommended, due to low damage. |
||
| ⚫ | * {{eil|Yoyos}} are another type of melee weapon, and excel against the boss. The strongest available is the {{item|Amazon|scale=0.6|icons=no}}, although it requires venturing into the [[Underground Jungle]] early on. If a large amount of {{item|Demonite Ore|Demonite|scale=0.6}} or {{item|Crimtane Ore|scale=0.6}} has been obtained, a {{item|Malaise|scale=0.6|icons=no}} or {{item|Artery|scale=0.6|icons=no}} can be crafted. A {{item|Rally|scale=0.6|icons=no}} is readily available, but requires some luck and is weaker. |
||
| ⚫ | |||
| ⚫ | * Using projectile-launching broadswords instead of regular broadswords is highly recommended, as their sword slash can take out nearby servants and their projectile can hit the boss itself. Their only downside is that they can be rather difficult to come across compared to regular broadswords. The three projectile swords available at this point are the {{item|Enchanted Sword|scale=0.6}} found rarely throughout the world |
||
| ⚫ | * [[Spears]] can be helpful, hitting both the boss itself ''and'' the servants with the same hit. |
||
| ⚫ | * [[File: Enchanted Boomerang.png|12px]] [[Boomerangs]] can be of great use due to their long range, but missing with a boomerang can leave the player open for a moment. An {{item|Enchanted Boomerang|Enchanted|scale=0.6}} or {{item|Ice Boomerang|scale=0.6}} would be preferred. A {{item|Wooden Boomerang|scale=0.6}} is not recommended, due to low damage. |
||
| ⚫ | * {{eil|Yoyos}} are another type of melee weapon, and excel against the boss. |
||
| + | * [[Bows]] are some of the best weapons available at the moment. The best one right now is likely either the {{item|Gold Bow|scale=0.6}} or {{item|Platinum Bow|scale=0.6}}. If you happened to find a large quantity of {{item|Demonite Ore|Demonite|scale=0.6}} or {{item|Crimtane Ore|scale=0.6}}, you can craft a {{item|Demon Bow|Demon|scale=0.6}} or {{item|Tendon Bow|scale=0.6}}. |
||
| ⚫ | |||
| − | * |
+ | ** {{item|Frostburn Arrow|Frostburn Arrows|scale=0.6}} deal the most damage to the boss itself and inflict [[Frostburn]], but {{item|Jester's Arrow|Jester's Arrows|scale=0.6}} can kill the Servants and hurt the Eye in the same shot. {{item|Flaming Arrow|s|scale=0.6}} are a good fallback option, in case your primary arrow choice runs out. |
| + | * {{eicons|1.4.0.1}} {{item|Bone Javelin|s|scale=0.6|icons=no}} are considered ranged in 1.4, and are cheap and powerful against the Eye of Cthulhu. They do damage similar to the [[Ruby Staff]] and apply up to 18 dps in debuffs. |
||
* The {{item|Snowball Cannon|scale=0.6}} is another fast firing weapon to use, doing decently against both phases. |
* The {{item|Snowball Cannon|scale=0.6}} is another fast firing weapon to use, doing decently against both phases. |
||
| − | *The {{item|Paintball Gun|scale=0.6}}with its fast fire rate and high critical strike chance works well if you can manage to |
+ | * The {{item|Paintball Gun|scale=0.6}}with its fast fire rate and high critical strike chance works well if you can manage to kill the {{item|Painter|size=20px}} enough times. |
| − | * While obtaining guns before first defeating this boss may be difficult (generally requiring exploring deep inside [[The Corruption]] / [[The Crimson]]), the {{item|Minishark|scale=0.6}} is extremely useful |
+ | * While obtaining guns before first defeating this boss may be difficult (generally requiring exploring deep inside [[The Corruption]] / [[The Crimson]]), the {{item|Minishark|scale=0.6}} is extremely useful as the second phase of the boss has no [[defense]] allowing the Minishark to hit rapidly for full damage. However, in its first phase, the boss has 12 defense, allowing the Minishark to do lower damage per hit. Therefore, a {{Item|Musket|scale=0.5}} or {{Item|The Undertaker|scale=0.5}} would be more effective at this stage of the fight. The Minishark is able to deal damage slightly easier than other conventional projectile weapons pre-[[Hardmode]] while the boss is charging rapidly due to its high rate of fire and fast projectile speed. |
| − | *If you were lucky enough to find it, the {{item|Boomstick|scale=0.6}} is useful in the fight due to the large spread of bullets and high damage. |
+ | * If you were lucky enough to find it, the {{item|Boomstick|scale=0.6}} is useful in the fight due to the large spread of bullets and high damage. |
| + | * If purchasing the ammo for the weapons, {{item|Wooden Arrow|s|scale=0.6}} will cost less than {{item|Musket Ball|s|scale=0.6}}, but guns may be a better choice due to their straight projectile trajectory. |
||
| + | |||
| ⚫ | |||
| ⚫ | |||
Magic weapons are mainly good for beating on the boss itself, but can also be used to attack servants in a pinch. All magic weapons at this point are able to pierce through multiple enemies. More adventurous players can get their hands on much better weapons, and these should certainly be used for later "repeat engagements": |
Magic weapons are mainly good for beating on the boss itself, but can also be used to attack servants in a pinch. All magic weapons at this point are able to pierce through multiple enemies. More adventurous players can get their hands on much better weapons, and these should certainly be used for later "repeat engagements": |
||
| − | * {{item|Diamond Staff|Gem Staves|link=Gem staves|scale=0.6}} are the usual Magic weapon of choice at this point, with their long ranged piercing shots being a perfect fit for the boss battle. You should try for the {{item|Diamond Staff|Diamond|scale=0.6}} or {{item|Ruby Staff|Ruby staves|scale=0.6}}, with {{item|Emerald Staff|Emerald|scale=0.6}} or {{item|Sapphire Staff|Sapphire|scale=0.6}} as second-best. The {{item|Amethyst Staff|Amethyst|scale=0.6}} and {{item|Topaz Staff|Topaz staves|scale=0.6}}are too short on damage for this fight. The {{item|Amber Staff|scale=0.6}} is not worthwhile, because obtaining [[Amber]] and [[Sturdy Fossil |
+ | * {{item|Diamond Staff|Gem Staves|link=Gem staves|scale=0.6}} are the usual Magic weapon of choice at this point, with their long ranged piercing shots being a perfect fit for the boss battle. You should try for the {{item|Diamond Staff|Diamond|scale=0.6}} or {{item|Ruby Staff|Ruby staves|scale=0.6}}, with {{item|Emerald Staff|Emerald|scale=0.6}} or {{item|Sapphire Staff|Sapphire|scale=0.6}} as second-best. The {{item|Amethyst Staff|Amethyst|scale=0.6}} and {{item|Topaz Staff|Topaz staves|scale=0.6}} are too short on damage for this fight. The {{item|Amber Staff|scale=0.6}} is not worthwhile, because obtaining [[Amber]] and [[Sturdy Fossil]]s requires exploration of the [[Underground Desert]] biome, which is very dangerous without post-Eye of Cthulhu gear (plus on {{eversions|Amber Staff|not=1.4.0.1|short=y}} it is even less likely that you have a pickaxe able to mine [[Desert Fossil]]s), and it is statwise-equivalent to the Ruby Staff. |
| − | * |
+ | * In {{eversions|1.4.0.1|invert=y|short}} versions, a {{item|Water Bolt|scale=0.6}} can be found on shelves in the [[Dungeon]]. If you get one, it can replace the [[Gem staves]] entirely. It will help to put solid-block walls around your arena, so you can make use of the [[Water Bolt]]'s ricocheting projectiles. |
| − | * Those players who have delved into |
+ | * Those players who have delved into an [[Evil biome]] may be able to get hold of the powerful magic weapons found in {{item|Shadow Orb|s|scale=0.6}}, {{item|Crimson Heart|s|scale=0.6}}, or the [[Crates]] fished up in these biomes. The{{item|Vilethorn|scale=0.6}} lacks some range, but the lingering thorn can hit the boss and servants many times, and can even pass through walls to hit it. The {{item|Crimson Rod|scale=0.6}} is similarly useful, as clouds can be set up to clear out the servants while also dealing steady damage to the boss. |
| − | *Those who have not only broken orbs/hearts, but gathered {{item|Meteorite|scale=0.6}} ore from the resulting crash sites |
+ | * {{eicons|1.4.0.1|invert=y}} Those who have not only broken orbs/hearts, but gathered {{item|Meteorite|scale=0.6}} ore from the resulting crash sites, can use the {{item|Space Gun|scale=0.6}}, with its fast velocity and piercing properties. It does use a lot of mana unless you pair it with {{item|Meteor Helmet|Meteor Armor|scale=0.6}}, which makes it free. Both weapon and armor are crafted with {{item|Meteorite Bar|s|scale=0.6}}. |
| − | ; For Summoners |
+ | ; For Summoners |
| − | A Summoner's options are ''extremely'' limited at this point of the game. Because there are only 3 ({{eicons|Hornet Staff|not=Finch Staff}}) / 5 ({{eicons|Finch Staff}}) [[summon weapons]] available pre-hardmode, summoners have a very tight selection available, made worse because many of these weapons are extremely difficult to obtain at the point you have to fight the Eye. If playing on the {{eversions|Finch Staff}}, there is (at least) one viable early-game option for you to use, but you may not have gotten lucky enough to find one yet, and it is so weak that it is only useful with other weapons to back it up, particularly some kind of [[whip]]. For first-time or unskilled players on the {{eversions|Hornet Staff|not=Finch Staff}}, it's better to completely avoid focusing on the Summoner class until later in the game. (For those who still want to try, get ready for a ''much'' harder challenge.) |
||
| + | Most summons available at this point are not strong enough to defeat the Eye of Cthulhu alone, especially on higher difficulty levels. Using a whip is essential, but using weapons from other classes is suggested for beginning players. |
||
| − | * {{item|Finch Staff|mode=image|size=22px}} {{item|Baby Finch|image=Finch.gif|nolink=y|mode=image|size=22px}} The {{item|Finch Staff|scale=0.6}} is by far the most easily-obtainable early-game summon weapon. While it is not by any means a very damaging weapon, being inferior in damage to even the Slime Staff (see below), its minion does have high mobility (being able to fly). Furthermore, obtaining a whip can further boost the effectiveness of this staff (see the list of recommended whips below). Obtaining it requires some luck, as (unless playing on [[Journey mode]]) it is only found inside [[Living Wood Chest]]s. |
||
| − | * [[File:Slime_Staff.png|22px]] [[File:Baby_Slime_(minion)_(animated).gif|22px]] The {{item|Slime Staff|scale=0.6}} does not require that you fight a much stronger boss or travel to a very dangerous place. Unfortunately, it is locked behind a 0.01% / {{expert|0.014%}} drop chance for all [[Slimes]] and [[Zombie|Slimed Zombies]] with the minor exceptions of {{item|Pinky|scale=0.6}} and the {{item|Sand Slime|scale=0.6}}. The Baby Slime deals very little damage but it can be boosted significantly by the [[Leather Whip]] or [[Snapthorn]]. The {{eversions|Finch Staff}}, a flying minion, may be a better option. Alternatively, platforms can be used to help the slime reach the eye. |
||
| − | * {{item|Vampire Frog Staff|mode=image|size=22px}} {{item|Vampire Frog (minion)|ext=gif|nolink=y|mode=image|size=22px}} The {{item|Vampire Frog Staff|scale=0.6}} is deals better damage than the Slime Staff, it is incapable of flight, thus requiring platforms to be able to reach the Eye. Also, obtaining it requires [[fishing]] during a [[Blood Moon]] - a dangerous prospect before your first boss fight, especially because the enemies that drop this staff can and will easily kill early-game players. |
||
| − | * {{item|Hornet Staff|mode=image|size=22px}} {{item|Hornet|image=Hornet (minion).gif|nolink=y|mode=image|size=22px}} The {{item|Hornet Staff|scale=0.6}} is another choice that is much more effective, but much harder to obtain - thus probably not recommended for your first fight. As well as dealing decent damage, the Hornet minion can inflict the {{item|Poisoned|scale=0.6}} debuff against enemies, and can fly quickly. This staff can only be crafted with {{item|Bee Wax|scale=0.6}}, which is a drop from the {{item|Queen Bee|scale=0.4}} - itself likely a more difficult fight than this one, and in a rather inaccessible location that is dangerous to early-game players. |
||
| − | * [[File:Imp_Staff.png|22px]] [[File:Flying_Imp.gif|24px]] The {{item|Imp Staff|scale=0.6}} is the most powerful summoner weapon available pre-Hardmode, as the flying imps deal 17 ({{eicons|1.4.0.1}}) / 21 ({{eicons|Imp Staff|not=1.4.0.1}}) damage and inflict the {{item|On Fire!|scale=0.6}} debuff against enemies, at the cost of being completely ineffective underwater - a flaw that does not come into play when fighting the Eye of Cthulhu. To get this weapon, you need to craft it on an anvil with 17 {{item|Hellstone Bar|s|scale=0.6}}, the most powerful ore before hardmode only found in [[The Underworld]], the last location you visit before fighting the {{item|Wall of Flesh|scale=0.1}} and activating [[hardmode]]. Ironically, if in version 1.3, out of all the three summoner weapons, this is the ''easiest'' to acquire, (in 1.4 being the {{item|Finch Staff|mode=image|size=22px}} {{item|Baby Finch|image=Finch.gif|nolink=y|mode=image|size=22px}} [[Finch Staff]]) – but is by no means truly easy. Assuming you can fish up a {{item|Reaver Shark|scale=0.6}} (Note: This doesn't work in 1.4 anymore, as the [[Reaver Shark]] can now only mine up to Demonite/Crimtane), it is only a matter of playing with water and lava to produce and mine {{item|Obsidian|scale=0.6}}, and carefully mining {{item|Hellstone|scale=0.6}}. Caution is necessary, as the enemies in the Underworld are very dangerous and can easily kill you. For more information, see [[Guide:Mining_techniques#Mining_Hellstone]]. |
||
| + | * The [[Flinx Staff]] is the best summon weapon available at this point in the game for most players. Weaker or rarer alternatives include the [[Finch Staff]] and [[Slime Staff]]. For those able to defeat [[Blood Moon]] enemies, the {{item|Vampire Frog Staff|scale=0.6}} is even stronger. Both struggle with flying enemies, requiring platforms. |
||
| − | In the {{eversions|Whips}}, [[Whips]] were introduced as a melee-like weapon for summoners to use which enhance the damage output of their summoning staves. There are only two whips available pre-Hardmode, as follows: |
||
| − | * The {{item|Leather Whip}} is the most practical option at this point in the game, as it is obtained from the {{item|Zoologist|size= |
+ | * The {{item|Leather Whip|scale=0.6}} is the most practical option at this point in the game, as it is obtained from the {{item|Zoologist|size=18px}} NPC (if you have one). Unlocking should be possible with some careful exploration. |
| − | * The {{item|Snapthorn}} is much less practical for your first fight, as it is crafted from items only found in the [[Underground Jungle]], which is highly dangerous this early in the game. |
+ | * The {{item|Snapthorn|scale=0.6}} is much less practical for your first fight, as it is crafted from items only found in the [[Underground Jungle]], which is highly dangerous this early in the game. |
| + | * {{eicons|Imp Staff|not=1.4.0.1}} The {{item|Imp Staff|scale=0.6|icons=no}} is the most powerful summoner weapon available pre-Hardmode, as the flying imps deal 21 damage and inflict the {{item|On Fire!|scale=0.6}} debuff against enemies, at the cost of being completely ineffective underwater. This item can be obtained by fishing up the [[Reaver Shark]] and mining [[Hellstone]] in [[The Underworld]], a difficult and dangerous place. |
||
| − | ; For Throwing Users : |
+ | ; For {{eicons|1.4.0.1|invert=y}} Throwing Users : |
Thrown weapons are at their best at this stage of the game, with a wide selection of effective weapons to use against this boss. Most of them are also cheap or easy to obtain, allowing the player to rack up stacks of thrown weapons. |
Thrown weapons are at their best at this stage of the game, with a wide selection of effective weapons to use against this boss. Most of them are also cheap or easy to obtain, allowing the player to rack up stacks of thrown weapons. |
||
* {{item|Shuriken|s}} are an effective weapon which can be bought from the {{item|Merchant|scale=0.6}}. They will hit up to 4 times, allowing a well aimed shot to kill a Servant and hit the Eye twice - even three times, if it falls back through the boss. 500 or so are more than enough to defeat this boss with relative ease. |
* {{item|Shuriken|s}} are an effective weapon which can be bought from the {{item|Merchant|scale=0.6}}. They will hit up to 4 times, allowing a well aimed shot to kill a Servant and hit the Eye twice - even three times, if it falls back through the boss. 500 or so are more than enough to defeat this boss with relative ease. |
||
* {{item|Throwing Knife|Throwing Knives}} or {{item|Poisoned Knife|Poisoned Knives|scale=0.6}} perform similarly to [[Shuriken|Shurikens]] but do a lot more damage. |
* {{item|Throwing Knife|Throwing Knives}} or {{item|Poisoned Knife|Poisoned Knives|scale=0.6}} perform similarly to [[Shuriken|Shurikens]] but do a lot more damage. |
||
| − | *{{item|Grenade|s}} cause high damage and hurt everything in their blast, but may pose as much danger to the player as they do to the boss. Since the Eye will be spawning Servants or charging at the player most of the time, it's difficult to keep a safe distance from the explosion. If desired, Grenades can be purchased from the {{item|Demolitionist|size=20px}}. A good strategy for Grenades is to lay them like a quick trap. As the Eye charges at you, you can predict its movements. Throw a grenade underneath you and run away as the Eye begins to charge. If timed correctly, the grenade will explode on contact with the Eye and you will be unharmed. |
+ | * {{item|Grenade|s}} cause high damage and hurt everything in their blast, but may pose as much danger to the player as they do to the boss. Since the Eye will be spawning Servants or charging at the player most of the time, it's difficult to keep a safe distance from the explosion. If desired, Grenades can be purchased from the {{item|Demolitionist|size=20px}}. A good strategy for Grenades is to lay them like a quick trap. As the Eye charges at you, you can predict its movements. Throw a grenade underneath you and run away as the Eye begins to charge. If timed correctly, the grenade will explode on contact with the Eye and you will be unharmed. |
| ⚫ | |||
| − | *{{item|Beenade|Beenade's|scale=0.6}} (if you can even get your hands on them) are useful for the start of the second stage often taking care of the minions before they can get close enough to harm you. the bees may also deal a grand amount of damage to the boss. there usefulness drops slightly in the second stage as the bees cant keep up with the boss very well. |
||
| ⚫ | |||
| ⚫ | |||
| ⚫ | |||
* {{item|Spiky Ball|s}} are very helpful in its second phase if you scatter them all over the floor of your arena. |
* {{item|Spiky Ball|s}} are very helpful in its second phase if you scatter them all over the floor of your arena. |
||
==== Accessories ==== |
==== Accessories ==== |
||
* A {{item|Cloud in a Bottle|scale=0.6}} or equivalents can aid in avoiding the rams, although this is less necessary with a good [[arena]]. |
* A {{item|Cloud in a Bottle|scale=0.6}} or equivalents can aid in avoiding the rams, although this is less necessary with a good [[arena]]. |
||
| + | * The {{item|Fledgling Wings|link=Wings|scale=0.6}} can be used to give the player short flight time and immunity to fall damage. |
||
* A {{item|Grappling Hook|link=Hooks|scale=0.6}} is also very useful if you can grapple onto platforms above you quickly. |
* A {{item|Grappling Hook|link=Hooks|scale=0.6}} is also very useful if you can grapple onto platforms above you quickly. |
||
| − | * {{item|Hermes Boots|scale=0.6}} or equivalents help by making it easier |
+ | * {{item|Hermes Boots|scale=0.6}} or equivalents help by making it easier to dodge the second phase's rams. In Expert Mode, these are almost required, as the Eye of Cthulhu will perform rapid dashing attacks. |
* The {{item|Shark Tooth Necklace|scale=0.6}} will give a significant damage boost to most weapons available at the moment. |
* The {{item|Shark Tooth Necklace|scale=0.6}} will give a significant damage boost to most weapons available at the moment. |
||
* If you find one, a {{item|Band of Regeneration|scale=0.6}} can help speed up life regeneration, making lasting a longer fight easier. A {{item|Mana Regeneration Band|scale=0.6}} should also be used for Magic players, as it regenerates Mana faster. |
* If you find one, a {{item|Band of Regeneration|scale=0.6}} can help speed up life regeneration, making lasting a longer fight easier. A {{item|Mana Regeneration Band|scale=0.6}} should also be used for Magic players, as it regenerates Mana faster. |
||
| Line 128: | Line 128: | ||
==== Potions ==== |
==== Potions ==== |
||
| − | * The most helpful potions are the {{item|Regeneration Potion|scale=0.6}}, the {{item|Ironskin Potion|scale=0.6}}, the {{ |
+ | * The most helpful potions are the {{item|Regeneration Potion|scale=0.6}}, the {{item|Ironskin Potion|scale=0.6}}, the {{item|Endurance Potion|scale=0.6}}, {{item|Wrath Potion|scale=0.6}} and the {{item|Swiftness Potion|scale=0.6}}. |
* Any food item that gives the {{item|Well Fed|scale=0.6}} buff is welcomed, especially so for [[Expert Mode]] and [[Master Mode]]. |
* Any food item that gives the {{item|Well Fed|scale=0.6}} buff is welcomed, especially so for [[Expert Mode]] and [[Master Mode]]. |
||
* {{item|Archery Potion|scale=0.6}} significantly increases the damage output of bows. |
* {{item|Archery Potion|scale=0.6}} significantly increases the damage output of bows. |
||
| Line 138: | Line 138: | ||
== Specific Strategies == |
== Specific Strategies == |
||
=== Slimy Saddle Strategy === |
=== Slimy Saddle Strategy === |
||
| − | An excellent strategy to beat the Eye is to use the {{item|Slimy Saddle|scale=0.6}} and bounce on the eye while at the same time attacking it with a ranged weapon. The eye will move toward you and you will bounce on top of it continuously dealing damage. If you want to try this strategy, make sure you have some forms of preventing fall damage (i.e,) the {{item|Lucky Horseshoe|scale=0.6}}, [[Hooks|Grappling Hook]], an {{item|Umbrella|scale=0.6}}, or {{item|Cloud in a Bottle|scale=0.6}}. |
+ | An excellent strategy to beat the Eye is to use the {{item|Slimy Saddle|scale=0.6}} and bounce on the eye while at the same time attacking it with a ranged weapon. The eye will move toward you and you will bounce on top of it continuously dealing damage. If you want to try this strategy, make sure you have some forms of preventing fall damage (i.e,) the {{item|Lucky Horseshoe|scale=0.6}}, [[Hooks|Grappling Hook]], an {{item|Umbrella|scale=0.6}}, or {{item|Cloud in a Bottle|scale=0.6}} or [[File:Fledgling Wings.png|frameless]] [[Wings|Fledgling wings]]. |
=== Magic Mirror Strategy === |
=== Magic Mirror Strategy === |
||
| − | During the Second Phase, if you have your spawn point nearby, you can run one way and attack, and just when you think that the Eye is going to charge, use a {{item|Magic Mirror|scale=0.6}}, |
+ | During the Second Phase, if you have your spawn point nearby, you can run one way and attack, and just when you think that the Eye is going to charge, use a {{item|Magic Mirror|scale=0.6}}, {{item|Ice Mirror|Scale=0.6}} or {{item|Recall Potion|scale=0.6}} to teleport to spawn, now running the other way, evading the attack and being left to open fire. |
=== Railway Strategy === |
=== Railway Strategy === |
||
Another great strategy is to build a long railway at least 400 blocks long, with each end hammered into a bumper. When the Eye spawns, start moving and continue to move whilst shooting at it. It may take longer than other methods, but it requires little mobility and you take minimal damage. Also, this strategy works better if in single player or all players in a [[multiplayer]] world are together in the same area. |
Another great strategy is to build a long railway at least 400 blocks long, with each end hammered into a bumper. When the Eye spawns, start moving and continue to move whilst shooting at it. It may take longer than other methods, but it requires little mobility and you take minimal damage. Also, this strategy works better if in single player or all players in a [[multiplayer]] world are together in the same area. |
||
| − | === |
+ | === Rail Loop Strategy === |
| + | This method is only recommended when fighting on Expert or Master difficulty, underprepared. Building a rhombus with around 200 rails and going on a minecart will make it diificult for the boss to hit you, but it will also be hard to deal damage. A fast firing weapon with easily obtainable ammo (like [[Snowball Cannon]] or [[Minishark]]) will do best with this strategy. The fight will take longer than usual, but you will evade most of hits from the boss, and with a fast minecart, you might not even take damage. This may work on [[Queen Bee]], but the fight will take what feels like an eternity, and a [[Magic Missile]] or a [[Flamelash]] will help a lot due to fast projectile speed and homing. |
||
| ⚫ | |||
| + | |||
| + | === Pathway strategy === |
||
| ⚫ | |||
This strategy requires 2 long pathways made out of [[Platforms|Platforms]] in the sky, one on top of the other. Make sure that the platforms are parallel to each other and at least 4 blocks apart. Make sure the length of the 2 platforms are around 200 to 500 blocks. Place {{item|Campfire|scale=0.6}}s every 20 to 40 blocks, if you can afford it, place a {{item|Heart Lantern|scale=0.6}} and/or a {{item|Star in a Bottle|scale=0.6}} near the campfires. |
This strategy requires 2 long pathways made out of [[Platforms|Platforms]] in the sky, one on top of the other. Make sure that the platforms are parallel to each other and at least 4 blocks apart. Make sure the length of the 2 platforms are around 200 to 500 blocks. Place {{item|Campfire|scale=0.6}}s every 20 to 40 blocks, if you can afford it, place a {{item|Heart Lantern|scale=0.6}} and/or a {{item|Star in a Bottle|scale=0.6}} near the campfires. |
||
| Line 157: | Line 160: | ||
This strategy is slightly harder to execute the first time but if done effectively it will be easier in the future. |
This strategy is slightly harder to execute the first time but if done effectively it will be easier in the future. |
||
| − | This strategy can be reused for |
+ | This strategy can be reused for {{item|The Twins|scale=0.2}}, {{item|King Slime|scale=0.3}} and {{item|Queen Bee|scale=0.3}}. It is not recommended for them but it is possible.{{Guides}} |
[[fr:Guide:Stratégies de l'Œil de Cthulhu]] |
[[fr:Guide:Stratégies de l'Œil de Cthulhu]] |
||
Revision as of 17:34, 3 June 2021
The Eye of Cthulhu is one of the first bosses a player will encounter. The following are some hints, tips, and strategies to help defeat it.

| Type | |
|---|---|
| Environment | |
| AI Type | Eye of Cthulhu AI |
| Damage | 15/30/45 |
| Max Life | 2800/3640/4641 |
| Defense | 12 |
| KB Resist | 100% |
| Immune to |
| Coins | 3750 |
|---|
| Hurt | |
|---|---|
| Killed |
- Internal NPC ID: 4

| Type | |
|---|---|
| Environment | |
| AI Type | Duke Fishron AI |
| Damage | 2336 40 when below 145 health54 60 when below 185 health [1] |
| Max Life | 1400/28002366/36403016/4641 |
| Defense | 0 [1] |
| KB Resist | 100% |
| Immune to |
| Coins | 3750 |
|---|
- Item (Quantity)Rate
- Only in Corruption worlds [2]
 Demonite Ore (30-90)100%
- Unholy Arrow (20-50)100%
- Corrupt Seeds (1-3)100%
- Only in Crimson worlds [2]
- Crimtane Ore (30-90)100%
- Crimson Seeds
(1-3)100% - 2.5%
- Lesser Healing Potion (5-15)100%
- Badger's Hat
(when defeated on the same day
as the Wall of Flesh) [3]100% - 14.29%
- 10%
- 100%
- Treasure Bag
(Eye of Cthulhu) - 100%
- 14.29%
- 3.33%
- Only in Corrupt worlds [2]
- Demonite Ore (30-90)100%
- Unholy Arrow (20-50)100%
- Corrupt Seeds (1-3)100%
- Only in Crimson worlds [2]
- Crimtane Ore (30-90)100%
- Crimson Seeds
(1-3)100% - 100%
| Charge | |
|---|---|
| Chain charge |
Spawn Condition
Eye of Cthulhu can be spawned by fulfilling one of these conditions:
- Have at least (200) Health, 10 Defense and at least 3 × 10NPCs: it will then have a 33% chance of spawning at the start of the night. Note that this only works when it has yet to be defeated;
- Use Suspicious Looking Eye during night.
It must then be defeated before the day arrives.
The Fight
First Phase
During this phase the Eye will spend most of its time floating above you. It will summon ![]() Servants of Cthulhu which fly towards you to attack, much like
Servants of Cthulhu which fly towards you to attack, much like ![]() Demon Eyes, but will fly through walls and the ground. The Eye will still hurt you if you run into it, so do not disregard it while you kill the Servants. If you start to get swarmed by too many Servants, temporarily switch to a fast swinging weapon such as a
Demon Eyes, but will fly through walls and the ground. The Eye will still hurt you if you run into it, so do not disregard it while you kill the Servants. If you start to get swarmed by too many Servants, temporarily switch to a fast swinging weapon such as a ![]() Sword to get rid of them quickly.
Sword to get rid of them quickly.
A good strategy in this phase is to aim mid-range weapons at the pupil of the Eye, since that is where it spawns the Servants. That way, you can kill the servants and damage the Eye. If you stand directly below the Eye and aim straight up with a piercing weapon, after a few seconds your projectile will fall back down and hit the Eye again. After spawning 3 or 4 Servants, the Eye will charge at you, attempting to ram you 3 times before hovering once more, so be prepared to evade. It turns rather slowly as it charges, giving you time to prepare your next dodge. It can be helpful to begin to evade after the 3rd servant is spawned, as this will often allow you to dodge its first charge.
If you manage to dodge it during his charging attack, and he goes underground momentarily, hit it with fire arrows before he disappears in order to set it alight, and you can see it ![]() on fire, making it visible. Keep in mind that in
on fire, making it visible. Keep in mind that in ![]() PC,
PC, ![]() Console,
Console, ![]() Mobile,
Mobile, ![]() Old Chinese,
Old Chinese, ![]() tModLoader, and
tModLoader, and ![]() tModLoader Legacy versions, bosses have minimap icons to increase their visibility.
tModLoader Legacy versions, bosses have minimap icons to increase their visibility.
Rinse and repeat and the first phase should go down easily.
Eye of Cthulhu has 12 defense during this form, which negates 6 damage from every attack. As such, higher damage, lower speed weapons are more effective during the first form, such as the ![]() Musket or a bow.
Musket or a bow.
Second Phase
For the last half of the fight, the boss sheds its iris to reveal a fanged mouth. Make sure to take advantage of its transformation sequence as much as possible, since it just spins in place for a few moments and you can still damage it. It moves slightly faster and deals more damage when it hits you but it also has no defense. It will not be summoning any more servants, so this time it will simply keep rushing at you. When it does so, do not try to attack it - concentrate on dodging. It'll charge you 3 times, and then pause for a few seconds during which you can attack freely. Try to hit it with your strongest weapon.
For this phase, ![]() Hermes Boots or a variant of them is an asset. With a wide enough arena, running in a straight line while the Eye of Cthulhu does his quick charge is fast enough to avoid any damage.
Hermes Boots or a variant of them is an asset. With a wide enough arena, running in a straight line while the Eye of Cthulhu does his quick charge is fast enough to avoid any damage.
Expert and Master Mode
In the first phase of the fight it is more aggressive, acting very similarly to first phase it spawns servants while floating around the player, and will occasionally make a few lunges. It also enters the second phase at 65% health instead of 50%, spawning a lot of servants in that process. A piercing weapon is recommended for eliminating the servants.
In this part of the fight, after the 3 normal charges it will perform a brief series of extremely quick dashes at a steeper angle. As its health goes down, the Eye will use this ability more frequently, until its only action is to dart haphazardly back and forth, making it rather hard to hit. To avoid the charges, Hermes Boots should be used at the bare minimum.
General Strategies
General Tips
This content is transcluded from Guide:Practical tips § Combat.
- For nocturnal bosses, starting the battle just after the sun sets (7:30 PM) will provide the maximum amount of time to defeat the boss. In Hardmode, the Moon Charm and/or Moon Stone and their upgrades are also useful at night.
- Boss battles can be won or lost before the battle ever starts. Choose your equipment and have it ready; find and/or make potions and placed buffs;
use the highest-tier food you have available; set up an arena appropriate to the boss; learn the strategies for the boss you're facing. - Prepare your Boss-fighting arena with adequate lighting, Campfires and Heart Lanterns for health regeneration, and Stars in Bottles for mana regeneration if you use magic. Bast Statues
will provide a significant defensive boost.Garden Gnomesand (if underground) proper torch placementwill reduce damage taken and increase damage dealt due to the luck. Note Torch God's Favor helps with this.Honey pools can also be used for extra health regeneration. - Sunflowers provide the Happy! buff to players within a 50-tile radius, which grants a +10% movement speed bonus and 17% reduction in enemy spawn rate.
- Always carry around a stack of the highest-tier healing potion available, as relying only on natural Health Regeneration is not a good idea. Depending on the game stage, this can include items such as Mushrooms or Honeyfins. On the PC, Console, Mobile, and tModLoader versions, Restoration Potions are healing potions with a shorter cooldown.
- Likewise carry mana potions, if you use Magic.
- The Strange Brew
is also an option, but its weak healing effect will trigger the Potion Sickness cooldown as well as Mana Sickness. On the Old-gen console version, Windows Phone version, Old Chinese version, Nintendo version, and tModLoader 1.3-Legacy version, Restoration Potions can save a slot, but will likewise trigger both cooldowns.
- It is suggested to build houses for the Dryad and the Nurse NPCs in your arena. The former casts the Dryad's Blessing
buff, which increases your defense and provides you with a thorns-like effect, while the latter can heal and remove debuffs instantly, at the cost of somecoins. - Bosses are displayed on the Minimap: Follow the boss's icon to track it when you're struggling to find it. You can identify the boss icons by checking their respective wiki pages.
- Once you have freed the Mechanic in the Dungeon, you can use Wire to enhance your arena with Traps and helpful Heart and Star Statues. The former helps to damage the enemies, though be careful to set them up correctly in order not to hurt yourself during the battle. The latter will spawn heart and star pickups, respectively. Connect these devices to timers.
- It may be useful to summon and kill the Eye of Cthulhu or King Slime before summoning any harder boss in order to spawn an extra one-use pool of Hearts. Note that this will prevent any Heart Statues from spawning new Hearts.
- Remember to use the Sharpening Station
,Ammo Box,Crystal Ball, Bewitching Table, andSlice of Cakebefore you go to explore or battle bosses/invasions. These will give boosts that are useful to take, with the first four being class-specific. They giveSharpened,Ammo Box,Clairvoyance, Bewitched, andSugar Rush, respectively.
Terrain preparation
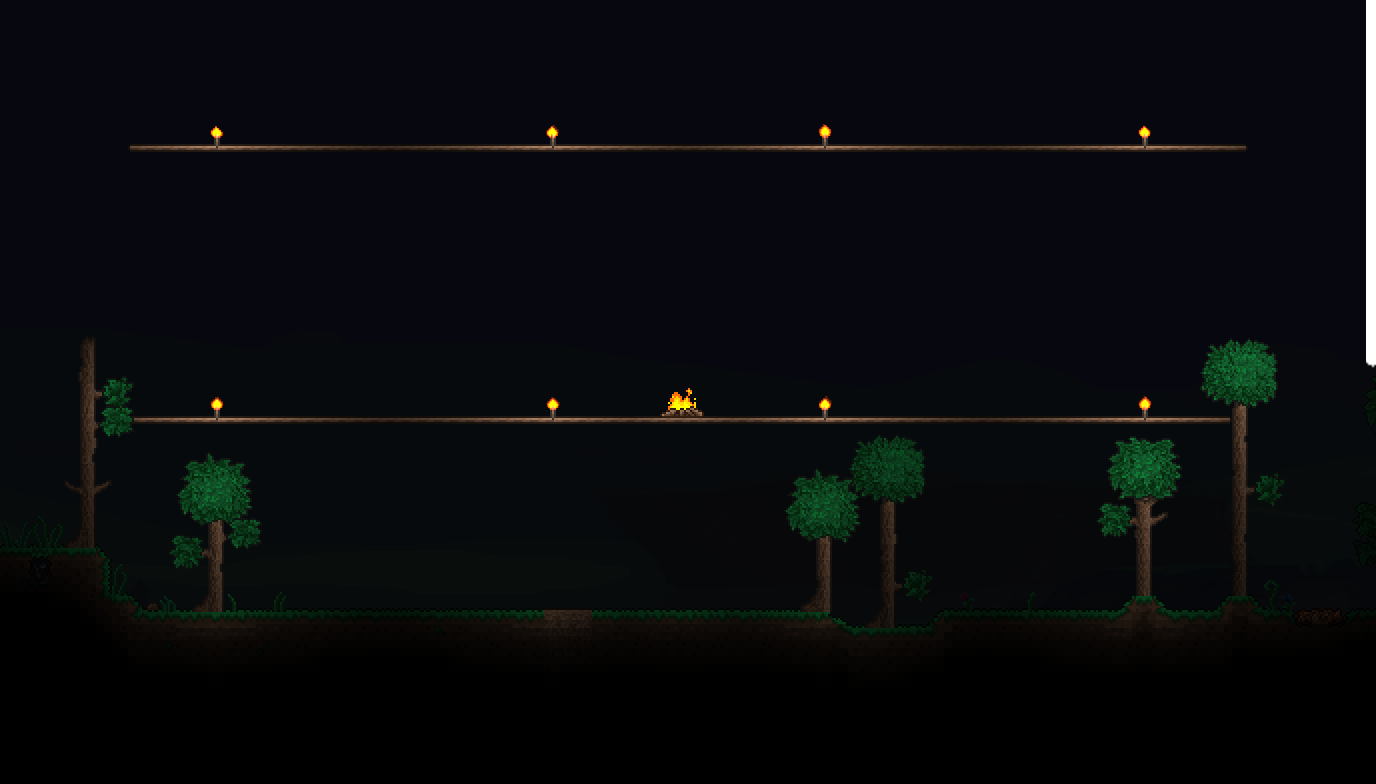
A basic arena made for the Eye of Cthulhu.
An arena for the Eye of Cthulhu should be large enough to dodge and maneuver around in. The recommended size is just about the size of the screen, as the boss does not require a lot of mobility.
The simplest arena design consists of multiple rows of wooden platforms to have more room to jump and dodge. As the fight will be at night, add torches to improve visibility. Remember to adjust the distance between platforms depending on your jump height (this is 6 tiles at minimum, depending on which accessories you have), and consider placing some ladders (with platforms or rope) to aid your vertical movement.
Another design is a long, completely flat surface. This allows you to dodge the Eye by running to the left or the right with Swiftness Potions or Hermes Boots.
One of the easiest ways to defeat the Eye is a long, stretch of sand paired with Dunerider Boots. Due to the speed boost gained on sand, it can be used as a surefire way to make dodging the Eye incredibly easy, making the fight trivial itself.
Gearing up
Armor
In ![]() PC version,
PC version, ![]() Console version,
Console version, ![]() Mobile version, and
Mobile version, and ![]() tModLoader version, the
tModLoader version, the ![]() Ninja Armor provides critical hit and speed boosts which benefit all classes. While it has less defense than ore armors, it will end the fight faster and help you to dodge. In
Ninja Armor provides critical hit and speed boosts which benefit all classes. While it has less defense than ore armors, it will end the fight faster and help you to dodge. In ![]() PC,
PC, ![]() Console,
Console, ![]() Mobile,
Mobile, ![]() Old Chinese,
Old Chinese, ![]() tModLoader, and
tModLoader, and ![]() tModLoader Legacy versions, it enhances the combat potential of throwing items, which are extremely effective against the boss. In all versions, it requires defeating King Slime, who can be farmed by creating Slime Crowns.
tModLoader Legacy versions, it enhances the combat potential of throwing items, which are extremely effective against the boss. In all versions, it requires defeating King Slime, who can be farmed by creating Slime Crowns.
For defense, the best armor to have at this point would be ![]() Gold Armor or
Gold Armor or ![]() Platinum armor, although they can be difficult to obtain. A full set of
Platinum armor, although they can be difficult to obtain. A full set of ![]() Silver Armor or
Silver Armor or ![]() Tungsten Armor is easier to get at this point, and it is a good choice for this fight. On the Nintendo
Tungsten Armor is easier to get at this point, and it is a good choice for this fight. On the Nintendo ![]() version, the
version, the ![]() Boots of Ostara
Boots of Ostara can be paired with Silver armor to complete the set bonus while increasing jump abilities, although using it with Tungsten armor will not grant the set bonus.
If using magic weapons, you can use the ![]() Wizard set, which provides big buffs to magic weapon's stats.
Wizard set, which provides big buffs to magic weapon's stats.
If using ranged (or throwing in the ![]() Old Chinese and
Old Chinese and ![]() tModLoader Legacy) weapons, the
tModLoader Legacy) weapons, the ![]() Fossil armor's
Fossil armor's set bonus can aid in defeating the boss quickly.
On the Nintendo ![]() version, bones drop from skeletons, so Necro armor can be used here.
version, bones drop from skeletons, so Necro armor can be used here.
The only choice for summoners at this point is the ![]() Flinx Fur Coat
Flinx Fur Coat.
Weapons
In general, long-range piercing weapons are recommended, as they are able to take out Servants and hit the boss.
- For Melee Users
Melee's options are fairly limited at this point, and mostly serve as a way to take out the low-hp Servants of Cthulhu. Certain melee weapons are able to launch projectiles, but may be difficult to come across.
- Swords aren't very helpful against the boss itself, but can make short work of the Servants of Cthulhu without the need to aim. You should aim for a Gold Broadsword or a Platinum Broadsword at this point, but if you've been lucky and found enough Demonite or Crimtane Ore, you can craft a Light's Bane or a Blood Butcherer, which will perform even better.
- Using projectile-launching broadswords instead of regular broadswords is highly recommended, as their sword slash can take out nearby servants and their projectile can hit the boss itself. Their only downside is that they can be rather difficult to come across compared to regular broadswords. The three projectile swords available at this point are the Enchanted Sword found rarely throughout the world, in Enchanted Sword Shrines, or in Golden Crates
, theIce Blade found in Frozen Chests in the Ice biome, and the Starfury found on Floating Islands. - A flail weapon such as the Flaming Mace
orBall O' Hurt can be useful due to their high speed and the ability to use the throw attack to deal high damage. - Spears can be helpful, hitting both the boss itself and the servants with the same hit. Most spears available at this point are lacking in range, so consider using a more ranged weapon when the boss is in motion. The recommended spear at this point is The Rotted Fork, otherwise the Trident found in Water Chests should suffice. In PC version, Console version, Mobile version, and tModLoader version, the Storm Spear
, obtainable in the Underground Desert, has a ranged projectile that allows the player to keep their distance during the fight. - Boomerangs can be of great use due to their long range, but missing with a boomerang can leave the player open for a moment. An Enchanted or Ice Boomerang would be preferred. A Wooden Boomerang is not recommended, due to low damage.
- Yoyos
are another type of melee weapon, and excel against the boss. The strongest available is theAmazon, although it requires venturing into the Underground Jungle early on. If a large amount of Demonite or Crimtane Ore has been obtained, a Malaise or Artery can be crafted. A Rally is readily available, but requires some luck and is weaker.
- For Ranged users
- Bows are some of the best weapons available at the moment. The best one right now is likely either the Gold Bow or Platinum Bow. If you happened to find a large quantity of Demonite or Crimtane Ore, you can craft a Demon or Tendon Bow.
- Frostburn Arrows deal the most damage to the boss itself and inflict Frostburn, but Jester's Arrows can kill the Servants and hurt the Eye in the same shot. Flaming Arrows are a good fallback option, in case your primary arrow choice runs out.
- Bone Javelins are considered ranged in 1.4, and are cheap and powerful against the Eye of Cthulhu. They do damage similar to the Ruby Staff and apply up to 18 dps in debuffs.
- The Snowball Cannon is another fast firing weapon to use, doing decently against both phases.
- The Paintball Gun
with its fast fire rate and high critical strike chance works well if you can manage to kill thePainter enough times. - While obtaining guns before first defeating this boss may be difficult (generally requiring exploring deep inside The Corruption / The Crimson), the Minishark is extremely useful as the second phase of the boss has no defense allowing the Minishark to hit rapidly for full damage. However, in its first phase, the boss has 12 defense, allowing the Minishark to do lower damage per hit. Therefore, a Musket or The Undertaker would be more effective at this stage of the fight. The Minishark is able to deal damage slightly easier than other conventional projectile weapons pre-Hardmode while the boss is charging rapidly due to its high rate of fire and fast projectile speed.
- If you were lucky enough to find it, the Boomstick is useful in the fight due to the large spread of bullets and high damage.
- If purchasing the ammo for the weapons, Wooden Arrows will cost less than Musket Balls, but guns may be a better choice due to their straight projectile trajectory.
- For Magic users
Magic weapons are mainly good for beating on the boss itself, but can also be used to attack servants in a pinch. All magic weapons at this point are able to pierce through multiple enemies. More adventurous players can get their hands on much better weapons, and these should certainly be used for later "repeat engagements":
- Gem Staves are the usual Magic weapon of choice at this point, with their long ranged piercing shots being a perfect fit for the boss battle. You should try for the Diamond or Ruby staves, with Emerald or Sapphire as second-best. The Amethyst and Topaz staves are too short on damage for this fight. The Amber Staff
is not worthwhile, because obtaining Amber and Sturdy Fossils requires exploration of the Underground Desert biome, which is very dangerous without post-Eye of Cthulhu gear (plus on Old Chinese and tModLoader Legacy it is even less likely that you have a pickaxe able to mine Desert Fossils), and it is statwise-equivalent to the Ruby Staff. - In Old-gen console, Windows Phone, Old Chinese, , and tModLoader Legacy versions, a Water Bolt can be found on shelves in the Dungeon. If you get one, it can replace the Gem staves entirely. It will help to put solid-block walls around your arena, so you can make use of the Water Bolt's ricocheting projectiles.
- Those players who have delved into an Evil biome may be able to get hold of the powerful magic weapons found in Shadow Orbs, Crimson Hearts, or the Crates fished up in these biomes. TheVilethorn lacks some range, but the lingering thorn can hit the boss and servants many times, and can even pass through walls to hit it. The Crimson Rod is similarly useful, as clouds can be set up to clear out the servants while also dealing steady damage to the boss.
Those who have not only broken orbs/hearts, but gatheredMeteorite ore from the resulting crash sites, can use the Space Gun, with its fast velocity and piercing properties. It does use a lot of mana unless you pair it with Meteor Armor, which makes it free. Both weapon and armor are crafted with Meteorite Bars.
- For Summoners
Most summons available at this point are not strong enough to defeat the Eye of Cthulhu alone, especially on higher difficulty levels. Using a whip is essential, but using weapons from other classes is suggested for beginning players.
- The Flinx Staff is the best summon weapon available at this point in the game for most players. Weaker or rarer alternatives include the Finch Staff and Slime Staff. For those able to defeat Blood Moon enemies, the Vampire Frog Staff
is even stronger. Both struggle with flying enemies, requiring platforms. - The Leather Whip
is the most practical option at this point in the game, as it is obtained from theZoologistNPC (if you have one). Unlocking should be possible with some careful exploration. - The Snapthorn
is much less practical for your first fight, as it is crafted from items only found in the Underground Jungle, which is highly dangerous this early in the game. TheImp Staff is the most powerful summoner weapon available pre-Hardmode, as the flying imps deal 21 damage and inflict the On Fire! debuff against enemies, at the cost of being completely ineffective underwater. This item can be obtained by fishing up the Reaver Shark and mining Hellstone in The Underworld, a difficult and dangerous place.
- For
Throwing Users
Thrown weapons are at their best at this stage of the game, with a wide selection of effective weapons to use against this boss. Most of them are also cheap or easy to obtain, allowing the player to rack up stacks of thrown weapons.
- Shurikens are an effective weapon which can be bought from the Merchant. They will hit up to 4 times, allowing a well aimed shot to kill a Servant and hit the Eye twice - even three times, if it falls back through the boss. 500 or so are more than enough to defeat this boss with relative ease.
- Throwing Knives or Poisoned Knives perform similarly to Shurikens but do a lot more damage.
- Grenades cause high damage and hurt everything in their blast, but may pose as much danger to the player as they do to the boss. Since the Eye will be spawning Servants or charging at the player most of the time, it's difficult to keep a safe distance from the explosion. If desired, Grenades can be purchased from the Demolitionist. A good strategy for Grenades is to lay them like a quick trap. As the Eye charges at you, you can predict its movements. Throw a grenade underneath you and run away as the Eye begins to charge. If timed correctly, the grenade will explode on contact with the Eye and you will be unharmed.
- Javelins are useful and deal good piercing damage, which makes them an amazing choice on the first phase.
- Molotov Cocktails avoid the danger of self-injury and work very well, especially in the second stage when Eye of Cthulhu will charge at you through the flaming puddles the Molotov Cocktails leave behind.
- Spiky Balls are very helpful in its second phase if you scatter them all over the floor of your arena.
Accessories
- A Cloud in a Bottle or equivalents can aid in avoiding the rams, although this is less necessary with a good arena.
- The Fledgling Wings
can be used to give the player short flight time and immunity to fall damage. - A Grappling Hook is also very useful if you can grapple onto platforms above you quickly.
- Hermes Boots or equivalents help by making it easier to dodge the second phase's rams. In Expert Mode, these are almost required, as the Eye of Cthulhu will perform rapid dashing attacks.
- The Shark Tooth Necklace
will give a significant damage boost to most weapons available at the moment. - If you find one, a Band of Regeneration can help speed up life regeneration, making lasting a longer fight easier. A Mana Regeneration Band should also be used for Magic players, as it regenerates Mana faster.
Any accessory with the Warding modifier will be useful if you come across one, and the extra four defense can be used to make up for lower-tier armor, like ![]() Iron Armor or
Iron Armor or ![]() Lead Armor.
Lead Armor.
Potions
- The most helpful potions are the Regeneration Potion, the Ironskin Potion, the Endurance Potion, Wrath Potion and the Swiftness Potion.
- Any food item that gives the Well Fed buff is welcomed, especially so for Expert Mode and Master Mode.
- Archery Potion significantly increases the damage output of bows.
- Magic Power Potion and Mana Regeneration Potion are good for magic users.
Other Tips
This content is transcluded from Eye of Cthulhu § Tips.
- The Eye of Cthulhu drops either Demonite or Crimtane Ore. While the corresponding set of armor and a number of tools additionally require Shadow Scales or Tissue Samples respectively—which the Eye does not drop—the sword, bow, axe, yoyo, and fishing pole can be crafted with only the bars.
- Due to the ease of crafting its summoning item and relatively low difficulty, farming the Eye of Cthulhu is one of the more effective ways of making money prior to Hardmode. It drops 3 / 750 up front, plus ores which can be sold as bars for twice (Demonite) or triple (Crimtane) that amount.
- The Eye of Cthulhu will only spawn randomly if a player has more than 10 defense. Taking defense-boosting equipment off before dusk can prevent it from spawning randomly.
- The boss looks at the player it will follow, which can be helpful information in multiplayer.
- In classic mode, it is most vulnerable during its transformation, because it neither moves nor attacks, but there is only a brief window of opportunity for this. In Expert Mode or above, it sheds a plethora of minions upon transformation, which protects it while it transforms.
- Because there are no location-based requirements for summoning, defeating multiple Eyes of Cthulhu in an area can be an effective setup for harder boss fights as the dropped Hearts can be picked up mid-fight as needed, though killing an Eye of Cthulhu for that purpose must be balanced with the time it takes away from killing a night-only boss.
- While it may seem that killing it on a Corruption-generated world would yield more money than doing so in a Crimson-generated world, as it will drop additional Unholy Arrows, Crimtane Ore and Bars sell for a 30% higher price than their Demonite counterparts, making them much more profitable.
- In singleplayer, the player can repeatedly pause the game using Autopause in order to properly aim at the Eye of Cthulhu during its dash attacks.
Specific Strategies
Slimy Saddle Strategy
An excellent strategy to beat the Eye is to use the ![]() Slimy Saddle
Slimy Saddle and bounce on the eye while at the same time attacking it with a ranged weapon. The eye will move toward you and you will bounce on top of it continuously dealing damage. If you want to try this strategy, make sure you have some forms of preventing fall damage (i.e,) the ![]() Lucky Horseshoe, Grappling Hook, an
Lucky Horseshoe, Grappling Hook, an ![]() Umbrella, or
Umbrella, or ![]() Cloud in a Bottle or
Cloud in a Bottle or ![]() Fledgling wings.
Fledgling wings.
Magic Mirror Strategy
During the Second Phase, if you have your spawn point nearby, you can run one way and attack, and just when you think that the Eye is going to charge, use a ![]() Magic Mirror,
Magic Mirror, ![]() Ice Mirror
Ice Mirror or ![]() Recall Potion to teleport to spawn, now running the other way, evading the attack and being left to open fire.
Recall Potion to teleport to spawn, now running the other way, evading the attack and being left to open fire.
Railway Strategy
Another great strategy is to build a long railway at least 400 blocks long, with each end hammered into a bumper. When the Eye spawns, start moving and continue to move whilst shooting at it. It may take longer than other methods, but it requires little mobility and you take minimal damage. Also, this strategy works better if in single player or all players in a multiplayer world are together in the same area.
Rail Loop Strategy
This method is only recommended when fighting on Expert or Master difficulty, underprepared. Building a rhombus with around 200 rails and going on a minecart will make it diificult for the boss to hit you, but it will also be hard to deal damage. A fast firing weapon with easily obtainable ammo (like Snowball Cannon or Minishark) will do best with this strategy. The fight will take longer than usual, but you will evade most of hits from the boss, and with a fast minecart, you might not even take damage. This may work on Queen Bee, but the fight will take what feels like an eternity, and a Magic Missile or a Flamelash will help a lot due to fast projectile speed and homing.
Pathway strategy
(For this strategy to work you need at least some form of fast running (e.g. ![]() Hermes Boots or its mount equivalent, the
Hermes Boots or its mount equivalent, the ![]() Fuzzy Carrot
Fuzzy Carrot ) )
This strategy requires 2 long pathways made out of Platforms in the sky, one on top of the other. Make sure that the platforms are parallel to each other and at least 4 blocks apart. Make sure the length of the 2 platforms are around 200 to 500 blocks. Place ![]() Campfires every 20 to 40 blocks, if you can afford it, place a
Campfires every 20 to 40 blocks, if you can afford it, place a ![]() Heart Lantern and/or a
Heart Lantern and/or a ![]() Star in a Bottle near the campfires.
Star in a Bottle near the campfires.
Around the middle of the pathway, put a valid NPC house, then move the Nurse into it. If you are playing Multiplayer put a Bed in the house and set your spawn, so you can continue the fight even if you die.
When the fight begins, run along the 2 platforms attacking the Eye. Switch between the platforms to dodge attacks and avoid the Servants of Cthulhu. If you reach the end of a platform jump or fall to the other platform and switch directions. It is recommended that you use projectile-firing weapons such as bows, staves or magic books.
This strategy is slightly harder to execute the first time but if done effectively it will be easier in the future.
This strategy can be reused for  The Twins,
 ![]() King Slime and
King Slime and ![]() Queen Bee. It is not recommended for them but it is possible.
Queen Bee. It is not recommended for them but it is possible.
- ↑ 1.0 1.1 Information taken from the PC 1.4.2.3 source code, method
AI()Terraria.NPC.csaiStyle == 4 PC version is 1.4.4.9.
- ↑ 2.0 2.1 2.2 2.3 Information taken from the PC 1.4.0.5 source code,
RegisterBoss_EOC()inTerraria.GameContent.ItemDropRules.ItemDropDatabase.cs. There may be inaccuracies, as the current PC version is 1.4.4.9.
- ↑ Information taken from the PC 1.4.0.5 source code,
DoDeathEvents_DropBossPotionsAndHearts()inTerraria.NPC.cs. There may be inaccuracies, as the current PC version is 1.4.4.9.