Welcome to Terraria!
This guide will help you get started on your journey through your world. It will cover gameplay basics like character creation, combat, and early-game tips, and point you to other guides for further advice. Keep reading for a step-by-step tutorial of how to begin your first game!
Gamemode
On Terraria's title screen you can pick the game mode you would like to play. The available options are Single Player or Multiplayer on the ![]() PC,
PC, ![]() Console,
Console, ![]() Mobile,
Mobile, ![]() Old Chinese,
Old Chinese, ![]() tModLoader, and
tModLoader, and ![]() tModLoader Legacy versions, or Play Game on the
tModLoader Legacy versions, or Play Game on the ![]() Old-gen console,
Old-gen console, ![]() Windows Phone, and
Windows Phone, and ![]() versions.
versions.
The Switch, ![]() Old-gen console,
Old-gen console, ![]() Windows Phone, and
Windows Phone, and ![]() versions have a built-in Tutorial that we recommend completing first.
versions have a built-in Tutorial that we recommend completing first.
This guide will assume you have chosen Single Player, as it is easier to learn to play the game, so choose that option for now.
Character Creation

The character creation screen on the  PC version,
  Console version,
  Mobile version, and
  tModLoader version
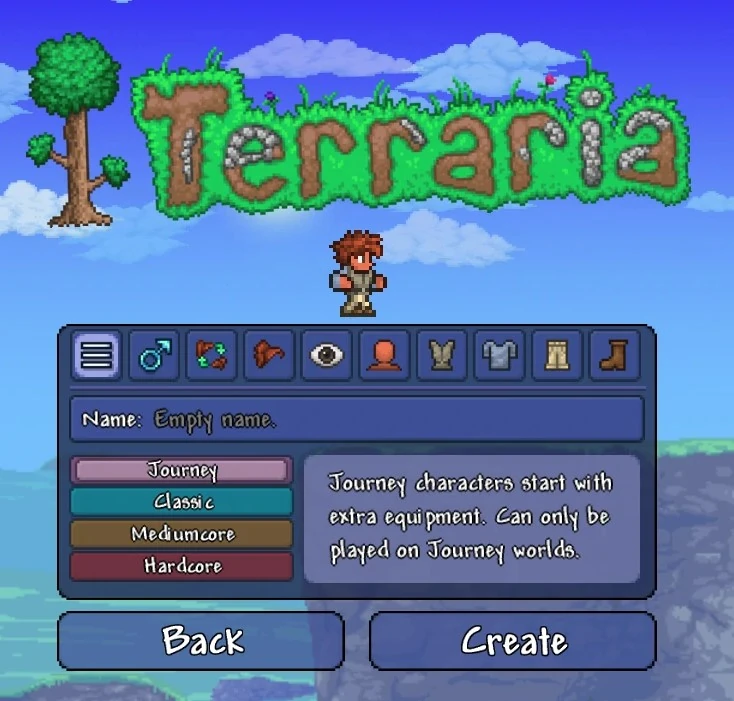
After selecting the game mode, you'll have to create and select your own character. Click the New button on the bottom right to open the character creation screen. Here, you can change a number of your character's properties.
Name and Difficulty
Your character's name will display when logging into a world, sending messages in chat, and whenever you die. It does not have to be the same as your Steam or console username.
You can choose different character difficulty options: Classic (also known as Softcore), Mediumcore, Hardcore, and Journey.
Note: On ![]() , all players are in Classic mode; there is no difficulty setting.
, all players are in Classic mode; there is no difficulty setting.
The character difficulty setting determines what happens when the character dies - it does not affect any other aspects of gameplay, including how hard the enemies will be.
- Classic, or Softcore, means that the player will drop some of their Coins upon death. Depending on world difficulty, you may drop half, 3/4, or all of your coins. Lost coins can be picked up by returning to your death location, but you may have to defeat an enemy to get them back.
- Mediumcore means that the player will drop every item they are carrying upon death. Dropped items may be permanently lost if the player falls into lava, is killed by an explosive, or exits the world.
- Hardcore means that the player has only 1 life; if they die, the character file is permanently deleted. Note: Hardcore is not the same thing as Hardmode, which is a game progression term.
- Journey Mode gives the player various cheat options, like a limited Creative mode. Journey characters can access the cheat menu by pressing C, allowing them to enable godmode, duplicate items, set the time and weather, disable enemy spawning, etc. However, Journey characters can only enter in Journey Mode worlds.
We recommend choosing Classic/Softcore for your first playthrough.
Appearance (optional)
Characters can be visually customized by changing their gender appearance, hairstyle, eye color, skin color, and clothing. All but eye and skin colors can be changed in-game using certain items.
None of the Appearance options have any effect on gameplay aside from visuals and occasional NPC quotes.
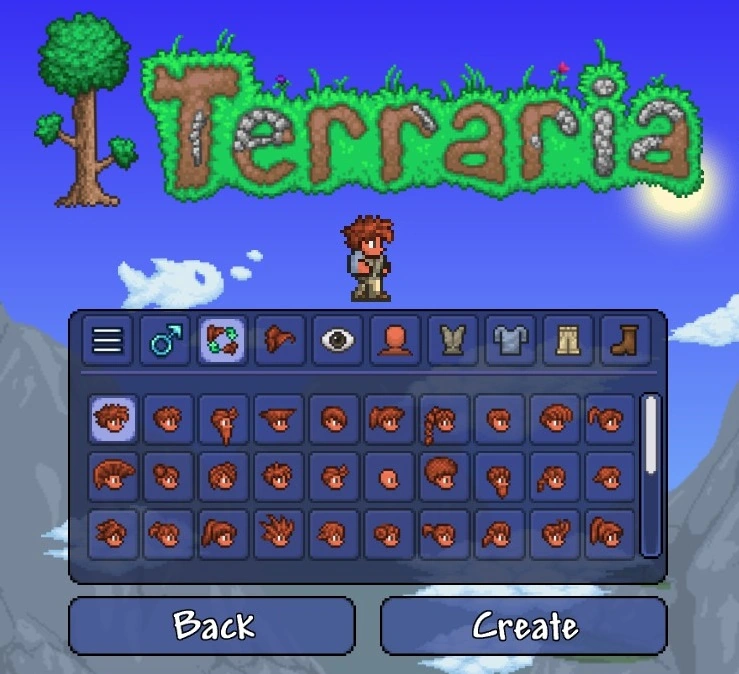

An example character made using the Terraria character customization menu on the PC version, Console version, Mobile version, and tModLoader version. The current tab is the hair customization tab.
- The color selection bars use the Hue/Saturation/Value system. The top bar changes the base color; the middle changes how faded the color is; the bottom bar lightens or darkens the color from white to black. See HSV (Wikipedia) for a more technical explanation.
- Clothing will be obscured by your armor and vanity items. This can be undone by wearing the Familiar set as you progress.
- To change your clothing in-game later, use a Dresser. To change hairstyle, find the Stylist NPC. To change your gender appearance, drink a Gender Change Potion.
Once you are finished, click Create to confirm character creation with the settings chosen. Now, click Play on your character to enter the World Selection screen.
World Creation
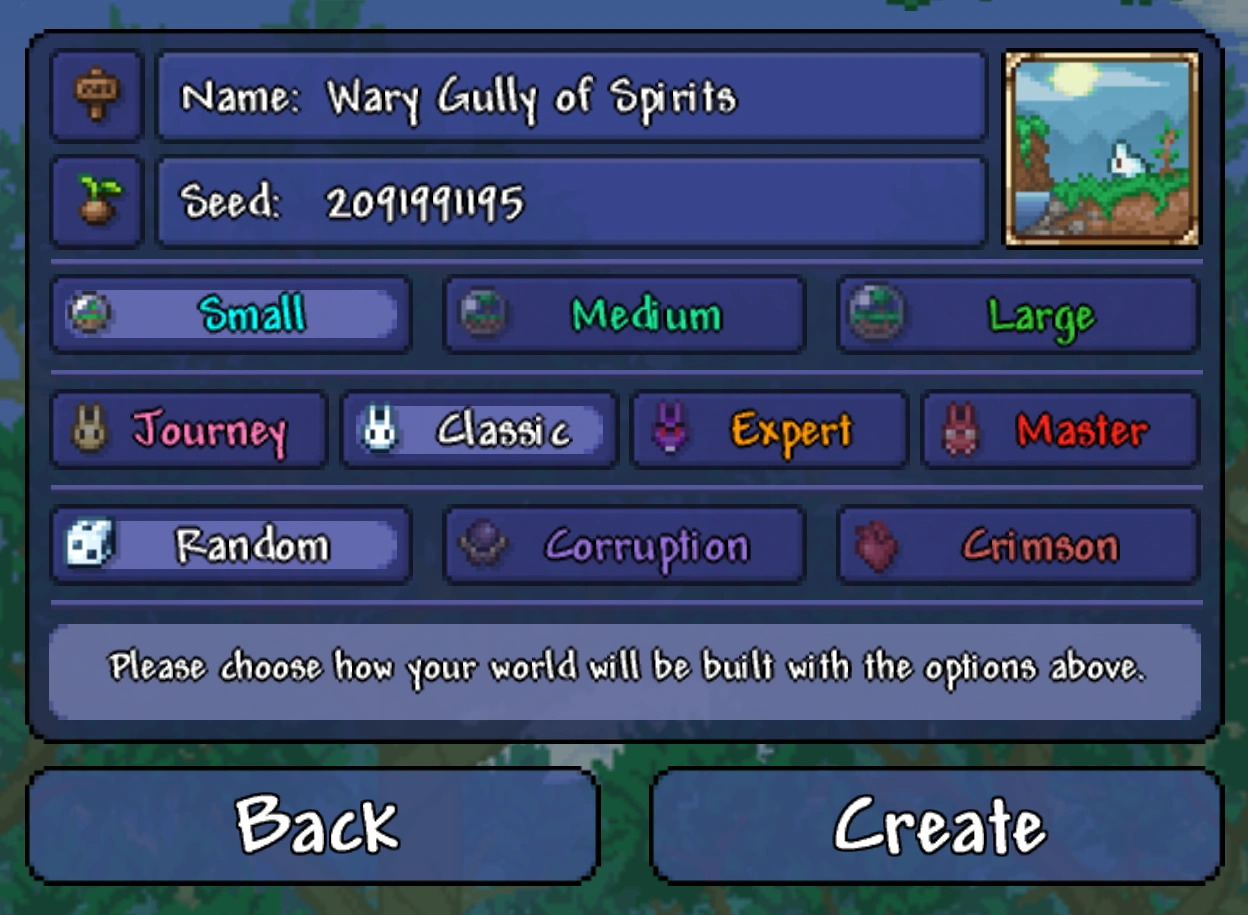
The world creation screen on the PC version, Console version, Mobile version, and tModLoader version
Click the New button on the Select World screen to generate your first world. Players are not locked to a single world; however, we recommend completing the game using a single world at first to keep things simple.
Name and Seed (optional)
These two options won't have much effect if you're starting out.
- Your world's name is displayed on the Select World screen, and it will be shown to other players if you hosted a Multiplayer session. It also appears in a few death messages.
- The world seed is a randomly-generated number which represents the world that has been created. It can be copied and pasted to create an identical world.
World Size
We recommend starting with a Small world size for your first playthrough, as it will take you much less time to travel between different areas.
There are three options:
- Small worlds are relatively compact and easy to traverse; it will take you less time to travel between biomes and descend into caves. This makes the game easier at first, since traveling is relatively risky. But small worlds generate less amounts of treasure and natural resources, so you may have a hard time later on.
- Medium worlds are 50% larger than small worlds; they take a bit longer to travel through but have more space to generate treasure and extra biomes.
- Large worlds are twice the size of small worlds. It takes a long time to travel between biomes, but the size allows for nearly all possible terrain, treasure, and resources to generate in large quantities, aside from a few very rare structures.
Difficulty
- Classic/Normal Mode worlds offer the standard Terraria experience.
- Expert Mode
worlds have enhanced enemy and boss attacks, environmental hazards, and valuable Expert-only treasure. Many of the Expert-only items significantly influence your gameplay, and can be worth the challenge. - Master Mode
worlds have even more dangerous enemies and bosses, but don't provide much loot in return other than vanity items, bragging rights, and one extra accessory slot. All Expert items appear in Master Mode. - Journey Mode
worlds are for Journey Mode characters only; they are the only worlds where the cheat menu can be used. Your Classic/Softcore character can't even log into a Journey world. Note that Journey mode has enemy difficulty sliders ranging from 0.5x (the easiest) to 3.0x (equivalent Master mode). Sliding to 2x will enable all Expert mode features and up to 3x will enable all Master mode features.
We recommend selecting Classic (also known as Normal) for your first playthrough.
World Evil
All Terraria worlds are infected with an Evil biome, which affects your ability to receive certain loot and changes a boss that you fight. Random is typically your best bet.
- The Corruption is a purple-colored biome with themes of curses, sickness, and decay.
- The Crimson is a red-colored biome with themes of flesh and gore. Overall, its items are slightly more powerful, but the enemies which spawn there are more dangerous.
Click Create or Accept to start generating your world; the game will display a progress bar until it is complete. Afterwards, press Play on the world you've created to start your adventure!
Beginning Gameplay
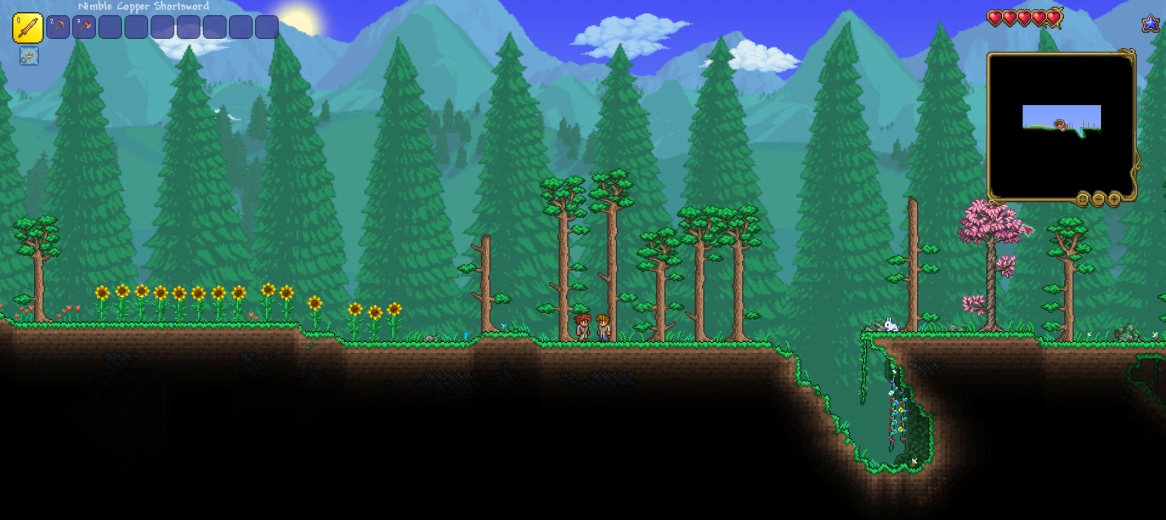

A new character spawning in a forest of a Terraria world that has just been created.
Upon entering a world for the first time, your character will appear at the center of the map, so you have half of the world to explore to the left, and half to the right. This location is known as the Spawn Point and will be where your character appears after you die, or whenever you enter the world. It's also marked with a Green Arrow on the Map in ![]() PC version,
PC version, ![]() Console version,
Console version, ![]() Mobile version, and
Mobile version, and ![]() tModLoader version. Note: Avoid building exactly on this spot, as you could potentially break blocks when spawning in.
tModLoader version. Note: Avoid building exactly on this spot, as you could potentially break blocks when spawning in.
You will notice you have a set of starter tools in your inventory, including a copper shortsword/wooden sword, a copper pickaxe, and a copper axe.
Movement and Tool Use
- On
 PC version, the game can be controlled using the Mouse and Keyboard. If you are using a controller, please see the console section further below.
- The cursor on the screen is moved using the mouse.
- ⚒ Use / Attack (left-click) will activate the item currently selected in the hotbar, or attached to the cursor. This usually results in attacking with a weapon, placing/breaking a block, drinking a potion, etc.
- The WASD keys move the character (note that W is not for jumping).
- ↷ Jump (spacebar) will make the character jump (or fly/swim/etc depending on your equipment).
- ⚷ Interact (right-click) will interact with placed objects like Chests and Doors. It is also for talking to NPCs.
- On the Mobile version, there will be a left joystick for movement, a right joystick for using items(alternatively tap anywhere on screen to use an item or place a block), and other buttons to do various things, such as quick heal and Mounts. There is also a lightbulb button that will show each button's function once tapped that can be toggled on and off.
- The console versions use controllers/joy cons to control the game. The switch version also has touch screen capability, when it isn’t docked, so some gameplay elements have mobile like controls (e.g, main menu, inventory).
- The left joystick moves the character, and the right one moves the cursor.
- The bottom face button make the character jump.
- The bumpers change the hot bar slot.
- The top face button opens the inventory.
- The right trigger attacks/places the block.
- The left trigger interacts with the world.
Hotbar and Inventory
The Inventory
In the upper-left corner of the screen you will see ten inventory slots labeled 1 through 10. These slots are referred to as the hotbar. They are a quick way of accessing commonly-used items. You can place any item into them from the inventory. To use the item, select the hotbar slot by pressing the associated number on the number row on the keyboard, use the scroll wheel to scroll to the right slot, or click a slot with the cursor. When you have selected a slot, you can press ⚒ Use / Attack anywhere on the screen to use the selected item.
By pressing Esc or Inventory you open up the inventory. It consists of 40 inventory slots, 10 hotbar slots, 4 slots each for coins and ammo, a trash slot, and various armor/equipment slots. It also contains the crafting menu, which is used to craft items.
All newly created characters (in Classic/Softcore mode) begin with the following items in their inventory:
- Copper Shortsword
orWooden Sword , used for stabbing/swinging at enemies. - Copper Pickaxe, used to dig blocks, as well as detaching placed items like Furnitures.
- Copper Axe, used for chopping down Trees and cacti to obtain Wood.
Note: Items may have a word as their prefix, such as "Demonic Copper Pickaxe" or "Broken Copper Shortsword". These will increase or decrease the item's base stats; see the Modifiers page for more information.
Rearranging the Inventory
Items in the inventory can be moved using the cursor. Pressing ⚒ Use / Attack on an item will remove it from its slot and attach it to your cursor. Clicking again on another slot will set the item back down, swapping it for another if the slot already contains an item.
Moving a held item out of the inventory screen allows you to ⚒ Use / Attack as if it were held in the hotbar; this can be used, for example, to drink a potion. Pressing ⚷ Interactwill throw the item onto the ground. this can be used to pass an item to another player in Multiplayer.
Certain inventory slots act in a special way.
- The ammo slots can only contain items that are either ammunition for Ranged weapons or wires for Wrenches. Keep in mind that the top-most Slot for ammo will be used first, followed by subsequent slots.
- The Coin slots can only contain coins, which may be dropped when you die. By default, when you collect coins, they will be deposited into these Coin slots, automatically converting to the next highest denomination when appropriate (ex: 100c = 1s, 100s = 1g, etc). You are able to move coins to your normal inventory instead of the Coin slots (though subsequent money will still deposit to the Coin slots by default). This may prevent Coin loss upon death, as the loss is presumably deducted from the actual Coin slot and not items in your standard inventory [source needed].
- While you can manually drag items into the Trash slot (located in the lower-right section of your Inventory Screen) to get rid of them, pressing Ctrlwhile clicking an item in your inventory will do so automatically. The last item placed in the Trash slot will remain there until you trash another one, so be careful when quickly removing items, as you can only retrieve the last item placed there. Trashed items are also removed when logging out.
- Alternatively, while shopping with an NPC, you can drag/drop to sell items, but you can quickly sell an item by pressing Ctrland clicking said item (instead of a trash icon, you'll see a coin icon, indicating a sale) . If you accidentally sell an item, you can buy it back for the same price - if it is still visible in the NPC's shop, but beware: once you sell an item and leave the dialogue, your sold items will disappear.
- If the NPC's inventory is already full when you sell an item, it cannot be bought back. For this reason, it may be optimal to sell your items to an NPC who only offers a few items for sale (eg: not the Tavernkeep, who may have a full inventory as-is).
- The equipment slots on the bottom-right/equipment menu/right are for items your character wears, such as armor and accessories. The default Inventory screen will show you your character's Armor and Equipment slots. Upon clicking the icons at the top of those slots, you can see your "alternative" Equipment, such as Mounts, Companions, Hooks, and Light Pets.
Other interface elements
These red hearts beside the inventory indicate the character's Health. Each red heart equals 20 health. All characters begin with 100 health. This can be permanently raised to 400 health using ![]() Life Crystals, and later 500 health with
Life Crystals, and later 500 health with ![]() Life Fruits.
Life Fruits.
You must keep your health above 0 health, or your character will die and re-appear at your Spawn Point. Health starts regenerating after a short period of not taking damage.
The blue star on the right side of the screen indicates the character's Mana. Each blue star is 20 mana.
All characters begin with 20 mana. This can be permanently raised to 200 mana using ![]() Mana Crystals and temporarily boosted further with some accessories and armor.
Mana Crystals and temporarily boosted further with some accessories and armor.
Mana is used to power Magic weapons; it regenerates similarly to health, but at a much faster rate.
The First Day
After loading up the world your character will be standing at the spawn point, with an NPC nearby, the ![]() Guide. You can talk to him with by pressing ⚷ Interact with your mouse over him. He has some tips for new players,
Guide. You can talk to him with by pressing ⚷ Interact with your mouse over him. He has some tips for new players, and will show you the available crafting recipes if you give him a material. This option can be used at any point in the game.
Digging and Placing
To dig, you first select your ![]() Copper Pickaxe. You are going to use this tool a lot, so you want to keep it on your hotbar. Now, if you move the cursor over a block near your character and press ⚒ Use / Attack, you will swing your Copper Pickaxe. After a few swings at the block, it will disappear and turn into a collectible item. Standing close to an item will cause you to collect it, which will put it in your inventory.
Copper Pickaxe. You are going to use this tool a lot, so you want to keep it on your hotbar. Now, if you move the cursor over a block near your character and press ⚒ Use / Attack, you will swing your Copper Pickaxe. After a few swings at the block, it will disappear and turn into a collectible item. Standing close to an item will cause you to collect it, which will put it in your inventory.
To place blocks, select a block by either putting it on your hotbar and selecting the hotbar slot or attaching it to the cursor and moving the cursor out of the inventory screen. Now move the cursor adjacent to a nearby block and click ⚒ Use / Attack. You will place the block. Holding down the button and moving the cursor to another empty space adjacent to a different block will place another block.
You can remove any previously placed blocks by digging them back out with your pickaxe, even the block originally connecting to the ground - blocks above it will not fall due to gravity.
There are some exceptions, such as ![]() Sand and
Sand and ![]() Silt, which do fall when there are no supporting blocks below them.
Silt, which do fall when there are no supporting blocks below them.
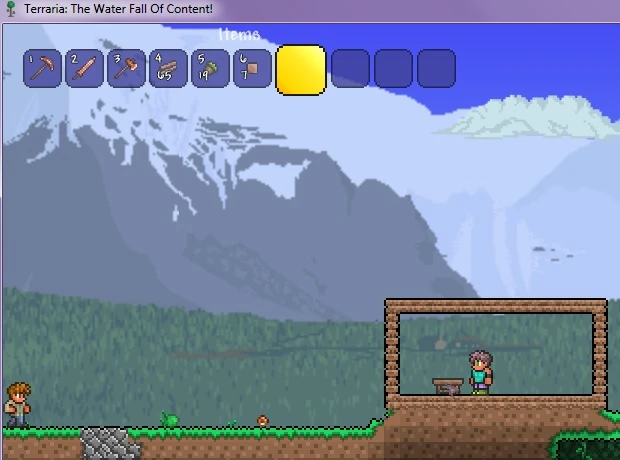
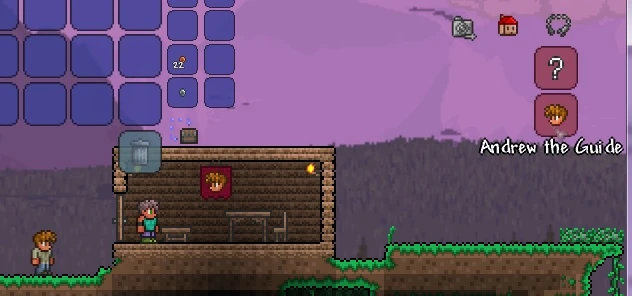
Building a house
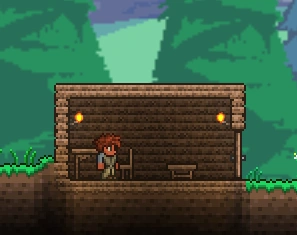

A basic house for the first night in Terraria
Your first goal when starting a new world is building a house. A house is an enclosed area with background walls and certain other requirements that shields you from monsters, and allows NPCs to move in. Building a house will provide shelter from enemies during the night, helping you survive early on.
Every world spawns with you and the Guide at the spawn point. He is a valuable resource of information and help, so we want to protect him.
- Wood is a versatile and plentiful resource, so use your Copper Axe to cut some Trees down.
- If a monster approaches you, switch to your weapon and kill it.
Once you have collected about 200 wood, return to where you initially spawned and dig out 1 block underneath where you first appeared.
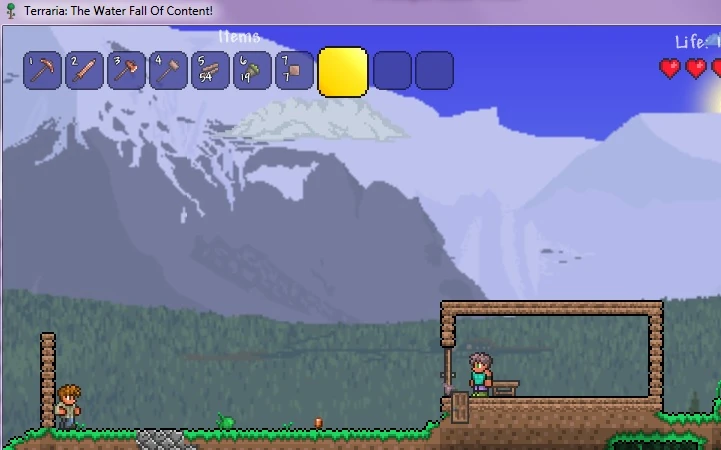
Time to get building!
- Steps of building a suitable House
1. Lay down the wood foundation;
2. Make a box;
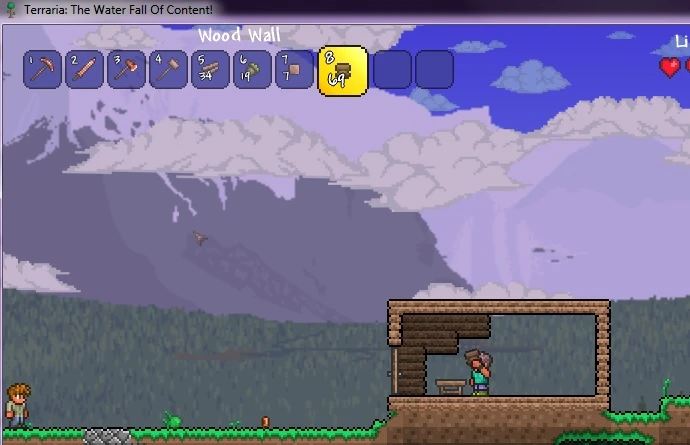
3. Craft a
 Work Bench;
4. Place the Work bench down;
5. Craft 1
 Door and replace a side wall with it; (tip: replace both walls if you want mobility)
6. Craft some
 Wood Walls and cover the interior of the house with it;
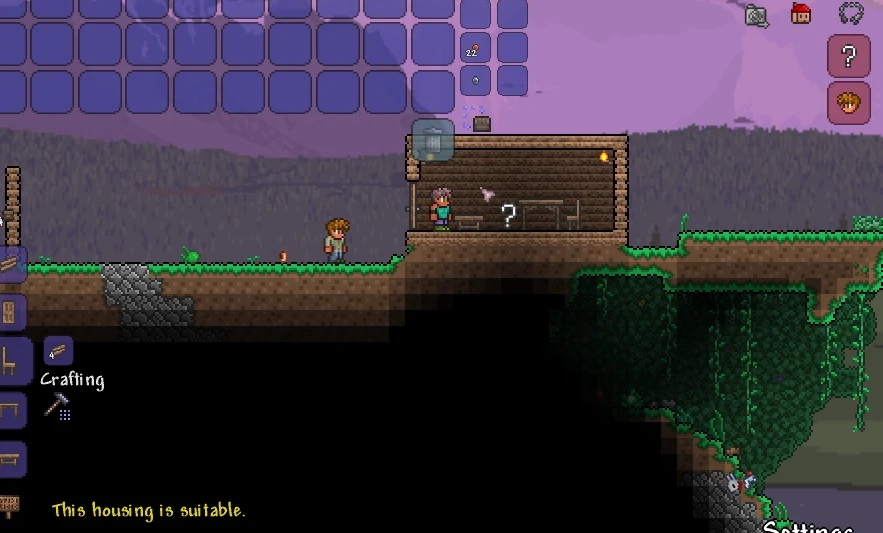
8. Assign the house to an NPC, in this case the
Guide.

- Tip: Work Benches are considered Tables for purposes of NPC Housing. You can replace Tables with them. For more info, consult Housing.
- Tip:
If you find yourself unable to build a house before sunset, you can dig yourself 4 blocks into the ground, and cover yourself up with dirt.
When Night falls, all NPCs will return to their designated houses and stop moving. NPCs without an assigned house will walk around aimlessly. You can temporarily surround them with blocks of dirt to prevent monsters from reaching them.
Continuing on
Combat
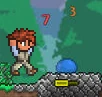
The red numbers are the damage dealt to the character; the orange numbers are the damage done to enemies.
During your adventures in Terraria you will encounter many enemies. To fight them you use weapons. There are 4 main types of weapons:
- Melee weapons: These weapons are the most straight-forward. They are weapons that physically hit the enemy like Swords, Boomerangs and Flails.
- Ranged weapons: These weapons use a form of ammo to fire projectiles at distant enemies, such as Bows.
- Magic weapons: Magic weapons have various different attacks, but generally they shoot a magical projectile that costs Mana. Examples include the different Staves.
- Summoning weapons: These weapons use a small amount of mana to summon a minion that automatically targets enemies and combats them itself. The Slime Staff does that.
- Throwing weapons: This is a minor Pre 1.4 damage type that uses damage dealing consumable damage, for example, grenades inflict throwing damage.
In Terraria, any damage done to the player will appear above their head as a red number. Damage done to enemies by players is shown with an orange number. When the player heals, the amount healed will be shown as a green number.
Enemies in Terraria drop coins, as well as enemy-specific drops. Certain drops have higher '"Drop chances"' than others, so farming for specific items may be required.
Healing
To avoid dying, the player can heal themselves using one of several healing items.
- Early on, you can recover health by eating Mushrooms. These spawn naturally on grass blocks in a Forest biome. To harvest them, simply swing a tool or weapon at them, and you can pick them up. Consuming one will restore 15 health.
- While exploring, the players will find and craft better Lesser Healing Potions. These will restore 50 health.
Note: Consumables like these give the ![]() Potion Sickness between uses. It prevents you to use any more healing items for 60 seconds, so it's a good idea to avoid taking damage as much as you can.
Potion Sickness between uses. It prevents you to use any more healing items for 60 seconds, so it's a good idea to avoid taking damage as much as you can.
Mining and Exploration

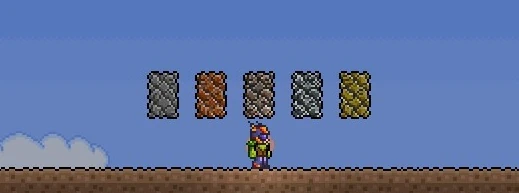
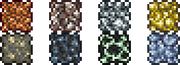
Ore types from left to right:  Stone,
  Copper,
  Iron,
Iron,  Silver, and
  Gold. (note: this picture is outdated, but it should allow you to differentiate the ore colors)
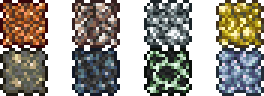
New gen consoles, switch, mobile, and pc version ore types, from left to right: copper and tin, iron and lead, silver and tungsten, and gold and platinum. (disclaimer: only shows the four main first ore types)
Eventually, a ![]() Work Bench will not be enough to craft gear; a
Work Bench will not be enough to craft gear; a ![]() Furnace is needed. A Furnace will be used to transform Ore into Bars, which are the main materials of better Weapons, Tools, and Armor. Find deposits of Stone and mine up at least 20 blocks.
Furnace is needed. A Furnace will be used to transform Ore into Bars, which are the main materials of better Weapons, Tools, and Armor. Find deposits of Stone and mine up at least 20 blocks. ![]() Torches are also needed for creating a Furnace, so make sure to kill a few
Torches are also needed for creating a Furnace, so make sure to kill a few ![]() Slimes to get a bit of
Slimes to get a bit of ![]() Gel. Finally, a small bit of
Gel. Finally, a small bit of ![]() Wood. Head to the Work bench and craft a Furnace, then place it down.
Wood. Head to the Work bench and craft a Furnace, then place it down.
While exploring the world keep an eye out for oddly colored blocks, as these will most likely be ore deposits.
You also need to make an ![]() Iron or
Iron or ![]() Lead Anvil (some worlds will have Lead instead of Iron). Anvils are used to create Items from Bars. Go out and find some
Lead Anvil (some worlds will have Lead instead of Iron). Anvils are used to create Items from Bars. Go out and find some ![]() Iron or
Iron or ![]() Lead Ore. In order to smelt one
Lead Ore. In order to smelt one ![]() Iron/
Iron/![]() Lead Bar, you need three ores. As you need five Bars to successfully create the Anvil, 15 Iron/Lead Ore is needed. Once the ore is gathered and smelted at the Furnace, head to the work bench and create an Anvil. When placed down (preferably next to the Furnace) an entirely new set of Recipes becomes available.
Lead Bar, you need three ores. As you need five Bars to successfully create the Anvil, 15 Iron/Lead Ore is needed. Once the ore is gathered and smelted at the Furnace, head to the work bench and create an Anvil. When placed down (preferably next to the Furnace) an entirely new set of Recipes becomes available.
Cave exploration
There are a few options when choosing how to dig: Digging straight down or searching for an open cave to explore. At this early stage in the game use caution when digging holes. Using the blocks picked up while digging or creating ![]() Wood Platforms, you can build a way back.
Wood Platforms, you can build a way back.
When underground there will be no light. To illuminate your area and see, you can hold a ![]() torch in your hand by putting a torch stack in your hotbar and selecting it. However, you will be unable to use anything else while holding the torch. You can stick a torch on a wall or on the ground by left clicking where you want to place it. This will not only let you see mobs so you can fight them, but you can also leave behind a trail of torches to see mobs coming at a greater distance, mark the way back out, and show where and how far you've gone if you come back to the same cave to explore further. In addition to placing torches, you can throw one, which is useful for seeing what's at the bottom of a pit, and how far down it goes.
torch in your hand by putting a torch stack in your hotbar and selecting it. However, you will be unable to use anything else while holding the torch. You can stick a torch on a wall or on the ground by left clicking where you want to place it. This will not only let you see mobs so you can fight them, but you can also leave behind a trail of torches to see mobs coming at a greater distance, mark the way back out, and show where and how far you've gone if you come back to the same cave to explore further. In addition to placing torches, you can throw one, which is useful for seeing what's at the bottom of a pit, and how far down it goes.
When exploring caves, you will frequently come across ![]() Pots. You can smash these with a weapon or tool to get some loot. Less common are
Pots. You can smash these with a weapon or tool to get some loot. Less common are ![]() Chests and
Chests and ![]() Gold Chests. When you are near or in front of a chest you can right-click, which will show your inventory and below it the contents of the chest. You can click on a chest item to grab it, then click again on an inventory square to put it in your inventory. Alternatively, you could click "Loot All" to the right of the chest contents grid to grab everything in the chest. Once the chest is empty you can repeatedly hit it with your pickaxe in order to pick it up, take it with you, and then place it elsewhere, like you'd place any other piece of furniture (you can't mine chests if it's not completely empty however). It's recommended that you take a few of the chests you find back to your house to store stuff with, since crafting your own chests will use
Gold Chests. When you are near or in front of a chest you can right-click, which will show your inventory and below it the contents of the chest. You can click on a chest item to grab it, then click again on an inventory square to put it in your inventory. Alternatively, you could click "Loot All" to the right of the chest contents grid to grab everything in the chest. Once the chest is empty you can repeatedly hit it with your pickaxe in order to pick it up, take it with you, and then place it elsewhere, like you'd place any other piece of furniture (you can't mine chests if it's not completely empty however). It's recommended that you take a few of the chests you find back to your house to store stuff with, since crafting your own chests will use ![]() Iron Bars, and you'll want to save up your iron for other purposes.
Iron Bars, and you'll want to save up your iron for other purposes.
Another thing you'll run into underground are ![]() Cobwebs, which slow you down when you try to move through them. You can cut them down with any weapon or tool and then pick them up. Harvested cobweb can be turned into
Cobwebs, which slow you down when you try to move through them. You can cut them down with any weapon or tool and then pick them up. Harvested cobweb can be turned into ![]() Silk, which is used to make a
Silk, which is used to make a ![]() Bed, used to change your spawn point. The Green Arrow on the Map will not disappear when you do this, however. Silk can also be used to make some types of decorative items and vanity clothing.
Bed, used to change your spawn point. The Green Arrow on the Map will not disappear when you do this, however. Silk can also be used to make some types of decorative items and vanity clothing.
While mining underground it is possible to come across pools of water. Torches do not work underwater, so you must use ![]() Glowsticks, but they cannot be crafted and must be found at this stage of the game. You can use them to throw them, but they will bounce and move around and it may be hard to place exactly where you want them. You can craft
Glowsticks, but they cannot be crafted and must be found at this stage of the game. You can use them to throw them, but they will bounce and move around and it may be hard to place exactly where you want them. You can craft ![]() Sticky Glowsticks anywhere by combining Gel with a Glowstick; these will stick to walls when thrown, making them easier to place. No matter which you use, however, glowsticks are not permanent when thrown, unlike placed torches.
Sticky Glowsticks anywhere by combining Gel with a Glowstick; these will stick to walls when thrown, making them easier to place. No matter which you use, however, glowsticks are not permanent when thrown, unlike placed torches.

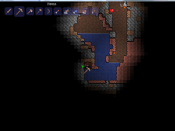
Digging out an air pocket.
When stepping into a pool of water the character will sink as if weighted down. Don't fear diving down underwater to continue moving downwards, as the character has a rather large air meter. However, if close to running out of air there is a way to regain air quickly. First either find a wall or make a small shaft at the bottom of the water, and then dig a tunnel in the wall and then upward in the ceiling. The water will not fill the upper squares. As the air supply runs low, jump into the hole. This will refill the meter.
If you see an area that glows blue and has blue mushrooms, congrats - you have found a glowing mushroom biome. This place is useful as it’s grass grows glowing mushrooms and giant glowing mushrooms (which act like trees).Gather some, and when you return to your base, craft a bottle, place it on a table, and craft healing potions out of lesser healing potions and those glowing mushrooms. They heal for twice as much as lesser healing potions do, and are the second best healing item pre-hard mode, after honeyfins.
Afterward
Now that you've learned how to play and survive, the best thing to do would be to simply continue playing, discovering new things on your own. If you do get stuck, find something you're unsure about, or simply want detailed information about one of your items, look up what you need on the wiki, or check out the wiki's Walkthrough. It may be handy to check the Armor or Weapons pages for info on what direction to head next. You might also want to look at the pages about the Bosses of the game so you know what your long term task will be. And remember, you can play the game your way, so don't feel bound by the information on this wiki.
Tips
- Exiting the game then re-entering the world will bring you back to your spawn point (this will destroy blocks that block your spawn point).
- If you want to be a mage, gather fallen stars at night and craft mana crystals with them, so you can increase you maximum mana.
- If you find Sunflowers, place some around your house. It gives some helpful bonuses that can make surviving easier.
- It's best to build your base close to the original Spawn point so you have less trouble returning to it at Night or if you respawn.
- When digging very deep, it's useful to leave a way back up. The easiest way would be to leave Platforms on a side of the passage as a makeshift ladder, or placing Ropes while digging the shaft.
- Torches last forever so bring plenty along and place them liberally when going mining and exploring.
- Avoid the Corruption / Crimson early on as they contain tough enemies that will kill you.
- If you want an Anvil but do not want to use Bars or Money, you can find them in some ruined houses underground.
- Finding a Living Tree is an easy way to get a free NPC house by placing torches. Only works in pre-1.4 versions. 1.4 players may also find deadly gnomes. Leading them to an area without background walls will turn them into objects, and will increase luck to nearby players.
- It is highly advisable to begin gathering materials for a few Buffs. You can quickly gather Sand and Dayblooms, as well as the Daybloom Seeds and Clay used to begin Gardening with Clay Pots.
- Two of the earliest buffs that can be easily concocted are the Regeneration Potion and the Ironskin Potion, and for the early game can significantly improve your survivability.
- Two of the earliest buffs that can be easily concocted are the
- On Old-gen console, Windows Phone, Old Chinese, , and tModLoader Legacy versions, if you find your way into a Dungeon early there is a chance you can obtain a Water Bolt, a powerful early-game Magic Weapon.
- Be careful not to venture too far into the dungeon as the Dungeon Guardian will spawn and instantly kill you.
- Be careful not to venture too far into the dungeon as the
More information
For more advanced information, please check out the guides listed below.
- Crafting 101 - This is the introductory crafting guide. It contains a detailed explanation of how crafting works, and the ideal crafting station setup.
- NPCs - There are more NPCs than just the Guide that you'll want to make homes for.
- Bases - How to create an effective home base.
- Mining techniques - This guide goes into detail on easy and efficient ways to mine ore, and what to expect when venturing deeper into Terraria.
- Gardening - How to grow gardens of Trees, Mushrooms and other less savory things. This is a wonderful guide for learning how to properly organize and maintain a garden.
- List of weapons - All the weapons you might find on your travels will be explained here.
- PvP - A great place to start when looking for information on Player vs. Player combat. Not quite for beginners, however it's a great read for those who would like to study beforehand.
- Eye of Cthulhu Boss Fight - One of the Bosses a player might run up against early on in their worlds.
- King slime boss fight - Another boss the player can encounter early game.
- List of Bosses - A list of all the Bosses players will come in contact with in their worlds. Bosses are powerful monsters that have a lot of health and do devastating damage to the unprepared.
- Practical Tips - Some tips for all skill levels of players
All guides have the following list of Guide pages, such as below, that you can use to move between guides very quickly. Use those if you want to learn more things.
- Getting started
- Practical tips
- Walkthrough
- Mining techniques
- Invasion events