Hardmode is a game advancement that is triggered in a world when the Wall of Flesh is defeated for the first time. The change is permanent (unless using third-party tools, ignored in this guide).
The beginning of Hardmode is considered to be one of the hardest parts of the game, so this guide will hopefully make it easier for a new player.
Preparations
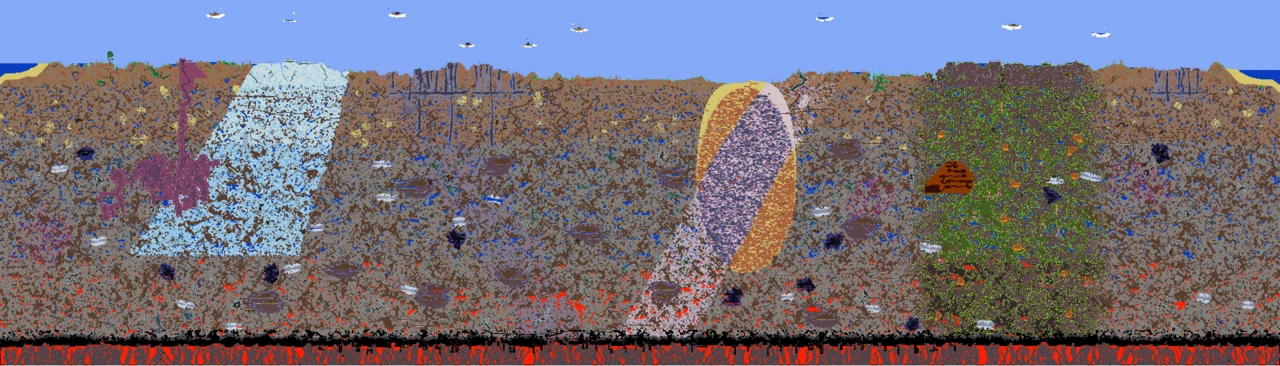
Initial Hardmode map of a small world on the  PC version. Notice the "V" made of the new outburst of Corruption (dark purple) and Hallow (pale pink), which each replace existing world blocks upon the defeat of the Wall of Flesh.
One of the things players should prepare for is the spread of the Hallow and Corruption/Crimson. As soon as Hardmode starts, two diagonal strips of Hallow and Corruption/Crimson will generate in a V-shape, and the two biomes start to slowly consume the world.
The main threat of the infection is its effects on the Jungle. Mud Blocks can be affected by Corruption/Crimson (but not Hallow), and they will be permanently turned into regular Dirt Blocks. Although it takes an extremely long time for it to consume a large part of it, the damage is very hard to repair as it requires the player to manually replace all the Dirt for Mud. A large, 3 block wide tunnel filled with incorruptible blocks will protect the biome. Note that smashing a Demon Altar/Crimson Altar has a chance to corrupt or hallow a random block on the map, which could be inside of the Jungle.
The player will need the best gear available in Pre-Hardmode if they want to survive for longer before obtaining better items.
- Melee users should use Molten armor and weapons like Night's Edge, Dark Lance or Cascade.
- Ranged users benefit from the Necro armor. The best weapons available for them are the Quad-Barrel Shotgun or Molten Fury. The Star Cannon is also powerful.
- For magic users, Jungle armor or the Wizard set are the best available, with weapons like the Flamelash, Water Bolt or Demon Scythe.
- A Summoner's best choices are the Bee armor or Obsidian Armor with the Imp Staff and the Spinal Tap.
- All classes should also bring accessories like the Terraspark Boots or Amphibian Boots, and one of the Emblems dropped by the Wall of Flesh. If in Expert or Master mode, bring a Shield of Cthulhu and a Worm Scarf/Brain of Confusion (
) - Additionally, a Molten Pickaxe (or, on the
 Windows Phone version, Old Chinese version, Nintendo version, and tModLoader 1.3-Legacy version, a Reaver Shark, obtained from fishing in the ocean) is required to mine Cobalt or Palladium ore.
Rare drops like the Black Lens, Nazar or Bezoar are easier to get without the stronger enemies of Hardmode.
A house in the Jungle should be made for the Witch Doctor, as he will sell Leaf Wings when he is in the biome at night. A King Statue can also be used to simply teleport him to the Jungle.
The player should make a Surface Glowing Mushroom biome with a house for Truffle. Because the enemies there are significantly stronger in Hardmode, it is advised that one create the biome and town pre-hardmode.
A Hellevator should also be built, as it's an effective way to access any depth at any time, which will save a lot of time when mining the new ores and farming for rare drops.
The First Steps
The first thing to do in Hardmode is to go to the natural Corruption/Crimson Biome and start smashing Altars.
- When smashing one altar, the world will be blessed with Cobalt or Palladium Ore;
- Smashing another one will make Mythril or Orichalcum Ore appear;
- Smashing a third one will make Adamantite or Titanium Ore appear.
Smashing every set of three after this point will cyclically generate the same ore, but much less than the last, so smashing 9 to 12 will be more than enough.
It's difficult to survive in this new environment, since the new enemies will quickly overwhelm players equipped with even the best Pre-hardmode gear. Because of this, it's better to look for a new weapon before going down into the Caverns to mine the new ores.
The easiest way to obtain Hardmode ore is mining them on the ceiling of the Underworld, as the Underworld won't get any new difficult enemies immediately upon entering hardmode.
A much more time-consuming way to obtain Hardmode ore is from fishing crates. While much slower than other methods, this does not require the player to smash any altars, which can help keep quarantined areas of the map safe from the new randomly-placed Hallow or Corruption/Crimson block that spawns when smashing each one.
There are many different choices for every class:
- Melee users can get an Amarok
very early on, although alternatives such as the craftableChikwill suffice until they do. The Amarok has a low chance to be dropped by any enemy in the Snow Biome, so with a quick farm they can easily (if perhaps not quickly) obtain it. TheSwords or Spears made from ores can be quickly obtained and they will get the job done until better weapons (e.g. a Phasesaber) are acquired. The Dao of Pow is a good flail, reasonably easy to craft, and the only option of flail for a while. - Ranged users can buy a Shotgun from the Arms Dealer as soon as Hardmode starts, which can then be upgraded to the Onyx Blaster
, using the drops from the corrupted/crimson desert and underground crimson or corruption. TheClockwork Assault Rifle is also very strong and should definitely be used if the Wall of Flesh dropped it. A Cobalt or Palladium Repeater also gets the job done until better options (e.g. higher-tier-ore repeaters, Shadowflame Bow, orDaedalus Stormbow) are acquired.- Ranged users have many more ammo options in Hardmode, several of which are available right away with a little exploration or farming, although obtaining a better weapon is a higher priority than getting better ammunition. Crystal Bullets, Cursed Bullets (in Corruption worlds), and Ichor Bullets (in Crimson worlds) are interesting options that require very few special crafting ingredients, while Exploding Bullets can be crafted entirely from purchased ingredients. Likewise, Holy Arrows, Cursed Arrows (in Corruption Worlds), and Ichor Arrows (in Crimson worlds) are special arrows which require few unusual ingredients. However, on
, the dryad can sell the opposite evil seeds in a graveyard, allowing the use of Ichor and Cursed Flames, regardless of the world's evil.
- Ranged users have many more ammo options in Hardmode, several of which are available right away with a little exploration or farming, although obtaining a better weapon is a higher priority than getting better ammunition.
- A Magic user can quickly farm for the Sky Fracture
, a weapon that is very useful even after Plantera is defeated. They can also fish for aCrystal Serpent, but it can take longer to obtain. TheMeteor Staffis even easier to craft, however it is hard to use it underground. TheLaser Rifle, if it dropped from the Wall of Flesh, will also be highly useful initially.
- Other early-Hardmode options that should be high priorities are the Crystal Storm (which has high DPS for early-Hardmode crowd control), the Cursed Flames (in Corruption worlds, which has high-damage piercing projectiles that inflict a high-DPS debuff), and the Golden Shower (in Crimson worlds, which deals modest damage but inflicts an extremely useful, defense-lowering debuff which few enemies - not even the Moon Lord - are immune to).
- Also be on the lookout for an abundance of enemy-dropped weapons, most crucially the Frost Staff (a good starting weapon), Poison Staff (a, upgradeable magic shotgun), and Nimbus Rod (a powerful, upgraded Crimson Rod).
- The above weapons will help magic-using players be able to eventually obtain more powerful early-Hardmode weapons, such as the Shadowflame Hex Doll
, theLife Drain, and theSpirit Flame.
- Other early-Hardmode options that should be high priorities are the
- A Summoner will have to get the Spider Staff
and theQueen Spider Staff. This is a problem because theBlack Recluses can very easily kill a player in 3 to 4 hits. Since they can't go through blocks, it is recommended to farm the Spider Fangsinside of a "box" while the minions kill the spiders from the outside. Make sure to have yourMagic Mirror (or, preferably, Cell Phone) ready in case aGiant Worm or another enemy spawns. Be sure to utilize any other, more easily-obtainable weapons for other classes to defend yourself as needed. Wall of Flesh drops can also be highly useful, especially if it dropped the Firecracker; if it didn't, you may consider farming for it.- The next whip upgrade requires defeating the highly-deadly Ice Golem, which is not wise until you are fully geared-up with early-Hardmode equipment.
- With the use of the above gear and a lot of luck, you might get the Pirate Staff
, which has much higher damage but lacks any debuff.
- The next whip upgrade requires defeating the highly-deadly
With these new weapons and a couple Mining and Spelunker Potions, getting the Hardmode ores will be a much easier task.
Before bosses
The Mechanical Bosses can be very hard to kill for a new player, so using the best weapons, armors and accessories is advised. If you are up to it, Queen Slime can be fought to get better gear (Such as the Blade Staff ()) and/or practice fighting.
Palladium and Titanium armors are very good with their defensive set bonuses, while Adamantite and Orichalcum armors are better for those looking for the maximum DPS. It is better to skip Cobalt and Mythril armor, as they don't have very good stats or a special set bonus to make up for it.
There is also Frost and Forbidden armor, but they should only be used if the player wishes to mix different damage types, as they aren't strong enough by themselves. Another good armor set for all classes is the Crystal Assassin Armor, dropped by Queen Slime.
If the player hasn't obtained them already, Wings are essential for the fights, as it's hard to dodge their attacks without them. The best ones available are the Frost Wings, but the Leaf Wings are easier to obtain at the cost of some speed.
An Emblem of the player's class is also important, as well as defensive and mobility accessories like the Cross Necklace, Philosopher's Stone, Ankh or Obsidian Shield, and Frog Leg. Having good modifiers like Lucky, Menacing or Warding is also very important for the battles.
Now that the player is well equipped, the only thing left to do is to make a good arena, since having one will make the bosses much easier to fight. Two to three rows of platforms will be enough space to move around. Additionally: This content is transcluded from Guide:Practical tips § Combat.
- For nocturnal bosses, starting the battle just after the sun sets (7:30 PM) will provide the maximum amount of time to defeat the boss. In Hardmode, the Moon Charm and/or Moon Stone and their upgrades are also useful at night.
- Boss battles can be won or lost before the battle ever starts. Choose your equipment and have it ready; find and/or make potions and placed buffs;
use the highest-tier food you have available; set up an arena appropriate to the boss; learn the strategies for the boss you're facing. - Prepare your Boss-fighting arena with adequate lighting, Campfires and Heart Lanterns for health regeneration, and Stars in Bottles for mana regeneration if you use magic. Bast Statues
will provide a significant defensive boost.Garden Gnomesand (if underground) proper torch placementwill reduce damage taken and increase damage dealt due to the luck. Note Torch God's Favor helps with this.Honey pools can also be used for extra health regeneration. - Sunflowers provide the Happy! buff to players within a 50-tile radius, which grants a +10% movement speed bonus and 17% reduction in enemy spawn rate.
- Always carry around a stack of the highest-tier healing potion available, as relying only on natural Health Regeneration is not a good idea. Depending on the game stage, this can include items such as Mushrooms or Honeyfins. On the PC, Console, Mobile, and tModLoader versions, Restoration Potions are healing potions with a shorter cooldown.
- Likewise carry mana potions, if you use Magic.
- The Strange Brew
is also an option, but its weak healing effect will trigger the Potion Sickness cooldown as well as Mana Sickness. On the Old-gen console version, Windows Phone version, Old Chinese version, Nintendo version, and tModLoader 1.3-Legacy version, Restoration Potions can save a slot, but will likewise trigger both cooldowns.
- It is suggested to build houses for the Dryad and the Nurse NPCs in your arena. The former casts the Dryad's Blessing
buff, which increases your defense and provides you with a thorns-like effect, while the latter can heal and remove debuffs instantly, at the cost of somecoins. - Bosses are displayed on the Minimap: Follow the boss's icon to track it when you're struggling to find it. You can identify the boss icons by checking their respective wiki pages.
- Once you have freed the Mechanic in the Dungeon, you can use Wire to enhance your arena with Traps and helpful Heart and Star Statues. The former helps to damage the enemies, though be careful to set them up correctly in order not to hurt yourself during the battle. The latter will spawn heart and star pickups, respectively. Connect these devices to timers.
- It may be useful to summon and kill the Eye of Cthulhu or King Slime before summoning any harder boss in order to spawn an extra one-use pool of Hearts. Note that this will prevent any Heart Statues from spawning new Hearts.
- Remember to use the Sharpening Station
,Ammo Box,Crystal Ball, Bewitching Table, andSlice of Cakebefore you go to explore or battle bosses/invasions. These will give boosts that are useful to take, with the first four being class-specific. They giveSharpened,Ammo Box,Clairvoyance, Bewitched, andSugar Rush, respectively.
- Getting started (Walkthrough)
- Maintaining purity
- Hallow
- Jungle Temple