
| Type | |
|---|---|
| Environment | |
| AI Type | Rider AI |
| Damage | 50/100/150 (contact) 140200 (Martian Deathray) 300450 (Martian Deathray berserk) 60100 (Saucer Scrap) |
| Max Life | 270005400081000 (all parts) |
| Defense | 100 |
| KB Resist | 100% |
| Immune to | All debuffs |
- Item (Quantity)Rate
- groupgroup (One of the 6
/ 9following items will always drop)900% - 16.66%
11.11% - 16.66%
11.11% - 16.66%
11.11% - 16.66%
11.11% - 16.66%
11.11% - 16.66%
11.11% - 11.11%
- 11.11%
- 11.11%
- 10%
 Greater Healing Potion (5-15)100%

| Hurt | |
|---|---|
| Killed |
- Internal NPC ID: 392
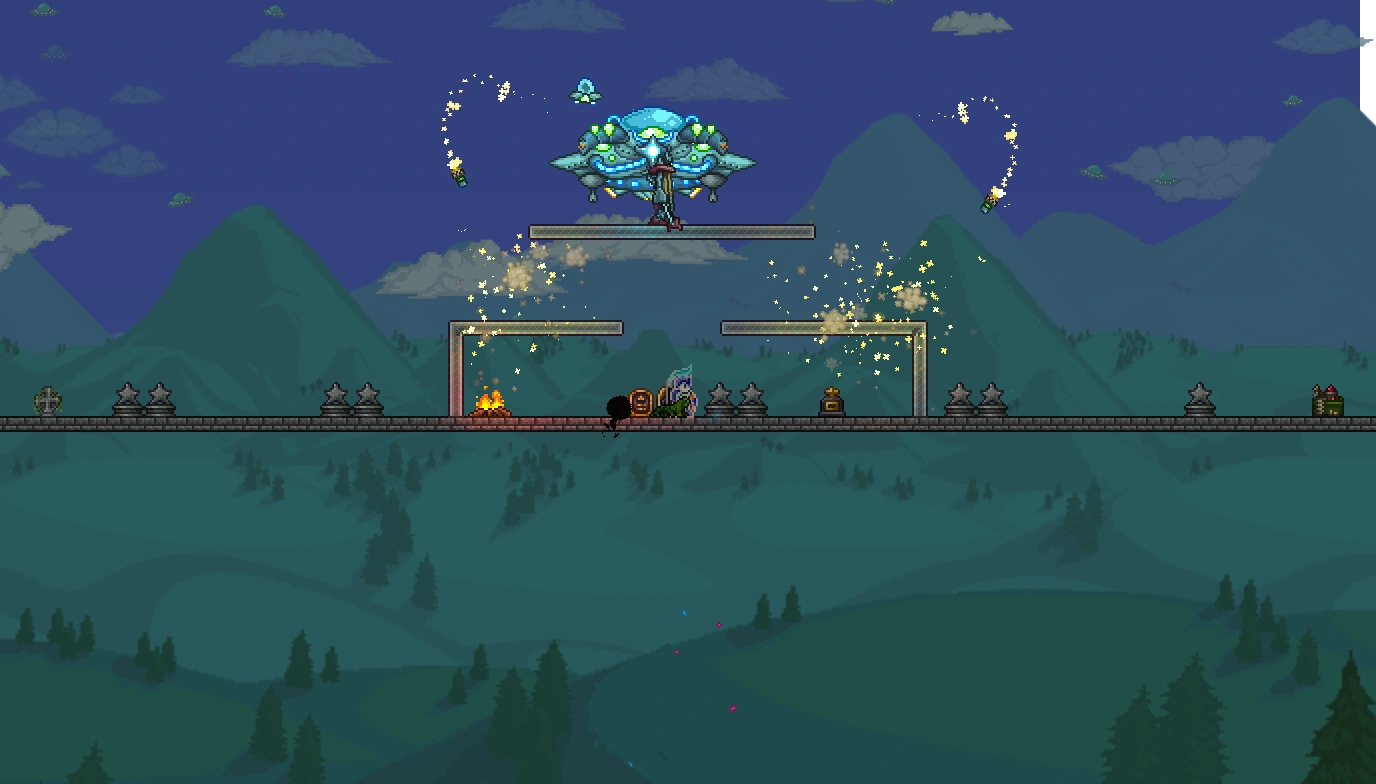
The Martian Saucer is a large flying Hardmode, post-Golem boss that spawns during the Martian Madness event. It can only spawn if the Martian Madness event is around 30% completed or higher. It can move through blocks. It has four turrets with independent health meters that each must be destroyed, which include two rocket launchers and two laser machine guns. In addition, the saucer itself fires a large beam ("Martian Deathray") which can only fire directly downward and which cannot be destroyed independently.
Behavior
The Martian Saucer has three attack phases it cycles through in order. It always moves a short distance between them.
- The saucer locks onto the player's current location and shoots a volley of lasers at that location. This attack does not follow the player if they move around.
- The saucer fires multiple small homing missiles from its cannons.
- The saucer positions itself above the player before unleashing its "deathray", traveling in the direction the player was in.
In Expert Mode, the Martian Saucer enters a second phase upon destroying all four turrets, whereupon its core becomes visible and can be damaged. During the second phase, the boss continually shoots a deathray that deals extreme damage, only bested by the Dungeon Guardian, enraged Skeletron, enraged Skeletron Prime, enraged Empress of Light, and in Master Mode, the Clown. Prior to Update 1.4.0.1, this phase would occur regardless of if the world was in Expert Mode.
Parts

Notes
- If the saucer is transitioning into its second phase during its deathray attack, the deathray will stay in one place until the transition is complete.
- Killing a Martian Saucer adds 5 percent completion to the event.
- Unlike other event bosses, the Saucer leaves if all players are killed.
- The Radar counts the Saucer as 6 enemies total: one for each turret, one for each cannon, one for the hitbox part of the saucer, and one for the large invulnerable piece.
Tips
A bunker that shields the player from most attacks pre-1.4.0.1.
- To dodge its first attack, hover above or below its lasers. To dodge its second attack, run away from the saucer as it shoots so that most of the missiles hit the ground in front of the player.
To avoid its third attack, as well as its final enraged stage, simply stand under blocks. Weapons that attack through blocks, yoyos, or homing weapons like the Possessed Hatchet are useful during this phase.As of 1.4.0.1, you can no longer hide under blocks to avoid the deathray. To avoid getting caught, fly over the saucer or dash away or use the Rod of Discord. During the second phase, move counter to the saucer's movement during the pauses in its deathray. With well timed dashes, the laser can be completely avoided.- If the "Wet" buff from Cute Fishron is activated, the player can fly slightly faster than the saucer.
The player does not get damaged by the deathray if teleported through it with Hook of Dissonance.
Trivia
- The Martian Saucer is a unique mini-boss in several ways:
- It is the only mini-boss that has a status message appear in the chat when defeated. It is furthermore the only mini-boss in the game that has a defeat message but not an "encounter" message (i.e. the message "Martian Saucer has awoken!" never appears).
- It is the only mini-boss to drop recovery potions.
- It appears in the "boss" section of the bestiary, unlike other minibosses.
- The Martian Saucer was once named "Mothership" during development, according to an unimplemented achievement.
The ![]() Bestiary entry for the Martian Saucer: "An advanced flying saucer from somewhere well beyond this world. The destruction from its weaponry is unimaginable."
Bestiary entry for the Martian Saucer: "An advanced flying saucer from somewhere well beyond this world. The destruction from its weaponry is unimaginable."
History
- Desktop 1.4.0.1:
- No longer drops the Laser Drill, Anti-Gravity Hook, and Charged Blaster Cannon.
- Spawns less often, no longer has a berserk phase in normal mode, and its deathray now goes through blocks.
- Desktop 1.3.0.4: Fixed invisible, invincible pieces in multiplayer.
- Desktop 1.3.0.1: Introduced.
- Console 1.0.933.1: Introduced. ()
- Console 1.0.750.0: Introduced. ()
- Switch 1.0.711.6: Introduced.
- Mobile 1.3.0.7: Introduced.
- Anomura Fungus
- Antlion
- Bat
- Bee
- Blood Crawler
- Crab
- Crimera
- Demon Eye
- Devourer
- Eater of Souls
- Face Monster
- Fungi Bulb
- Giant Worm
- Granite Elemental
- Granite Golem
- Harpy
- Hoplite
- Hornet
- Jellyfish
- Man Eater
- Meteor Head
- Mushi Ladybug
- Piranha
- Skeleton ()
- Shark (
- Orca
-
- Slime
- Snatcher
- Snow Flinx
- Tomb Crawler
- Undead Viking
- Vulture
- Wall Creeper
- Zombie
- Angler Fish
- Angry Trapper
- Arapaima
- Armored Skeleton
- Armored Viking
- Bat
- Black Recluse
- Blood Feeder
- Chaos Elemental ()
- Clinger
- Corruptor
- Derpling
- Digger
- Floaty Gross
- Gastropod ()
- Giant Fungi Bulb
- Giant Tortoise (
- Ice
-
- Herpling
- Ice Elemental
- Ichor Sticker
- Icy Merman
- Jellyfish
- Jungle Creeper
- Moss Hornet
- Pigron
- Pixie
- Possessed Armor
- Skeleton Archer
- Slime
- Unicorn
- Wandering Eye
- Werewolf
- Wraith
- Wolf
- Alien Skater
- Baby Dinosaur
- Baby Eater
- Baby Face Monster
- Baby Grinch
- Baby Hornet
- Baby Imp
- Baby Ogre
- Baby Penguin
- Baby Red Panda
- Baby Skeletron Head
- Baby Snowman
- Baby Truffle
- Baby Werewolf
- Black Cat
- Bunny
- Cursed Sapling
- Destroyer-Lite
- Dynamite Kitten
- Eater of Worms
- Estee
- Everscream Sapling
- Eyeball Spring
- Fennec Fox
- Flying Piggy Bank
- Glittery Butterfly
- Hoardragon
- Honey Bee
- Ice Queen
- Itsy Betsy
- Lil' Harpy
- Lizard
- Mini Minotaur
- Mini Prime
- Moonling
- Parrot
- Phantasmal Dragon
- Plantera Seedling
- Plantero
- Puppy
- Propeller Gato
- Rez and Spaz
- Sapling
- Shadow Mimic
- Shark Pup
- Skeletron Jr.
- Slime Prince
- Slime Princess
- Spider
- Spider Brain
- Squashling
- Sugar Glider
- Suspicious Eye
- Tiki Spirit
- Turtle
- Tiny Fishron
- Void Bag
- Volt Bunny
- Zephyr Fish
- Bat
- Guinea Pig
- Slime
- Lua error: too many expensive function calls.
- Lua error: too many expensive function calls.
- Lua error: too many expensive function calls.
- Lua error: too many expensive function calls.
- Lua error: too many expensive function calls.
- Lua error: too many expensive function calls.
- Lua error: too many expensive function calls.
- Lua error: too many expensive function calls.
- Lua error: too many expensive function calls.
- Lua error: too many expensive function calls.
- Lua error: too many expensive function calls.
- Lua error: too many expensive function calls.
- Lua error: too many expensive function calls.
- Lua error: too many expensive function calls.
- Lua error: too many expensive function calls.
- Lua error: too many expensive function calls.
- Lua error: too many expensive function calls.
- Lua error: too many expensive function calls.
- Lua error: too many expensive function calls.
- Lua error: too many expensive function calls.
- Lua error: too many expensive function calls.
- Lua error: too many expensive function calls.
- Lua error: too many expensive function calls.
- Lua error: too many expensive function calls.
- Lua error: too many expensive function calls.
- Lua error: too many expensive function calls.
- Raven
- Lua error: too many expensive function calls.
- Lua error: too many expensive function calls.
- Lua error: too many expensive function calls.
- Lua error: too many expensive function calls.
- Lua error: too many expensive function calls.
- Lua error: too many expensive function calls.
- Lua error: too many expensive function calls.
- Lua error: too many expensive function calls.
- Lua error: too many expensive function calls.
- Lua error: too many expensive function calls.
- Lua error: too many expensive function calls.
- Lua error: too many expensive function calls.
- Lua error: too many expensive function calls.
- Lua error: too many expensive function calls.
- Lua error: too many expensive function calls.
- Lua error: too many expensive function calls.
- Lua error: too many expensive function calls.
- Lua error: too many expensive function calls.
- Lua error: too many expensive function calls.
- Lua error: too many expensive function calls.
- Lua error: too many expensive function calls.
- Lua error: too many expensive function calls.
- Lua error: too many expensive function calls.
- Lua error: too many expensive function calls.
- Lua error: too many expensive function calls.
- Lua error: too many expensive function calls.
- Lua error: too many expensive function calls.
- Lua error: too many expensive function calls.
- Lua error: too many expensive function calls.
- Lua error: too many expensive function calls.
- Lua error: too many expensive function calls.
- Lua error: too many expensive function calls.
- Lua error: too many expensive function calls.
- Lua error: too many expensive function calls.
- Lua error: too many expensive function calls.
- Lua error: too many expensive function calls.
- Lua error: too many expensive function calls.
- Lua error: too many expensive function calls.
- Lua error: too many expensive function calls.
- Lua error: too many expensive function calls.
- Lua error: too many expensive function calls.
- Lua error: too many expensive function calls.
- Lua error: too many expensive function calls.
- Lua error: too many expensive function calls.
- Lua error: too many expensive function calls.