(→Types: I fixed a programming error) Tag: Visual edit |
(→Trivia) Tag: Visual edit |
||
| Line 1: | Line 1: | ||
| + | {{npc infobox |
||
| − | '''Critters''' are characters that do not normally cause harm or interact with the player in any other way, except in that they can be killed by players or enemies rather easily. They have very low health and serve as ambient wildlife in the world of Terraria. Some critters can be summoned by means of a [[statue]], and otherwise spawn randomly in any environments that support them. There are currently 28 different Critters. |
||
| + | | image2 = Golem second form.png |
||
| + | | type = Boss |
||
| + | | environment = Jungle Temple |
||
| + | | ai = Golem Body AI |
||
| + | | damage = 72 |
||
| + | | life = 39000<br>16000 (head)<br> 9000 (body)<br> 7000 (each fist) |
||
| + | | defense = 26 |
||
| + | | Stynger|1|12.5% |
||
| + | | Stynger Bolt|60-99|100% (with Stynger) |
||
| + | | Possessed Hatchet|1|12.5% |
||
| + | | Sun Stone|1|12.5% |
||
| + | | Eye of the Golem|1|12.5% |
||
| + | | Picksaw|1|12.5% |
||
| + | | Heat Ray|1|12.5% |
||
| + | | Staff of Earth|1|12.5% |
||
| + | | Golem Fist|1|12.5% |
||
| + | | Golem Trophy|1|10% |
||
| + | | Greater Healing Potion|5-15|100% |
||
| + | | Beetle Husk|4-8|100%{{pc icon}} {{Console icon}} |
||
| + | | Golem Mask|1|14.29%{{pc icon}} {{Console icon}} |
||
| + | | Treasure Bag (Golem)|1|100% in [[Expert Mode]] |
||
| + | | money = {{gc|15}} |
||
| + | }} |
||
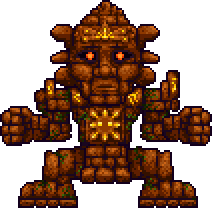
| + | '''Golem''' is a [[Hardmode]], post-[[Plantera]] [[boss]] found in the [[Jungle Temple]]. {{pc icon}} Defeating Golem enables [[Cultist|Cultists]] to spawn at the dungeon, along with [[Martian Probe|Martian Probes]] to spawn in the world. |
||
| − | As of 1.3, some critters have a golden variation that has a 1 in 150 chance of spawning instead of a normal one. These golden critters sell for 10 gold each. |
||
| + | == Summoning == |
||
| − | All Critters can be caught with the [[Bug Net]]. If a Critter caught with a Bug Net is taken from the inventory and "used" (placed on the ground), it is again released into the environment to behave as usual. Many caught Critters can also be combined with a [[Terrarium]] to make a [[Cage]] for display. In the case of [[Butterfly|Butterflies]], a [[bottle]] is required instead to make a [[Butterfly Jar]], or [[Bottled Water]] in the case of [[Goldfish]]. Bottled [[Firefly|Fireflies]] and [[Lightning Bug]]s also function as light sources. In the {{console version}}, some captured critters can be sold for {{sc|5}} as well. |
||
| + | Golem is summoned by activating the [[Lihzahrd Altar]] found in the final chamber of the [[Jungle Temple]]. Activation requires one [[Lihzahrd Power Cell]], which must be present in the player's inventory. The activation automatically consumes one Power Cell and spawns Golem immediately. But you need to have killed [[Plantera]] first. You can't just use a [[Picksaw]] to mine through the temple and then summon the Golem |
||
| + | == Attacks == |
||
| − | Many caught Critters can be used as [[Bait]] with a [[Fishing Pole]] in order to go [[Fishing]]. These generally include any insect, worm, or mollusk (snail) Critters. |
||
| + | (Normal Mode) |
||
| + | Golem's main body cannot move through [[block]]s, but its fist and laser attacks can. Its stone head can also travel through blocks once it detaches in the second stage. On console versions, the stone head cannot pass through blocks once detached, allowing players to trap it by placing blocks. |
||
| + | {{pc icon}}(Expert Mode) |
||
| − | == |
+ | === First form === |
| + | (Normal Mode) |
||
| − | [[File:Placed Birds.gif|frame]] |
||
| + | Golem will shoot ricocheting fireballs, attack with its fists that extend from chains, and jump around. These increase in frequency as each part takes more damage: When the fists are damaged, they will attack more often; when the head is damaged, Golem jumps and shoots more often. Golem's fists can travel through blocks, but have limited range, and will also retract immediately upon being hit with any weapon. |
||
| − | [[File:Placed Ducks.gif|frame]] |
||
| − | [[File:Placed Scorpions.gif|frame]] |
||
| − | [[File:Placed Bunny.gif|frame]] |
||
| − | [[File:Placed Squirrel.gif|frame]] |
||
| − | [[File:Placed Red Squirrel.gif|frame]] |
||
| − | [[File:Placed Gold Squirrel.gif|frame]] |
||
| − | [[File:Placed Penguin.gif|frame]] |
||
| − | [[File:Placed Snails.gif|frame]] |
||
| − | [[File:Placed Frog.gif|frame]] |
||
| − | [[File:Placed Mouse.gif|frame]] |
||
| − | [[File:Placed Worm.gif|frame]] |
||
| − | [[File:Placed Goldfish.gif|frame]] |
||
| − | [[File:Placed Butterflies.gif|frame]] |
||
| − | [[File:Placed Fireflies.gif|frame]]<!--Still needs the Grasshopper cage, guys.--> |
||
| + | * When the head falls below half health (8000), all previous attacks continue, but the head will begin to fire lasers that can travel through blocks. It fires more rapidly as it takes more damage and the fists will not retract upon being damaged with a weapon. |
||
| − | {| |
||
| − | |-style="vertical-align:top" |
||
| − | |{{npc infobox |
||
| − | | name = [[Bird]] |
||
| − | | image = Bird.png |
||
| − | | environment = Forest |
||
| − | | ai = Bird |
||
| − | | damage = 0 |
||
| − | | life = 5 |
||
| − | | defense = 0 |
||
| − | | Bird Banner|1| 0.5% |
||
| − | }} |
||
| − | |{{npc infobox |
||
| − | | name = [[Gold Bird]] |
||
| − | | image = Gold Bird.png |
||
| − | | environment = Forest |
||
| − | | ai = Bird |
||
| − | | damage = 0 |
||
| − | | life = 5 |
||
| − | | defense = 0 |
||
| − | }} |
||
| − | |{{npc infobox |
||
| − | | name = [[Black Scorpion]] |
||
| − | | image = Black Scorpion.png |
||
| − | | environment = Desert |
||
| − | | ai = Passive |
||
| − | | damage = 0 |
||
| − | | life = 5 |
||
| − | | defense = 0 |
||
| − | | power = 15% bait |
||
| − | }} |
||
| − | |-style="vertical-align:top" |
||
| − | |{{npc infobox |
||
| − | | name = [[Blue Jay]] |
||
| − | | image = Blue Jay.png |
||
| − | | environment = Forest |
||
| − | | ai = Bird |
||
| − | | damage = 0 |
||
| − | | life = 5 |
||
| − | | defense = 0 |
||
| − | }} |
||
| − | |{{npc infobox |
||
| − | | name = [[Bunny]] |
||
| − | | image = Bunny.png |
||
| − | | environment = Surface |
||
| − | | ai = Passive |
||
| − | | damage = 0 |
||
| − | | life = 5 |
||
| − | | defense = 0 |
||
| − | | Bunny Banner|1| 0.5% |
||
| − | }} |
||
| − | |{{npc infobox |
||
| − | | name = [[Gold Bunny]] |
||
| − | | image = Gold Bunny.png |
||
| − | | environment = Surface |
||
| − | | ai = Passive |
||
| − | | damage = 0 |
||
| − | | life = 5 |
||
| − | | defense = 0 |
||
| − | }} |
||
| − | |-style="vertical-align:top" |
||
| − | |{{npc infobox |
||
| − | | name = [[Cardinal]] |
||
| − | | image = Cardinal.png |
||
| − | | environment = Forest |
||
| − | | ai = Bird |
||
| − | | damage = 0 |
||
| − | | life = 5 |
||
| − | | defense = 0 |
||
| − | }} |
||
| − | |{{npc infobox |
||
| − | | name = [[Duck]] |
||
| − | | image = Duck.png |
||
| − | | environment = Forest |
||
| − | | ai = Duck AI |
||
| − | | damage = 0 |
||
| − | | life = 5 |
||
| − | | defense = 0 |
||
| − | }} |
||
| − | |{{npc infobox |
||
| − | | name = [[Firefly]] |
||
| − | | image = Firefly.png |
||
| − | | environment = Forest |
||
| − | | ai = Firefly AI |
||
| − | | damage = 0 |
||
| − | | life = 5 |
||
| − | | defense = 0 |
||
| − | | power = 20% bait |
||
| − | }} |
||
| − | |-style="vertical-align:top" |
||
| − | |{{npc infobox |
||
| − | | name = [[Frog]] |
||
| − | | image = Frog.png |
||
| − | | environment = Jungle |
||
| − | | ai = Passive |
||
| − | | damage = 0 |
||
| − | | life = 5 |
||
| − | | defense = 0 |
||
| − | }} |
||
| − | |{{npc infobox |
||
| − | | name = [[Glowing Snail]] |
||
| − | | image = Glowing Snail.png |
||
| − | | environment = Mushroom Biome |
||
| − | | ai = Snail AI |
||
| − | | damage = 0 |
||
| − | | life = 5 |
||
| − | | defense = 0 |
||
| − | | power = 15% bait |
||
| − | }} |
||
| − | |{{npc infobox |
||
| − | | name = [[Goldfish (NPC)|Goldfish]] |
||
| − | | image = Goldfish.png |
||
| − | | environment = Water |
||
| − | | environment2 = Rain |
||
| − | | ai = Swimming |
||
| − | | damage = 0 |
||
| − | | life = 5 |
||
| − | | defense = 0 |
||
| − | | Goldfish Banner|1| 0.5% |
||
| − | }} |
||
| − | |-style="vertical-align:top" |
||
| − | |{{npc infobox |
||
| − | | name = [[Grasshopper]] |
||
| − | | image = Grasshopper.png |
||
| − | | environment = Surface |
||
| − | | ai = Slime |
||
| − | | damage = 0 |
||
| − | | life = 5 |
||
| − | | defense = 0 |
||
| − | | power = 10% bait |
||
| − | }} |
||
| − | |{{npc infobox |
||
| − | | name = [[Gold Grasshopper]] |
||
| − | | image = Gold Grasshopper.png |
||
| − | | environment = Surface |
||
| − | | ai = Slime |
||
| − | | damage = 0 |
||
| − | | life = 5 |
||
| − | | defense = 0 |
||
| − | }} |
||
| − | |{{npc infobox |
||
| − | | name = [[Lightning Bug]] |
||
| − | | image = Lightning Bug.png |
||
| − | | environment = The Hallow |
||
| − | | ai = Firefly AI |
||
| − | | damage = 0 |
||
| − | | life = 5 |
||
| − | | defense = 0 |
||
| − | | power = 35% bait |
||
| − | }} |
||
| − | |-style="vertical-align:top" |
||
| − | |{{npc infobox |
||
| − | | name = [[Mallard Duck]] |
||
| − | | image = Mallard Duck.png |
||
| − | | environment = Forest |
||
| − | | ai = Duck AI |
||
| − | | damage = 0 |
||
| − | | life = 5 |
||
| − | | defense = 0 |
||
| − | }} |
||
| − | |{{npc infobox |
||
| − | | name = [[Mouse]] |
||
| − | | image = Mouse.png |
||
| − | | environment = Underground |
||
| − | | ai = Passive |
||
| − | | damage = 0 |
||
| − | | life = 5 |
||
| − | | defense = 0 |
||
| − | }} |
||
| − | |{{npc infobox |
||
| − | | name = [[Penguin]] |
||
| − | | image = Penguin.png |
||
| − | | environment = Snow Biome |
||
| − | | ai = Passive |
||
| − | | damage = 0 |
||
| − | | life = 5 |
||
| − | | defense = 0 |
||
| − | }} |
||
| − | |-style="vertical-align:top" |
||
| − | |{{npc infobox |
||
| − | | name = [[Scorpion]] |
||
| − | | image = Scorpion.png |
||
| − | | environment = Desert |
||
| − | | ai = Passive |
||
| − | | damage = 0 |
||
| − | | life = 5 |
||
| − | | defense = 0 |
||
| − | | power = 10% bait |
||
| − | }} |
||
| − | |{{npc infobox |
||
| − | | name = [[Snail]] |
||
| − | | image = Snail.png |
||
| − | | environment = Underground |
||
| − | | ai = Snail AI |
||
| − | | damage = 0 |
||
| − | | life = 5 |
||
| − | | defense = 0 |
||
| − | | power = 10% bait |
||
| − | }} |
||
| − | |{{npc infobox |
||
| − | | name = [[Squirrel]] |
||
| − | | image = Squirrel.png |
||
| − | | environment = Surface |
||
| − | | ai = Passive |
||
| − | | damage = 0 |
||
| − | | life = 5 |
||
| − | | defense = 0 |
||
| − | }} |
||
| − | |-style="vertical-align:top" |
||
| − | |{{npc infobox |
||
| − | | name = [[Red Squirrel]] |
||
| − | | image = Red Squirrel.png |
||
| − | | environment = Surface |
||
| − | | ai = Passive |
||
| − | | damage = 0 |
||
| − | | life = 5 |
||
| − | | defense = 1 |
||
| − | }} |
||
| − | |{{npc infobox |
||
| − | | name = [[Gold Squirrel]] |
||
| − | | image = Gold Squirrel.png |
||
| − | | environment = Surface |
||
| − | | ai = Passive |
||
| − | | damage = 0 |
||
| − | | life = 5 |
||
| − | | defense = ? |
||
| − | }} |
||
| − | |{{npc infobox |
||
| − | | name = [[Worm]] |
||
| − | | image = Worm.png |
||
| − | | environment = Rain |
||
| − | | environment2 = Underground |
||
| − | | ai = Worm |
||
| − | | damage = 0 |
||
| − | | life = 5 |
||
| − | | defense = 0 |
||
| − | | power = 25% bait |
||
| − | }} |
||
| − | |-style="vertical-align:top" |
||
| − | |{{npc infobox |
||
| − | | name = [[Truffle Worm]] |
||
| − | | image = Truffle Worm.png |
||
| − | | environment = Mushroom Biome |
||
| − | | ai = Worm |
||
| − | | damage = 0 |
||
| − | | life = 5 |
||
| − | | defense = 0 |
||
| − | | power = 666% bait |
||
| − | }} |
||
| − | |} |
||
| + | {{pc icon}}(Expert Mode) |
||
| − | ===Butterflies=== |
||
| − | {{main|Butterfly}} |
||
| + | === Second form === |
||
| + | (Normal Mode) |
||
| + | When Golem's stone head has taken full damage, it detaches to reveal its "true" form (this also stops the laser attacks). It's body (9000 health) becomes the target. If the arms have not been destroyed, they will continue to attack the player more rapidly while the body continues to jump around. |
||
| + | |||
| + | The stone head is invulnerable to attacks and will fly around with the ability to travel through blocks. It will fire lasers that can also travel through blocks, and shoot ricocheting fireballs. Both fireballs and lasers are fired more frequently as the body takes more damage. Once the body drops to 0 health, the stone head and any surviving arms will also die. The Golem will always drop one of the first 8 items (not counting [[Stynger Bolt]]). |
||
| + | |||
| + | {{pc icon}}(Expert Mode) |
||
| + | |||
| + | == Parts == |
||
{| |
{| |
||
| + | |- style="vertical-align:bottom" |
||
|{{npc infobox |
|{{npc infobox |
||
| − | | name = |
+ | | name = Golem Head |
| + | | ai = Golem Head AI |
||
| − | | environment = Forest |
||
| − | | |
+ | | damage = 64 |
| − | | |
+ | | life = 16000 |
| − | | |
+ | | defense = 20 |
| − | | |
+ | | id = 246 |
| − | | power = 5% bait |
||
| − | }} |
||
| − | |{{npc infobox |
||
| − | | name = Sulphur Butterfly |
||
| − | | environment = Forest |
||
| − | | ai = Butterfly AI |
||
| − | | damage = 0 |
||
| − | | life = 5 |
||
| − | | defense = 0 |
||
| − | | power = 10% bait |
||
| − | }} |
||
| − | |{{npc infobox |
||
| − | | name = Zebra Swallowtail Butterfly |
||
| − | | environment = Forest |
||
| − | | ai = Butterfly AI |
||
| − | | damage = 0 |
||
| − | | life = 5 |
||
| − | | defense = 0 |
||
| − | | power = 15% bait |
||
| − | }} |
||
| − | |-style="vertical-align:top" |
||
| − | |{{npc infobox |
||
| − | | name = Ulysses Butterfly |
||
| − | | environment = Forest |
||
| − | | ai = Butterfly AI |
||
| − | | damage = 0 |
||
| − | | life = 5 |
||
| − | | defense = 0 |
||
| − | | power = 20% bait |
||
| − | }} |
||
| − | |{{npc infobox |
||
| − | | name = Julia Butterfly |
||
| − | | environment = Forest |
||
| − | | ai = Butterfly AI |
||
| − | | damage = 0 |
||
| − | | life = 5 |
||
| − | | defense = 0 |
||
| − | | power = 25% bait |
||
| − | }} |
||
| − | |{{npc infobox |
||
| − | | name = Red Admiral Butterfly |
||
| − | | environment = Forest |
||
| − | | ai = Butterfly AI |
||
| − | | damage = 0 |
||
| − | | life = 5 |
||
| − | | defense = 0 |
||
| − | | power = 30% bait |
||
}} |
}} |
||
| − | |-style="vertical-align:top" |
||
|{{npc infobox |
|{{npc infobox |
||
| − | | name = |
+ | | name = Golem Body |
| + | | image = Golem_True_Head.png |
||
| − | | environment = Forest |
||
| − | | ai = |
+ | | ai = Golem Body AI |
| − | | damage = |
+ | | damage = 72 |
| − | | life = |
+ | | life = 9000 |
| − | | defense = |
+ | | defense = 30 |
| − | | |
+ | | id = 245 |
}} |
}} |
||
| + | |- |
||
|{{npc infobox |
|{{npc infobox |
||
| − | | name = |
+ | | name = Golem Fist |
| + | | image = Left_Golem_Fist.png |
||
| − | | environment = Forest |
||
| − | | ai = |
+ | | ai = Golem Fist AI |
| − | | damage = |
+ | | damage = 59 |
| − | | life = |
+ | | life = 7000 |
| − | | defense = |
+ | | defense = 28 |
| − | | |
+ | | id = 247 |
}} |
}} |
||
|{{npc infobox |
|{{npc infobox |
||
| − | | name = |
+ | | name = Golem Fist |
| + | | image = Right_Golem_Fist.png |
||
| − | | environment = Forest |
||
| − | | ai = |
+ | | ai = Golem Fist AI |
| − | | damage = |
+ | | damage = 59 |
| − | | life = |
+ | | life = 7000 |
| − | | defense = |
+ | | defense = 28 |
| − | | |
+ | | id = 248 |
}} |
}} |
||
|} |
|} |
||
== Notes == |
== Notes == |
||
| + | * In expert mode, aside from the default health and damage increase, Golem's fists will not be stopped by your attacks once the Golem's head loses enough HP (needs confirmation to see if it's the head or the actual fists) |
||
| − | * The spawn rates and spawn caps of Critters are affected by many of the same factors as those of hostile [[enemies]], so [[Water Candle]]s, [[Battle Potion]]s, and [[Calming Potion]]s will affect Critter spawns. |
||
| + | * Golem can only be summoned in a world where [[Plantera]] has been defeated. Attempting to summon it in a world where Plantera has not yet been defeated will fail, and a [[Lihzahrd Power Cell]] will not be consumed from your inventory. |
||
| − | * Once a Critter is put inside a cage, bottle, or jar, that single Critter can no longer be released, and will stay in there forever. An alternative is to simply release the critter into an enclosed area, though the Critter can then despawn if a player travels far enough. |
||
| + | * {{pc icon}} In order to use a Lihzahrd Power Cell, you must right-click the altar. Holding a Power Cell and left-clicking will do nothing. |
||
| − | * Critters regenerate health, although it's next to impossible to see this happening. |
||
| + | * Like most bosses, Golem will despawn if the player travels too far away, including traveling back through the Lihzarhd Temple. |
||
| + | * {{console icon}} It is possible to summon Golem pre-Plantera by using the Power Cell when you're under the room's floor, however certain items such as the Beetle Husk will not be dropped once it is defeated. |
||
| + | * You are only able to destroy Lihzahrd Bricks after you get the [[Picksaw]]. |
||
| + | ** However, if you defeat Golem, you get access to the Martian Madness event. Killing the Martian Saucer in this event may result in it dropping a Laser Drill, which, with it's 230% pickaxe power, can also mine Lihzahrd Bricks. This means that you don't need the Picksaw to mine Lihzahrd Bricks, as long as you kill Golem and get lucky with the Martian Saucer. |
||
| + | * The detached Golem head can be teleported with a [[Teleporter]]. |
||
== Tips == |
== Tips == |
||
| + | {{strategies|Guide:Golem strategies}} |
||
| − | * With several [[NPC]]s acquired, keeping [[Water Candle]]s around your [[Town]] will cause more Critters to spawn, without spawning enemies. |
||
| + | * When summoned, Golem will spawn above the Lihzahrd Altar and fall. If you have already beaten the Golem, you can use the [[Picksaw]] to pick up the [[Lihzahrd Altar]] and move it to a more suitable arena. |
||
| + | * Golem's fist attack will only fire at you when you are in the middle or to the same side as the fist. A fist will not cross the Golem to strike a player, even if the other fist has been destroyed. |
||
| − | == |
+ | == Trivia == |
| + | * A [[wikipedia:golem|Golem]] was originally a being from Jewish folklore, created from mud or clay and brought to life through rituals in order to defend townspeople from attacks. The theme persists in stories and video games today. |
||
| − | *[http://www.terrariaonline.com/threads/1-2-0-3-changelog.111428/ Redigit refers to "critters"] in a game update. |
||
| + | * The insignia on Golem's chest is also found on several other [[Jungle Temple]] themed items, such as the [[Heat Ray]]. |
||
| − | ==History== |
+ | == History == |
| + | {{history|1.3.0.1| |
||
| − | {{history|1.3.0.1|Many new critters added, and golden variations of some. Critters now have a sell price.}} |
||
| + | **Now triggers [[Cultist]]s to spawn |
||
| − | {{history|1.2.4|Many critters can now be used as [[bait]].}} |
||
| + | **Now triggers [[Martian Probe]]s to spawn |
||
| − | {{history|1.2.3|There are now critter sounds, 20 new critters added. Can catch all critters with Bug Net. You can now place critters in cages. Goldfish no longer drop as items when killed.}} |
||
| + | **Now drops a treasure bag on [[Expert Mode]]}} |
||
| − | {{history|1.2.1|Mice can no longer be killed by monsters and Mice no longer spawn in the underworld.}} |
||
| + | {{history|1.2.3| |
||
| − | {{history|1.2.0.3|Added new friendly critters: Blue Jay, Cardinal, Squirrel and Mouse.}} |
||
| + | **Now unable to spawn until [[Plantera]] has been defeated. |
||
| + | **Has increased health, damage, and defense. |
||
| + | **Its attacks are able to penetrate walls. |
||
| + | **Now drops {{gc|15}}, 4-8 [[Beetle Husk]]s, and [[Golem Mask]]. |
||
| + | **Now immune to [[Poisoned]] and [[On Fire!]]. |
||
| + | **"Golem's evil plans are no longer foiled by platforms." |
||
| + | **Summoning Golem will now properly only use one Power Cell. |
||
| + | **Will now flee to despawn after all players have been killed.}} |
||
| + | {{History|1.2|Introduced.}} |
||
{{Master Template Characters |
{{Master Template Characters |
||
| − | | show- |
+ | | show-boss = yes |
}} |
}} |
||
| + | {{Post-Plantera entities}} |
||
| − | [[fr:Créature]] |
||
| + | [[fr:Golem]] |
||
| − | [[Category:Critter NPCs]] |
||
{{translation project}} |
{{translation project}} |
||
Revision as of 05:00, 5 July 2015
| Type | |
|---|---|
| Environment | |
| AI Type | Golem Body AI |
| Damage | 72 |
| Max Life | 39000 16000 (head) 9000 (body) 7000 (each fist) |
| Defense | 26 |
| Coins | 15 |
|---|
- Item (Quantity)Rate
- 12.5%
 Stynger Bolt (60-99)100% (with Stynger)
- 12.5%
- 12.5%
- 12.5%
- 12.5%
- 12.5%
- 12.5%
- 12.5%
- 10%
- Greater Healing Potion (5-15)100%
- Beetle Husk (4-8)100%Template:Pc icon Template:Console icon
- 14.29%Template:Pc icon Template:Console icon
- Treasure Bag
(Golem)100% in Expert Mode
Golem is a Hardmode, post-Plantera boss found in the Jungle Temple. Template:Pc icon Defeating Golem enables Cultists to spawn at the dungeon, along with Martian Probes to spawn in the world.
Summoning
Golem is summoned by activating the Lihzahrd Altar found in the final chamber of the Jungle Temple. Activation requires one Lihzahrd Power Cell, which must be present in the player's inventory. The activation automatically consumes one Power Cell and spawns Golem immediately. But you need to have killed Plantera first. You can't just use a Picksaw to mine through the temple and then summon the Golem
Attacks
(Normal Mode) Golem's main body cannot move through blocks, but its fist and laser attacks can. Its stone head can also travel through blocks once it detaches in the second stage. On console versions, the stone head cannot pass through blocks once detached, allowing players to trap it by placing blocks.
Template:Pc icon(Expert Mode)
First form
(Normal Mode) Golem will shoot ricocheting fireballs, attack with its fists that extend from chains, and jump around. These increase in frequency as each part takes more damage: When the fists are damaged, they will attack more often; when the head is damaged, Golem jumps and shoots more often. Golem's fists can travel through blocks, but have limited range, and will also retract immediately upon being hit with any weapon.
- When the head falls below half health (8000), all previous attacks continue, but the head will begin to fire lasers that can travel through blocks. It fires more rapidly as it takes more damage and the fists will not retract upon being damaged with a weapon.
Template:Pc icon(Expert Mode)
Second form
(Normal Mode) When Golem's stone head has taken full damage, it detaches to reveal its "true" form (this also stops the laser attacks). It's body (9000 health) becomes the target. If the arms have not been destroyed, they will continue to attack the player more rapidly while the body continues to jump around.
The stone head is invulnerable to attacks and will fly around with the ability to travel through blocks. It will fire lasers that can also travel through blocks, and shoot ricocheting fireballs. Both fireballs and lasers are fired more frequently as the body takes more damage. Once the body drops to 0 health, the stone head and any surviving arms will also die. The Golem will always drop one of the first 8 items (not counting Stynger Bolt).
Template:Pc icon(Expert Mode)
Parts

Notes
- In expert mode, aside from the default health and damage increase, Golem's fists will not be stopped by your attacks once the Golem's head loses enough HP (needs confirmation to see if it's the head or the actual fists)
- Golem can only be summoned in a world where Plantera has been defeated. Attempting to summon it in a world where Plantera has not yet been defeated will fail, and a Lihzahrd Power Cell will not be consumed from your inventory.
- Template:Pc icon In order to use a Lihzahrd Power Cell, you must right-click the altar. Holding a Power Cell and left-clicking will do nothing.
- Like most bosses, Golem will despawn if the player travels too far away, including traveling back through the Lihzarhd Temple.
- Template:Console icon It is possible to summon Golem pre-Plantera by using the Power Cell when you're under the room's floor, however certain items such as the Beetle Husk will not be dropped once it is defeated.
- You are only able to destroy Lihzahrd Bricks after you get the Picksaw.
- However, if you defeat Golem, you get access to the Martian Madness event. Killing the Martian Saucer in this event may result in it dropping a Laser Drill, which, with it's 230% pickaxe power, can also mine Lihzahrd Bricks. This means that you don't need the Picksaw to mine Lihzahrd Bricks, as long as you kill Golem and get lucky with the Martian Saucer.
- The detached Golem head can be teleported with a Teleporter.
Tips
- When summoned, Golem will spawn above the Lihzahrd Altar and fall. If you have already beaten the Golem, you can use the Picksaw to pick up the Lihzahrd Altar and move it to a more suitable arena.
- Golem's fist attack will only fire at you when you are in the middle or to the same side as the fist. A fist will not cross the Golem to strike a player, even if the other fist has been destroyed.
Trivia
- A Golem was originally a being from Jewish folklore, created from mud or clay and brought to life through rituals in order to defend townspeople from attacks. The theme persists in stories and video games today.
- The insignia on Golem's chest is also found on several other Jungle Temple themed items, such as the Heat Ray.
History
- 1.3.0.1:
- Now triggers Cultists to spawn
- Now triggers Martian Probes to spawn
- Now drops a treasure bag on Expert Mode
- 1.2.3:
- Now unable to spawn until Plantera has been defeated.
- Has increased health, damage, and defense.
- Its attacks are able to penetrate walls.
- Now drops 15, 4-8 Beetle Husks, and Golem Mask.
- Now immune to Poisoned and On Fire!.
- "Golem's evil plans are no longer foiled by platforms."
- Summoning Golem will now properly only use one Power Cell.
- Will now flee to despawn after all players have been killed.
- 1.2: Introduced.
- Anomura Fungus
- Antlion
- Bat
- Bee
- Blood Crawler
- Crab
- Crimera
- Demon Eye
- Devourer
- Eater of Souls
- Face Monster
- Fungi Bulb
- Giant Worm
- Granite Elemental
- Granite Golem
- Harpy
- Hoplite
- Hornet
- Jellyfish
- Man Eater
- Meteor Head
- Mushi Ladybug
- Piranha
- Skeleton ()
- Shark (
- Orca
-
- Slime
- Snatcher
- Snow Flinx
- Tomb Crawler
- Undead Viking
- Vulture
- Wall Creeper
- Zombie
- Angler Fish
- Angry Trapper
- Arapaima
- Armored Skeleton
- Armored Viking
- Bat
- Black Recluse
- Blood Feeder
- Chaos Elemental ()
- Clinger
- Corruptor
- Derpling
- Digger
- Floaty Gross
- Gastropod ()
- Giant Fungi Bulb
- Giant Tortoise (
- Ice
-
- Herpling
- Ice Elemental
- Ichor Sticker
- Icy Merman
- Jellyfish
- Jungle Creeper
- Moss Hornet
- Pigron
- Pixie
- Possessed Armor
- Skeleton Archer
- Slime
- Unicorn
- Wandering Eye
- Werewolf
- Wraith
- Wolf
- Alien Skater
- Baby Dinosaur
- Baby Eater
- Baby Face Monster
- Baby Grinch
- Baby Hornet
- Baby Imp
- Baby Ogre
- Baby Penguin
- Baby Red Panda
- Baby Skeletron Head
- Baby Snowman
- Baby Truffle
- Baby Werewolf
- Black Cat
- Bunny
- Cursed Sapling
- Destroyer-Lite
- Dynamite Kitten
- Eater of Worms
- Estee
- Everscream Sapling
- Eyeball Spring
- Fennec Fox
- Flying Piggy Bank
- Glittery Butterfly
- Hoardragon
- Honey Bee
- Ice Queen
- Itsy Betsy
- Lil' Harpy
- Lizard
- Mini Minotaur
- Mini Prime
- Moonling
- Parrot
- Phantasmal Dragon
- Plantera Seedling
- Plantero
- Puppy
- Propeller Gato
- Rez and Spaz
- Sapling
- Shadow Mimic
- Shark Pup
- Skeletron Jr.
- Slime Prince
- Slime Princess
- Spider
- Spider Brain
- Squashling
- Sugar Glider
- Suspicious Eye
- Tiki Spirit
- Turtle
- Tiny Fishron
- Void Bag
- Volt Bunny
- Zephyr Fish
- Bat
- Guinea Pig
- Slime
- Lua error: too many expensive function calls.
- Lua error: too many expensive function calls.
- Lua error: too many expensive function calls.
- Lua error: too many expensive function calls.
- Lua error: too many expensive function calls.
- Lua error: too many expensive function calls.
- Lua error: too many expensive function calls.
- Lua error: too many expensive function calls.
- Lua error: too many expensive function calls.
- Lua error: too many expensive function calls.
- Lua error: too many expensive function calls.
- Lua error: too many expensive function calls.
- Lua error: too many expensive function calls.
- Lua error: too many expensive function calls.
- Lua error: too many expensive function calls.
- Lua error: too many expensive function calls.
- Lua error: too many expensive function calls.
- Lua error: too many expensive function calls.
- Lua error: too many expensive function calls.
- Lua error: too many expensive function calls.
- Lua error: too many expensive function calls.
- Lua error: too many expensive function calls.
- Lua error: too many expensive function calls.
- Lua error: too many expensive function calls.
- Lua error: too many expensive function calls.
- Lua error: too many expensive function calls.
- Raven
- Lua error: too many expensive function calls.
- Lua error: too many expensive function calls.
- Lua error: too many expensive function calls.
- Lua error: too many expensive function calls.
- Lua error: too many expensive function calls.
- Lua error: too many expensive function calls.
- Lua error: too many expensive function calls.
- Lua error: too many expensive function calls.
- Lua error: too many expensive function calls.
- Lua error: too many expensive function calls.
- Lua error: too many expensive function calls.
- Lua error: too many expensive function calls.
- Lua error: too many expensive function calls.
- Lua error: too many expensive function calls.
- Lua error: too many expensive function calls.
- Lua error: too many expensive function calls.
- Lua error: too many expensive function calls.
- Lua error: too many expensive function calls.
- Lua error: too many expensive function calls.
- Lua error: too many expensive function calls.
- Lua error: too many expensive function calls.
- Lua error: too many expensive function calls.
- Lua error: too many expensive function calls.
- Lua error: too many expensive function calls.
- Lua error: too many expensive function calls.
- Lua error: too many expensive function calls.
- Lua error: too many expensive function calls.
- Lua error: too many expensive function calls.
- Lua error: too many expensive function calls.
- Lua error: too many expensive function calls.
- Lua error: too many expensive function calls.
- Lua error: too many expensive function calls.
- Lua error: too many expensive function calls.
- Lua error: too many expensive function calls.
- Lua error: too many expensive function calls.
- Lua error: too many expensive function calls.
- Lua error: too many expensive function calls.
- Lua error: too many expensive function calls.
- Lua error: too many expensive function calls.
- Lua error: too many expensive function calls.
- Lua error: too many expensive function calls.
- Lua error: too many expensive function calls.
- Lua error: too many expensive function calls.
- Lua error: too many expensive function calls.
- Lua error: too many expensive function calls.
Template:Post-Plantera entities Template:Translation project