Tag: Visual edit |
Madminecrafter12 (talk | contribs) m (Reverted edits by 121.58.209.66 (talk) to last revision by Rye Greenwood) Tag: Rollback |
||
| Line 1: | Line 1: | ||
| − | + | <section begin=npc infobox />{{npc infobox | boxwidth = 25em |
|
| auto = 113 |
| auto = 113 |
||
| damage2 =  {{note|small=y|(melee)}} |
| damage2 =  {{note|small=y|(melee)}} |
||
| Line 36: | Line 36: | ||
== Summoning == |
== Summoning == |
||
| − | The Wall of Flesh is summoned when a |
+ | The Wall of Flesh is summoned when a [[Guide Voodoo Doll]] is dropped into [[lava]] in The Underworld while the [[Guide]] is alive (this must be done in The Underworld; lava in any other [[layer]] will only kill the Guide and will not summon the Wall of Flesh). This will kill the Guide and spawn the boss immediately. It can be done either by killing a [[Voodoo Demon]] who carries the Doll while it flies above a lava pool or by picking up a dropped Guide Voodoo Doll and throwing it into the lava manually. |
If the Guide is not alive when the Guide Voodoo Doll is destroyed, the Wall of Flesh will not be summoned and the item will be destroyed without any effect. If you have already summoned the Wall of Flesh recently or if the Guide was killed in some other instance, make sure the Guide has respawned before attempting to summon the Wall of Flesh again. The [[housing menu]] as well as the [[Minimap|map]] can also be used to see if the guide is present in the world. |
If the Guide is not alive when the Guide Voodoo Doll is destroyed, the Wall of Flesh will not be summoned and the item will be destroyed without any effect. If you have already summoned the Wall of Flesh recently or if the Guide was killed in some other instance, make sure the Guide has respawned before attempting to summon the Wall of Flesh again. The [[housing menu]] as well as the [[Minimap|map]] can also be used to see if the guide is present in the world. |
||
Revision as of 02:35, 19 October 2019

| Type | |
|---|---|
| AI Type | Wall of Flesh AI |
| Damage | 50/150/225 (melee) |
| Max Life | 8000/11200/14280 |
| Defense | 12/18 |
| KB Resist | 100% |
| Immune to |
| Debuff | |
|---|---|
| Debuff tooltip | You have seen something nasty, there is no escape. |
| Debuff | |
|---|---|
| Debuff tooltip | You are being sucked into the mouth |
| Coins | 820 |
|---|
- Item (Quantity)Rate
 Healing Potion (5-15)100%
- 100%
- 700%
- 16.67% / 33.33%
- 16.67% / 33.33%
- 16.67% / 33.33%
- 12.5% / 25%
- 12.5% / 25%
- 12.5% / 25%
- 12.5% / 25%
- 14.29%
- 10%
- Treasure Bag
(Wall of Flesh)

| Hurt | |
|---|---|
| Killed |
- Internal NPC ID: 113
![]() "The master and core of the world..."
"The master and core of the world..." ![]()

A Player facing the Wall of Flesh.
The Wall of Flesh is the final pre-Hardmode boss, and is spawnable only in The Underworld. It is considered to be the most difficult boss before entering Hardmode. Once defeated, the world permanently converts to Hardmode. This will grant players new challenges and gives them more content to explore.
To defeat the Wall of Flesh, the player must attack either its eyes or its mouth. They all share the same life counter, so attacking any of the three will deplete the total health of the boss. Attacking the eyes causes the most damage, as they have the lowest defense. Its other parts are intangible to weapons, so attacking those will not deplete its health.
See below for information on the Horrified and The Tongue debuffs.
Summoning
The Wall of Flesh is summoned when a Guide Voodoo Doll is dropped into lava in The Underworld while the Guide is alive (this must be done in The Underworld; lava in any other layer will only kill the Guide and will not summon the Wall of Flesh). This will kill the Guide and spawn the boss immediately. It can be done either by killing a Voodoo Demon who carries the Doll while it flies above a lava pool or by picking up a dropped Guide Voodoo Doll and throwing it into the lava manually.
If the Guide is not alive when the Guide Voodoo Doll is destroyed, the Wall of Flesh will not be summoned and the item will be destroyed without any effect. If you have already summoned the Wall of Flesh recently or if the Guide was killed in some other instance, make sure the Guide has respawned before attempting to summon the Wall of Flesh again. The housing menu as well as the map can also be used to see if the guide is present in the world.
The Wall of Flesh's sweep direction is determined by its spawn location. Spawning it anywhere left of the center of the world will cause it to sweep from left to right, while spawning it right of center will cause it to sweep right to left, regardless of the direction the doll was thrown into lava from. Maximum fight space can be achieved by spawning it at the extreme right or left of the world, though these areas have fewer natural structures and may require additional lava survival gear or construction.
Attacks
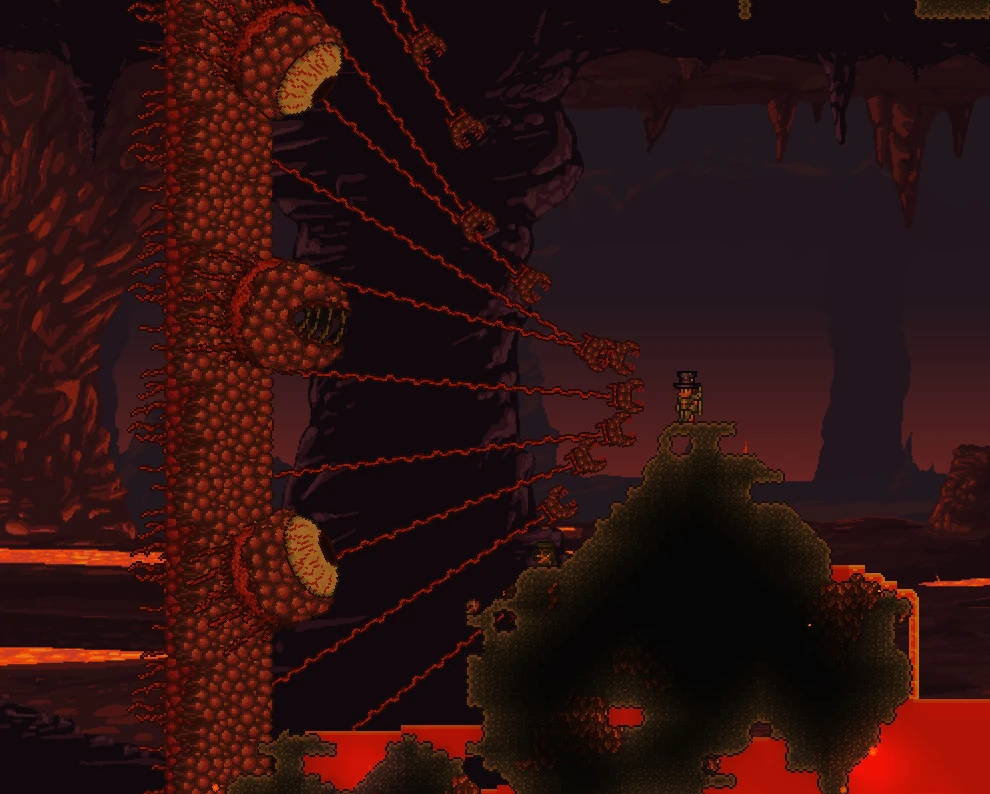
The Wall of Flesh is very large, occupying the entire screen vertically. Once spawned, it slowly sweeps across the map in a single direction, forcing the player to constantly move away for the duration of the fight, while also contending with the Underworld's usual hazards. It must be killed before it reaches the other end of the map, otherwise, it will despawn, and all players in The Underworld will die (with the unique death message "").
Once the Wall of Flesh has spawned, all players within 1800 feet will be inflicted with the Horrified debuff. The debuff lasts until either the player or the Wall of Flesh dies. If a player dies and then returns to the battle, they will again be inflicted with this debuff. While under this debuff, players cannot flee the battle. Attempting to leave the Underworld, or to get behind the Wall of Flesh will inflict The Tongue debuff. Attempting to escape the Underworld via a Magic/Ice Mirror, Recall Potion, Teleporter, or running far ahead of the Wall and leaving, will cause the player to die instantly with the unique death message "<Player name> tried to escape."
When The Tongue debuff is activated, a tendril will snatch the player and draw them into the Wall of Flesh's mouth, ignoring blocks in the way, and dealing high damage to the player (50 damage per second). During this, the player will be unable to move or use items.
The Wall of Flesh moves faster as its health depletes. In Expert mode, it can reach up to 50 mph while below 500 HP (as compared to the Hermes Boots at only 30 mph, Lightning Boots at 34, and the Bunny Mount at 38).
Additionally:
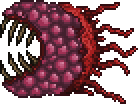
- The Wall of Flesh has small mouths called The Hungry, each attached by a long vein, which move towards and damage players. As the Wall of Flesh's main body takes damage, they deal more damage and become more resistant to attacks. When sufficiently damaged, they detach and fly towards players at high speed.
In Expert mode, the Hungry respawn as long as the Wall of Flesh is alive.
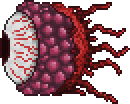
- The Wall of Flesh's eyes fire lasers. As its health depletes, the lasers increase in damage and frequency, to the point where they barely stop.
- The Wall of Flesh "burps" Leeches from its mouth that chase players. These will always drop hearts when killed.
In Expert mode, Leeches only have a 20% chance to drop hearts when killed.
Aftermath
When the Wall of Flesh is killed, it leaves its drops in a floating, fully-enclosed frame of Demonite Brick for Corruption worlds, or Crimtane Brick for Crimson worlds. The one definite drop is the Pwnhammer, which becomes an essential tool moving into Hardmode.
- In the Old-gen console version, Windows Phone version, and Nintendo version, the frame is always made of Demonite Bricks.
Hardmode
After defeating the Wall of Flesh for the first time, the status message "The ancient spirits of light and dark have been released." displays and the world converts to Hardmode. Hardmode brings new biomes, new and tougher enemies, and new tiers of equipment.
Two diagonal stripes of Hallow and Corruption or Crimson form in a "V" pattern from the center of the Underworld, all the way to the surface. Corruption/Crimson and Hallow will spread at a much faster rate, eventually covering large parts of the world if no action is taken.
Components

| Type | |
|---|---|
| Environment | |
| AI Type | The Hungry AI |
| Damage | 30/60/90 (WoF health 75%+) 45 / 90 (WoF health 50%+) 60 / 120 (WoF health 25%+) 75 / 150 (WoF health <25%) |
| Max Life | 240/336/503 |
| Defense | 10/16 (WoF health 75%+) 20 (WoF health 50%+) 30 (WoF health 25%+) 40 (WoF health <25%) |
| KB Resist | -10%/1%/12% |
| Immune to |
| Hurt | |
|---|---|
| Killed |
- Internal NPC ID: 115
Notes
- If you have problems getting the Guide to spawn, make sure there is no Event in progress. Traveling back to your world's original spawn point can reveal an ongoing event, like a Goblin Invasion, and allow you to complete it. It also must be Day for the Guide to respawn.
- If the Guide NPC is killed by lava contact damage in the Underworld, the Wall of Flesh will not be summoned.
- The Wall of Flesh is one of the few bosses that does not despawn based on player distance. Once summoned, it only despawns once it reaches the far edge of the world, which also kills the player.
- This also means that it won't despawn upon player death, possibly allowing one to carry on with the fight if they get back down there fast enough before it reaches the end.
- While the Wall of Flesh is alive, it is possible for the Guide NPC to respawn. Dropping another Guide Voodoo Doll into lava will kill the Guide. However, this will not summon a second Wall of Flesh.
- The Wall of Flesh attempts to cover the entire Underworld cavern space by moving its eyes up and down; it orients by existence/absence of solid blocks and liquids 4-5 tiles above and beneath the eyes. That means making a bridge will make the eyes stay at constant height 4-7 blocks from the bridge. It is programmed to not go through ash blocks, so bear that in mind when making a bridge.
- Due to the Horrified Debuff, trying to use a Magic Mirror, Ice Mirror, Teleportation Potions or Recall Potions will instantly kill the player.
- The Wall of Flesh will not despawn until it reaches the other end of the map, this means that if the player gets killed but can get down to the Underworld quick enough, they can resume the fight.
Tips
- Take care to avoid accidentally letting a Voodoo Demon drop its doll into lava when you're not prepared to fight, as this will summon the Wall of Flesh. If it does get summoned while you're not prepared, you can save and quit and reopen the world to avoid the fight. This can be very helpful in Hardcore mode, although some players may consider it cheating.
- Mobility-enhancing items, such as Gravitation Potion, Rocket Boots or one of their upgrades, and various Hooks can make traversing the Underworld much easier. Similarly, items like Obsidian Skin Potions, Lava Waders, or an Obsidian Rose can mitigate the underworld's many lava pools and other ambient hazards.
- The player can build a long bridge (e.g. made of Wooden Platforms; at least 500 tiles long in normal mode) going along the Underworld quite high up, so the structures, lava, and mounds of ash do not get in the way.
- It is advised to focus on The Hungry first before significantly damaging the Wall itself due to their increases in damage and defense.
- Melee weapons are not recommended for fighting the Wall of Flesh for the first time, because the close range of this class results in a sizable amount of contact damage. However, certain melee weapons with extended range, like the Dark Lance, might prove useful.
- Viable ranged weapons include The Bee's Knees and Hellwing Bow (both with Wooden Arrows), the Molten Fury (preferably with Heart Arrows
), the Sharanga, the Phoenix Blaster, the Minishark, and the Star Cannon (with about 250 Fallen Stars).- Note that Heart Arrows will freeze the Wall of Flesh in place, as long as the arrows hit its mouth.
- Beenades and Molotov Cocktails are highly effective throwing weapons against the Wall of Flesh, especially in Expert mode
. - Using a Water Bolt might finish the fight even after the player's death, as the projectile continues to bounce.
- Making a platform with Explosion-proof tiles (such as Dungeon Bricks) and proceeding to use Dynamite can be extremely effective if the player times their throws well.
- A good way to defeat the Wall of Flesh is to build a long Minecart Track instead of a plain platform because you can keep up with the Wall of Flesh. This is even more useful in Expert mode
because when the Wall of Flesh's health is below 500 HP, it travels at 50 mph. Even when using the Wooden Minecart, you can travel faster than the Wall of Flesh, at 51 mph. - The Hungry are not immune to On Fire!, making the Inferno Potion and the Flask of Fire very useful, also making The Hungry the only Underworld enemy not immune to the On Fire! Debuff.
- If the player teleports back to the spawn before the Wall of Flesh spawns, they will be able to potentially go behind the wall (after waiting for it to pass) and defeat it from there without much trouble (although you have to keep your distance and buildings get in the way). However, you will probably need a Ranged Weapon for the best results. Keep in mind, due to The Tongue debuff, this may prove difficult.
- If you make a platform out of ash blocks, the wall of flesh will stay above them. This is useful for rangers or gunslingers.
- If you're a gunslinger, you could make the the platform hilly, so you shoot at the Wall of Flesh on the hill, and as it gets closer you move to the next hill. This also works great with the Space Gun and Meteor armor combo.
Trivia
- Despite being based around flesh, the Wall of Flesh was in the game long before the Crimson, and this flesh theme was a coincidence.
- The Hungry appear to be a smaller version of the Wall's mouth.
- Although the eyes and mouth of the Wall of Flesh are immune to numerous debuffs, The Hungry are only immune to Confused.
- Because killing the Wall of Flesh creates strips of Hallow and Corruption/Crimson, if it is defeated near the middle of the map, it may drop a Soul of Light or Soul of Night on death, proving that the world is in fact converted to Hardmode before the status message displays.
- The Wall of Flesh's eyes and mouth resemble the Eye of Cthulhu on its first and second form, respectively.
- The Wall of Flesh was inspired by the Demon Wall from the Japanese science fantasy video game series Final Fantasy.[2]
Achievements


References
- ↑ Two in Expert mode
, see Treasure Bag (Wall of Flesh) - ↑ Terraria's 8th Anniversary - Ask Redigit and Cenx! May 20, 2019
History
- Desktop 1.3.5: Sprite updated.
- Desktop 1.3.0.1:
- Has new AI for Expert mode and will drop its own Treasure Bag.
- Can now drop the Summoner Emblem.
- Drops will now be encased in Crimtane Bricks if the world was generated with Crimson.
- Desktop 1.2.3: Now has a chance to drop the Wall of Flesh Mask.
- Desktop 1.2: Now has a chance to drop the Wall of Flesh Trophy.
- Desktop 1.1: Introduced.
- Console-Release: Introduced.
- Switch 1.0.711.6: Introduced.
- Mobile-Release: Introduced.
- 3DS-Release: Introduced.
- Anomura Fungus
- Antlion
- Bat
- Bee
- Blood Crawler
- Crab
- Crimera
- Demon Eye
- Devourer
- Eater of Souls
- Face Monster
- Fungi Bulb
- Giant Worm
- Granite Elemental
- Granite Golem
- Harpy
- Hoplite
- Hornet
- Jellyfish
- Man Eater
- Meteor Head
- Mushi Ladybug
- Piranha
- Skeleton ()
- Shark (
- Orca
-
- Slime
- Snatcher
- Snow Flinx
- Tomb Crawler
- Undead Viking
- Vulture
- Wall Creeper
- Zombie
- Angler Fish
- Angry Trapper
- Arapaima
- Armored Skeleton
- Armored Viking
- Bat
- Black Recluse
- Blood Feeder
- Chaos Elemental ()
- Clinger
- Corruptor
- Derpling
- Digger
- Floaty Gross
- Gastropod ()
- Giant Fungi Bulb
- Giant Tortoise (
- Ice
-
- Herpling
- Ice Elemental
- Ichor Sticker
- Icy Merman
- Jellyfish
- Jungle Creeper
- Moss Hornet
- Pigron
- Pixie
- Possessed Armor
- Skeleton Archer
- Slime
- Unicorn
- Wandering Eye
- Werewolf
- Wraith
- Wolf
- King Slime ()
- Eye of Cthulhu
- Eater of Worlds
- Brain of Cthulhu ()
- Queen Bee (
- Bees
-
- Skeletron
- Deerclops
- Wall of Flesh ()
- Alien Skater
- Baby Dinosaur
- Baby Eater
- Baby Face Monster
- Baby Grinch
- Baby Hornet
- Baby Imp
- Baby Ogre
- Baby Penguin
- Baby Red Panda
- Baby Skeletron Head
- Baby Snowman
- Baby Truffle
- Baby Werewolf
- Black Cat
- Bunny
- Cursed Sapling
- Destroyer-Lite
- Dynamite Kitten
- Eater of Worms
- Estee
- Everscream Sapling
- Eyeball Spring
- Fennec Fox
- Flying Piggy Bank
- Glittery Butterfly
- Hoardragon
- Honey Bee
- Ice Queen
- Itsy Betsy
- Lil' Harpy
- Lizard
- Mini Minotaur
- Mini Prime
- Moonling
- Parrot
- Phantasmal Dragon
- Plantera Seedling
- Plantero
- Puppy
- Propeller Gato
- Rez and Spaz
- Sapling
- Shadow Mimic
- Shark Pup
- Skeletron Jr.
- Slime Prince
- Slime Princess
- Spider
- Spider Brain
- Squashling
- Sugar Glider
- Suspicious Eye
- Tiki Spirit
- Turtle
- Tiny Fishron
- Void Bag
- Volt Bunny
- Zephyr Fish
- Bat
- Guinea Pig
- Slime
- Lua error: too many expensive function calls.
- Lua error: too many expensive function calls.
- Lua error: too many expensive function calls.
- Lua error: too many expensive function calls.
- Lua error: too many expensive function calls.
- Lua error: too many expensive function calls.
- Lua error: too many expensive function calls.
- Lua error: too many expensive function calls.
- Lua error: too many expensive function calls.
- Lua error: too many expensive function calls.
- Lua error: too many expensive function calls.
- Lua error: too many expensive function calls.
- Lua error: too many expensive function calls.
- Lua error: too many expensive function calls.
- Lua error: too many expensive function calls.
- Lua error: too many expensive function calls.
- Lua error: too many expensive function calls.
- Lua error: too many expensive function calls.
- Lua error: too many expensive function calls.
- Lua error: too many expensive function calls.
- Lua error: too many expensive function calls.
- Lua error: too many expensive function calls.
- Lua error: too many expensive function calls.
- Lua error: too many expensive function calls.
- Lua error: too many expensive function calls.
- Lua error: too many expensive function calls.
- Raven
- Lua error: too many expensive function calls.
- Lua error: too many expensive function calls.
- Lua error: too many expensive function calls.
- Lua error: too many expensive function calls.
- Lua error: too many expensive function calls.
- Lua error: too many expensive function calls.
- Lua error: too many expensive function calls.
- Lua error: too many expensive function calls.
- Lua error: too many expensive function calls.
- Lua error: too many expensive function calls.
- Lua error: too many expensive function calls.
- Lua error: too many expensive function calls.
- Lua error: too many expensive function calls.
- Lua error: too many expensive function calls.
- Lua error: too many expensive function calls.
- Lua error: too many expensive function calls.
- Lua error: too many expensive function calls.
- Lua error: too many expensive function calls.
- Lua error: too many expensive function calls.
- Lua error: too many expensive function calls.
- Lua error: too many expensive function calls.
- Lua error: too many expensive function calls.
- Lua error: too many expensive function calls.
- Lua error: too many expensive function calls.
- Lua error: too many expensive function calls.
- Lua error: too many expensive function calls.
- Lua error: too many expensive function calls.
- Lua error: too many expensive function calls.
- Lua error: too many expensive function calls.
- Lua error: too many expensive function calls.
- Lua error: too many expensive function calls.
- Lua error: too many expensive function calls.
- Lua error: too many expensive function calls.
- Lua error: too many expensive function calls.
- Lua error: too many expensive function calls.
- Lua error: too many expensive function calls.
- Lua error: too many expensive function calls.
- Lua error: too many expensive function calls.
- Lua error: too many expensive function calls.
- Lua error: too many expensive function calls.
- Lua error: too many expensive function calls.
- Lua error: too many expensive function calls.
- Lua error: too many expensive function calls.
- Lua error: too many expensive function calls.
- Lua error: too many expensive function calls.