No edit summary |
(→Requirements: fishron can be summoned in lava with a gold rod this technicallys isnt fishing but he has fish in his name video https://www.youtube.com/watch?v=bOgVY9rY1RE.) Tag: Visual edit |
||
| Line 1: | Line 1: | ||
| + | {{all versions}} |
||
| − | == Merge == |
||
| + | {| style="float:right; text-align:right" |
||
| + | | [[File:Fishing animation.gif|frame|right|Fishing]] |
||
| + | |- |
||
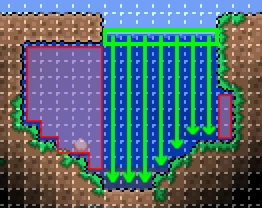
| + | | [[File:Fishing dimensions.png|202px|thumb|right|Surface width is determined first (green rectangle), then the depth below those tiles (arrows). Tiles falling outside the originally calculated surface width are not counted (red areas).]] |
||
| + | |}<div style="float:right; margin-left:10px;">__TOC__</div>'''Fishing''' is accomplished by using a [[Fishing Pole]] at a body of [[liquid]] while having a [[Bait]] item in your inventory. By standing on dry blocks and clicking a point over water, a line is cast into the water. Click again when the bobber moves up and down in order to reel in the line, and hopefully, an item will come up with the line. |
||
| + | == Requirements == |
||
| − | I don't think this warrants a merge, since they have two distinct roles and even look different. --[[User:JonTheMon|JonTheMon]] 18:27, 10 June 2011 (UTC) |
||
| + | <div style="float: right; margin-left:10px;"></div> |
||
| + | 75 connected tiles of liquid are required (1,000 for [[ocean]]s, 50 for [[honey]]). The width of the top row of continuous liquid tiles (the row where the fishing bobber sits) determines the calculated pond width, and then the depth directly below those is counted. If the pond becomes wider at lower depths, that additional width is ''not'' counted. The player may successfully fish in a 1 tile-wide pond, as long as it's 75 tiles deep. The distance of the bobber to the shoreline does not matter. |
||
| − | :Same here,don't merge,instead remove request.--[[User:MadPedro|MadPedro]] 18:44, 10 June 2011 (UTC) |
||
| + | It is not possible to fish when the player is submerged in liquid, even partially, and even within a completely disconnected body of water. Fishing can however be done while moving, flying, while [[Grappling Hooks|grappled]] to blocks, or while standing on top of water, eg. using [[Water Walking Boots]]. Fishing can be done in [[Lava]], but will only work with the [[Hotline Fishing Hook]](duke fishron can be summoned with golden fishing rod in lava though this technically isnt fishing it just requires a fishing rod). |
||
| − | :Alright, if you say so. It just makes sense from a content perspective and would clean up npc info. You don't have separate pages for wild wolf and tame wolf in Minecraft. --[[Special:Contributions/12.16.164.205|12.16.164.205]] 18:56, 10 June 2011 (UTC) |
||
| + | |||
| + | == Fishing Quests == |
||
| + | Catching a quest fish for the [[Angler]] [[NPC]] requires fishing in the proper [[biome]] and [[depth|height]] for the day's current quest, which can be determined by talking to the Angler. You don't need to speak with him beforehand, nor have even encountered him, but the chances of finding the correct area to fish for a quest are much lower without speaking to him first. Quest fish cannot be caught if the player already has that particular quest fish in their inventory, nor if the quest fish was already turned in that day. However, if you put the Quest fish in your safe/bank then you may catch another Quest Fish. You can then transfer the Quest Fish to a chest if you wish. The [[Angler]] gives out [[Angler#Quest Rewards|special rewards]] when a proper quest fish is turned in. |
||
| + | |||
| + | == Factors == |
||
| + | Given the prerequisites for fishing are fulfilled, a number of factors influence the quality/rarity of the caught item. All are combined into a total "Fishing Skill" that determines the chances of higher-quality catches. Percentages in the tables below that influence Fishing Skill are marked {{green|green}} or {{red|red}}. |
||
| + | |||
| + | * The Fishing Power of the [[Fishing Pole]] used. |
||
| + | * The Bait Power of the [[Bait]] used.<ref name="bp" group="fb">% Bait Power also means % Fishing Power, and is combined with all other Fishing Power factors, such as the Fishing Pole's power and the Time factor, etc. Bait Power ''additionally'' determines the chances that the Bait item will be consumed from the player's inventory. Items with higher Bait Powers will tend to last through more fishing attempts: Higher Bait Power means ''lower'' chance of consumption.</ref> |
||
| + | * Equipped items and [[Potion]]s. |
||
| + | * The [[time]] the player is fishing. |
||
| + | * The size of the lake. Lakes with fewer than 300 tiles incur a Fishing Power penalty. |
||
| + | * When fishing '''without''' the [[High Test Fishing Line]], there is always a 1 in 7 chance that the fishing line will break on reel-in, forfeiting the caught item. Chances of consuming bait remain the same even if the line breaks. With the High Test Fishing Line equipped, the line never breaks. |
||
| + | |||
| + | {| |
||
| + | | |
||
| + | {| class="terraria" style="margin:0; width:600px" |
||
| + | ! colspan = "5" | Fishing Power Boost Gear |
||
| + | |- |
||
| + | ! colspan="2" | Item !! Effect !! Source |
||
| + | |- |
||
| + | | {{il2c|Angler Earring|size=30px}} || {{green|+10}} Fishing Power || Random [[Angler#Quest Rewards|Angler quest reward]] |
||
| + | |- |
||
| + | | {{il2c|Angler armor}} || {{green|+5}} Fishing Power per piece || 10th, 15th, & 20th [[Angler#Quest Rewards|Angler quests]] |
||
| + | |- |
||
| + | | {{il2c|Fishing Potion}} || {{green|+15}} Fishing Power (8 min) ||align="center"| {{item link2|Bottled Water}} + {{item link2|Waterleaf}} + {{item link2|Crispy Honey Block}} |
||
| + | |} |
||
| + | |||
| + | |valign="top" rowspan=2 | |
||
| + | {| class="terraria" style="margin:0" |
||
| + | ! colspan = "2" | Time |
||
| + | |- |
||
| + | ! Factor !! Effect |
||
| + | |- |
||
| + | | Cloudy or Overcast || {{green|+10%}} |
||
| + | |- |
||
| + | | [[Rain]] || {{green|+20%}} |
||
| + | |- |
||
| + | | 4:30am - 6:00am || {{green|+30%}} |
||
| + | |- |
||
| + | | 9:00am - 3:00pm || {{red|-20%}} |
||
| + | |- |
||
| + | | 6:00pm - 7:30pm || {{green|+30%}} |
||
| + | |- |
||
| + | | 9:00pm - 3:00am || {{red|-20%}} |
||
| + | |- |
||
| + | | Full [[Moon]] || {{green|+10%}} |
||
| + | |- |
||
| + | | [[Moon]] 2 or 8 <ref name="moon" group="fb">Moon phases are numbered according to the graphic shown on the [[Moon Phase]] page.</ref> || {{green|+5%}} |
||
| + | |- |
||
| + | | [[Moon]] 4 or 6 <ref name="moon" group="fb" /> || {{red|-5%}} |
||
| + | |- |
||
| + | | New [[Moon]] (no moon) || {{red|-10%}} |
||
| + | |} |
||
| + | |||
| + | | rowspan="2" valign="top" | |
||
| + | {| class="terraria" style="margin:0; text-align:center" |
||
| + | ! colspan="2" | Lake Size <ref group="fb">Lake sizes listed here are example numbers to illustrate the lake size effect, and are not thresholds. The penalty is actually determined by an equation: <code>'''(tiles / 300) * Fishing Power'''</code>. In effect, a lake ''n'' times smaller than 300 tiles (200 for honey) results in ''n'' times less Fishing Power. Any increase or decrease in total tiles between 75 and 300 will alter the lake size penalty.</ref> |
||
| + | |- |
||
| + | ! Water Tiles !! Effect |
||
| + | |- |
||
| + | |75 || {{red|-75%}} |
||
| + | |- |
||
| + | |100 || {{red|-66.6%}} |
||
| + | |- |
||
| + | |125 || {{red|-58.3%}} |
||
| + | |- |
||
| + | |150 || {{red|-50%}} |
||
| + | |- |
||
| + | |175 || {{red|-41.6}} |
||
| + | |- |
||
| + | |200 || {{red|-33.3%}} |
||
| + | |- |
||
| + | |225 || {{red|-25%}} |
||
| + | |- |
||
| + | |250 || {{red|-16.6%}} |
||
| + | |- |
||
| + | |275 || {{red|-8.3%}} |
||
| + | |- |
||
| + | |300+ || {{green|''no penalty''}} |
||
| + | |} |
||
| + | |||
| + | |- |
||
| + | | |
||
| + | {| class="terraria" style="margin:0; width:600px" |
||
| + | ! colspan = "5" | Other Fishing Gear |
||
| + | |- |
||
| + | ! colspan="2" | Item !! Effect !! Source |
||
| + | |- |
||
| + | |- |
||
| + | | [[File:High Test Fishing Line.png|link=High Test Fishing Line|size=30px]] || [[High Test Fishing Line|High Test<br>Fishing Line]] || Line never breaks || Random [[Angler#Quest Rewards|Angler quest reward]] |
||
| + | |- |
||
| + | | {{il2c|Tackle Box|size=30px}} || -5% bait consumption chance || Random [[Angler#Quest Rewards|Angler quest reward]] |
||
| + | |- |
||
| + | | {{il2c|Crate Potion}} || +10% [[Crate]] chance (3 min) ||align="center"| {{item link2|Bottled Water}} + {{item link2|Amber}} + {{item link2|Deathweed}} + {{item link2|Moonglow}} |
||
| + | |- |
||
| + | | {{il2c|Sonar Potion}} || Shows hooked item name<br />before reel-in (4 min) ||align="center"| {{item link2|Bottled Water}} + {{item link2|Waterleaf}} + {{item link2|Coral}} |
||
| + | |- |
||
| + | |{{il2c|Fisherman's Pocket Guide}}|| Shows current Fishing Power ||Random [[Angler#Quest Rewards|Angler quest reward]] |
||
| + | |- |
||
| + | |{{il2c|Weather Radio}}|| Displays current weather ||Random [[Angler#Quest Rewards|Angler quest reward]] |
||
| + | |- |
||
| + | |{{il2c|Sextant}}|| Shows [[moon phase]] ||Random [[Angler#Quest Rewards|Angler quest reward]] |
||
| + | |} |
||
| + | |||
| + | |} |
||
| + | |||
| + | <references group="fb" /> |
||
| + | |||
| + | == Catches == |
||
| + | === [[File:Trout.png|25px]] Fish === |
||
| + | These items can be caught at any time. Most can serve as [[crafting material]] for [[Food and Drink Potions|Food]] and other [[Potions]]. Some can also craft other item types. Jellyfish can be used as bait. Most can be sold to [[NPC]]s. |
||
| + | |||
| + | {{ajax|Ordinary Fishing Catches}} |
||
| + | |||
| + | === [[File:Slimefish.png|25px]] Quest fish === |
||
| + | These are fish items that can be caught only when their particular quest is active, and serve no purpose other than acquiring [[Angler#Quest Rewards|quest rewards]]. Their catch chance is around 1:10. You can determine the day's quest by speaking to the [[Angler]] [[NPC]]. There are 39 distinctive variants of quest fish. |
||
| + | |||
| + | {{ajax|Angler/Quests}} |
||
| + | |||
| + | === [[File:Scaly Truffle.png|25px]] Usable Items === |
||
| + | These items can be used directly without further crafting. Some are [[Tools]], while others are [[Weapons]], [[Accessories]], [[Potions]], or [[Mount]]- or [[Pet]]-summoning items. |
||
| + | |||
| + | {{ajax|Other Fishing Catches}} |
||
| + | |||
| + | === [[File:Wooden Crate.png|25px]] Crates === |
||
| + | Crates are grab bag-type items that can each contain random loot. They can be right-clicked from within the player's inventory, which will unload their contents. Rarer Crate types contain more valuable loot. Each Crate type can be stacked up to 99 in a single inventory slot. |
||
| + | |||
| + | {{collapse top}} |
||
| + | <center>{{:Crates}}</center> |
||
| + | {{collapse bottom}} |
||
| + | |||
| + | === [[File:Tin Can.png|25px]] Junk === |
||
| + | These items have no use or [[coin]] value. They can each be stacked up to 99 in a single inventory slot. You will only "catch" these if a lake is too small or if your Fishing Power is too low. When a lake is at least 300 tiles (200 for honey) in size or your total fishing power is at least 50 you will no longer catch junk. |
||
| + | |||
| + | <!--it’s so small, we can spare the user 1 click :)--> |
||
| + | <!--{{collapse top}}--> |
||
| + | <center> |
||
| + | {| class="terraria sortable" style="text-align:center" |
||
| + | ! colspan=2 | Type !! Value !! [[Rarity]] !! [[Height]] !! [[Biome]] |
||
| + | |- |
||
| + | | style="text-align:left" | {{il2cn|Old Shoe|text-align:left|id=2337}} || 0 || {{rare|-1}} || Any || Any |
||
| + | |- |
||
| + | | style="text-align:left" | {{il2cn|Seaweed|text-align:left|image=Seaweed (junk).png|id=2338}} || 0 || {{rare|-1}} || Any || Any |
||
| + | |- |
||
| + | | style="text-align:left" | {{il2cn|Tin Can|text-align:left|id=2339}} || 0 || {{rare|-1}} || Any || Any |
||
| + | |} |
||
| + | </center> |
||
| + | <!--{{collapse bottom}}--> |
||
| + | |||
| + | == Crafting == |
||
| + | === Used in === |
||
| + | {{collapse top}} |
||
| + | {{crafts top | image=y}} |
||
| + | {{crafts row | top=y |
||
| + | | tool = By Hand | toolspan = 6 |
||
| + | | result = Blue Jellyfish Jar | |
||
| + | | Bottled Water | |
||
| + | | Blue Jellyfish (Bait) | |
||
| + | }} |
||
| + | {{crafts row |
||
| + | | result = Green Jellyfish Jar | |
||
| + | | Bottled Water | |
||
| + | | Green Jellyfish (Bait) | |
||
| + | }} |
||
| + | {{crafts row |
||
| + | | result = Pink Jellyfish Jar | |
||
| + | | Bottled Water | |
||
| + | | Pink Jellyfish (Bait) | |
||
| + | }} |
||
| + | {{crafts row | image=y |
||
| + | | tool = Cooking Pot | toolspan = 7 |
||
| + | | result = Cooked Fish | |
||
| + | | Bass | |
||
| + | }} |
||
| + | {{crafts row |
||
| + | | result = Cooked Fish | |
||
| + | | Trout | |
||
| + | }} |
||
| + | {{crafts row |
||
| + | | result = Cooked Fish | |
||
| + | | Salmon | |
||
| + | }} |
||
| + | {{crafts row |
||
| + | | result = Cooked Fish | |
||
| + | | Atlantic Cod | |
||
| + | }} |
||
| + | {{crafts row |
||
| + | | result = Cooked Fish | |
||
| + | | Tuna | |
||
| + | }} |
||
| + | {{crafts row |
||
| + | | result = Cooked Fish | |
||
| + | | Red Snapper | |
||
| + | }} |
||
| + | {{crafts row |
||
| + | | result = Cooked Shrimp | |
||
| + | | Shrimp | |
||
| + | }} |
||
| + | {{crafts row |
||
| + | | tool = Work Bench | toolspan = 4 |
||
| + | | result = Sashimi | |
||
| + | | Tuna | |
||
| + | }} |
||
| + | {{crafts row |
||
| + | | result = Sashimi | |
||
| + | | Trout | |
||
| + | }} |
||
| + | {{crafts row |
||
| + | | result = Sashimi | |
||
| + | | Salmon | |
||
| + | }} |
||
| + | {{crafts row |
||
| + | | result = Sashimi | |
||
| + | | Red Snapper | |
||
| + | }} |
||
| + | {{crafts row |
||
| + | | tool = Placed Bottle | toolspan = 56 |
||
| + | | result = Ammo Reservation Potion | |
||
| + | | Bottled Water | |
||
| + | | Double Cod | |
||
| + | | Moonglow | |
||
| + | }} |
||
| + | {{crafts row |
||
| + | | result = Calming Potion | |
||
| + | | Bottled Water | |
||
| + | | Damselfish | |
||
| + | | Daybloom | |
||
| + | }} |
||
| + | {{crafts row |
||
| + | | result = Endurance Potion | |
||
| + | | Bottled Water | |
||
| + | | Armored Cavefish | |
||
| + | | Blinkroot | |
||
| + | }} |
||
| + | {{crafts row |
||
| + | | result = Heartreach Potion | |
||
| + | | Bottled Water | |
||
| + | | Crimson Tigerfish | |
||
| + | | Daybloom | |
||
| + | | Moonglow | |
||
| + | }} |
||
| + | {{crafts row |
||
| + | | result = Inferno Potion | |
||
| + | | Bottled Water | |
||
| + | | Flarefin Koi | |
||
| + | | Obsidifish | 2 |
||
| + | | Fireblossom | |
||
| + | }} |
||
| + | {{crafts row |
||
| + | | result = Lifeforce Potion | |
||
| + | | Bottled Water | |
||
| + | | Prismite | |
||
| + | | Moonglow | |
||
| + | | Shiverthorn | |
||
| + | | Waterleaf | |
||
| + | }} |
||
| + | {{crafts row |
||
| + | | result = Love Potion | |
||
| + | | Bottled Water | |
||
| + | | Princess Fish | |
||
| + | | Shiverthorn | |
||
| + | }} |
||
| + | {{crafts row |
||
| + | | result = Rage Potion | |
||
| + | | Bottled Water | |
||
| + | | Hemopiranha | |
||
| + | | Deathweed | |
||
| + | }} |
||
| + | {{crafts row |
||
| + | | result = Recall Potion | |
||
| + | | Bottled Water | |
||
| + | | Specular Fish | |
||
| + | | Daybloom | |
||
| + | }} |
||
| + | {{crafts row |
||
| + | | result = Stink Potion | |
||
| + | | Bottled Water | |
||
| + | | Stinkfish | |
||
| + | | Deathweed | |
||
| + | }} |
||
| + | {{crafts row |
||
| + | | result = Summoning Potion | |
||
| + | | Bottled Water | |
||
| + | | Variegated Lardfish | |
||
| + | | Moonglow | |
||
| + | }} |
||
| + | {{crafts row |
||
| + | | result = Teleportation Potion | |
||
| + | | Bottled Water | |
||
| + | | Chaos Fish | |
||
| + | | Blinkroot | |
||
| + | | Fireblossom | |
||
| + | }} |
||
| + | {{crafts row |
||
| + | | result = Warmth Potion | |
||
| + | | Bottled Water | |
||
| + | | Frost Minnow | |
||
| + | | Shiverthorn | |
||
| + | }} |
||
| + | {{crafts row |
||
| + | | result = Wrath Potion | |
||
| + | | Bottled Water | |
||
| + | | Ebonkoi | |
||
| + | | Deathweed | |
||
| + | }} |
||
| + | {{crafts bottom}} |
||
| + | {{collapse bottom}} |
||
| + | |||
| + | == Notes == |
||
| + | * The bobber will move two or three times per bite, after which the fish will go away but the line will remain cast. As long as the reel-in occurs before this animation ends, the timing of the click doesn't affect the quality of the catch (the [[Sonar Potion]] shows this plainly). |
||
| + | * It is possible to get a day's quest fish without having asked the [[Angler]] about it, though that would be a lucky event since the player won't know where to fish for it. Taking it to him will then successfully complete the quest. |
||
| + | * Time must pass naturally from 04:29-04:30 (new day) before another quest begins. |
||
| + | * However, with an [[Enchanted Sundial]], you can get a new quest immediately. |
||
| + | * Crate contents are determined upon opening them. Crates caught in normal mode can therefore yield [[Hardmode]] items when stockpiled and opened in Hardmode. |
||
| + | * [[Ocean]]-only catches, including the Capn' Tunabeard quest fish, cannot be obtained from a Hallowed or Corrupted Ocean shoreline, but may be obtainable further out towards the map edge, where Corrupted or Hallowed sand is farther from the water surface. When the Ocean Biome music plays, Ocean fish can be caught. |
||
| + | * Possible catches are determined by the [[biome]] that the player is currently within, rather than the biome the liquid body is in. |
||
| + | * However, the height of the bobber is what determines the height requirements of the catch, not the height of the player. |
||
| + | |||
| + | == Mechanics == |
||
| + | * Some [[biomes]] override other biomes. The biome order for fishing is: |
||
| + | Lava > Honey > Corruption = Crimson > Hallow > Snow > Jungle > Mushroom > Ocean > Forest(including sky, surface, underground, cavern, etc.). |
||
| + | ** NOTE: 1. Possible catches determined by biomes have ''different'' priorities from how the music plays. The background music of Terraria is misleading because its priority for music is: |
||
| + | Ocean > Mushroom > Corruption > Crimson > Jungle > Snow > Hallow > Others |
||
| + | Because the music priority is drastically different then the fishing priority, this may explain why you could not find a quest fish in a part of the world that is playing the music for the biome that fish could be found in. (For example, you stand where Jungle and Snow overlaps, so you will hear ''Jungle'' music but harvest ''Tundra'' catches.) |
||
| + | |||
| + | 2. There is inconsistency in the mushroom biome criteria. Note that 200 mushroom tiles is considered valid when it refers to fishing, while for other uses 100 is mostly enough. |
||
| + | * Additionally, each biome has its own list of catches that each occupy "rarity slots". Each fishing attempt yields a particular slot. When fishing in overlapping biomes the higher-priority biome's catch occupying that slot will be caught. A fish from the lower-priority biome will only be caught if the higher-priority biome(s) has no fish occupying that rarity slot. |
||
| + | * Most quest fish occupy the "uncommon" slot, with the exceptions of the Mirage Fish and Pixiefish, which are "rare". However, quest fish have higher priority within their native biomes than other fish. |
||
| + | * The Ocean overrides all lower priority biomes and defaults to catching Trout. All other biomes default to catching Bass. |
||
| + | |||
| + | == Tips == |
||
| + | * A good way to grind for [[Lightning Bug]]s is to either convert a large slab of land to [[Hallow]], or one can dig a large hole (lined with dirt) and convert it to Hallow. |
||
| + | * On some nights, many fireflies will spawn in the area around NPCs; however, if several NPCs live in the hallow, the same effect can occur with lightning bugs. This seems to happen on any night when fireflies are spawning in large numbers. |
||
| + | * A good way to grind for Bait is to create a jungle farm, to allow and break the plants that grow, due to the high odds of getting bait per plant. Possible drops are [[Grubby]], [[Sluggy]] or [[Buggy]]. |
||
| + | * The most reliable way of obtaining [[Bait]] seems to be fishing in a surface forest, at night, close to [[NPC]]s. Staying still and restricting the spawns to critters will result in a lot of Fireflies spawning, and if alternating fishing and catching it's easy to end with dozens more bait. [[Water Candle]]s and [[Battle Potion]]s can be used to increase the spawn rate of critters, while the NPCs still prevent [[enemy]] spawns. Alternatively, if one obtains [[Flower Boots]] from a [[Jungle Shrine]], they can stand on grass with a [[yoyo]] or [[flail]] and have the plants spawned by the boots be constantly destroyed, generating many worms and grasshoppers. |
||
| + | * There are a total of 16 different fishing locations that can yield distinct catches: ''[[Surface]]'': [[Forest]], [[Ocean]], [[Jungle]], [[Corruption]], [[Crimson]], [[Hallow]], [[Snow]], [[Honey]]; ''[[Underground]]'': Forest, Snow, Hallow, Jungle; ''[[Cavern]]'': Snow + Hallow/Corruption/Crimson; [[Floating Island]]; ''Any [[Layer]]'': [[Lava]], [[Mushroom Biome|Mushroom]]. |
||
| + | * Since quest fish cannot be fished or picked up when that same quest fish is already in the player's inventory, duplicate quest fish can be saved in [[Chest]]s or other storage items, which can be useful since quests often repeat. Duplicate quest fish can however be placed in a player's inventory manually by moving them from Chests afterward. |
||
| + | * An easy pre-hardmode way to tell if it's a full moon, and thus an ideal night to fish, would be to use a [[Deathweed]]'s blooming as an indicator. A Deathweed only blooms under either a full moon or a [[Blood Moon]], therefore -unless a Blood Moon is currently occuring- if the plant blooms when placed in a [[Clay Pot|Pot]], it means the Moon is full. |
||
| + | * It's a good idea to save up your crates until hard mode has been activated because of their chance to drop hard mode bars this can make your character much more survivable in expert mode. |
||
| + | * The quest is the same for every character every day. The quest fish can also be stored in a chest - you can use one character to fish up and then piggy bank the quest fish and then fish up another and bank it over and over, then move the fish from the piggybank to a chest back in the house - and then use other characters to log in, grab the fish, then complete the quest. Rather than making different worlds to do the daily you can use different characters to drasticlly increase the number of fishing completes per in game day. |
||
| + | * If you have a very high fishing power ([[Master Bait]], [[Golden Fishing Rod]], along with fishing buffs and equipment) it is possible to have a net gain of Master Bait from the crates obtained. |
||
| + | |||
| + | == Trivia == |
||
| + | * The Neon Tetra and Golden Carp have no use, aside from their coin value. The Golden Carp is especially valuable at {{gc|10}}. |
||
| + | * The Clownfish quest description is a reference to the 2003 ''Pixar'' film, ''[[wikipedia:Finding Nemo|Finding Nemo]]''. |
||
| + | * The Batfish quest description is a reference to the iconic [[wikipedia: Batman Theme|Batman Theme]]. |
||
| + | |||
| + | == History == |
||
| + | {{history|1.3.0.5|[[Seedler]] can no longer be obtained through fishing.}} |
||
| + | {{history|1.3.0.4|Loot from fishing is now properly highlighted in highlight system.}} |
||
| + | {{history|1.3.0.1|Added [[Jungle Crate]], [[Sky Crate]], [[Corrupt Crate]], [[Crimson Crate]], [[Hallowed Crate]], and [[Dungeon Crate]]. Sky quest fish can no longer be found on the surface. Reduced the number of water tiles needed to fish successfully in the sky.}} |
||
| + | {{history|1.2.4.1| |
||
| + | ** Fixed bug where repeated clicks after your line broke would nevertheless produce a catch. |
||
| + | ** Fixed bug causing Seaweed to turn into [[Seaweed]] (pet item) if in the inventory of a dying [[Mediumcore]] character (the Seaweed now simply disappears).}} |
||
| + | {{history|1.2.4|Introduced.}} |
||
| + | |||
| + | {{Master Template Consumables |
||
| + | | show-material = yes |
||
| + | }} |
||
| + | [[Category:Game mechanics]] |
||
| + | [[fr:Pêcher]] |
||
| + | [[ko:낚시]] |
||
| + | [[ru:Рыбалка]] |
||
| + | {{translation project}} |
||
Revision as of 21:23, 19 February 2016
Fishing |
 Surface width is determined first (green rectangle), then the depth below those tiles (arrows). Tiles falling outside the originally calculated surface width are not counted (red areas). |
Fishing is accomplished by using a Fishing Pole at a body of liquid while having a Bait item in your inventory. By standing on dry blocks and clicking a point over water, a line is cast into the water. Click again when the bobber moves up and down in order to reel in the line, and hopefully, an item will come up with the line.
Requirements
75 connected tiles of liquid are required (1,000 for oceans, 50 for honey). The width of the top row of continuous liquid tiles (the row where the fishing bobber sits) determines the calculated pond width, and then the depth directly below those is counted. If the pond becomes wider at lower depths, that additional width is not counted. The player may successfully fish in a 1 tile-wide pond, as long as it's 75 tiles deep. The distance of the bobber to the shoreline does not matter.
It is not possible to fish when the player is submerged in liquid, even partially, and even within a completely disconnected body of water. Fishing can however be done while moving, flying, while grappled to blocks, or while standing on top of water, eg. using Water Walking Boots. Fishing can be done in Lava, but will only work with the Hotline Fishing Hook(duke fishron can be summoned with golden fishing rod in lava though this technically isnt fishing it just requires a fishing rod).
Fishing Quests
Catching a quest fish for the Angler NPC requires fishing in the proper biome and height for the day's current quest, which can be determined by talking to the Angler. You don't need to speak with him beforehand, nor have even encountered him, but the chances of finding the correct area to fish for a quest are much lower without speaking to him first. Quest fish cannot be caught if the player already has that particular quest fish in their inventory, nor if the quest fish was already turned in that day. However, if you put the Quest fish in your safe/bank then you may catch another Quest Fish. You can then transfer the Quest Fish to a chest if you wish. The Angler gives out special rewards when a proper quest fish is turned in.
Factors
Given the prerequisites for fishing are fulfilled, a number of factors influence the quality/rarity of the caught item. All are combined into a total "Fishing Skill" that determines the chances of higher-quality catches. Percentages in the tables below that influence Fishing Skill are marked green or red.
- The Fishing Power of the Fishing Pole used.
- The Bait Power of the Bait used.[fb 1]
- Equipped items and Potions.
- The time the player is fishing.
- The size of the lake. Lakes with fewer than 300 tiles incur a Fishing Power penalty.
- When fishing without the High Test Fishing Line, there is always a 1 in 7 chance that the fishing line will break on reel-in, forfeiting the caught item. Chances of consuming bait remain the same even if the line breaks. With the High Test Fishing Line equipped, the line never breaks.
|
|
| ||||||||||||||||||||||||||||||||||||||||||||||||||||||||||||||||||
| ||||||||||||||||||||||||||||||||||||||||||||||||||||||||||||||||||||
- ↑ % Bait Power also means % Fishing Power, and is combined with all other Fishing Power factors, such as the Fishing Pole's power and the Time factor, etc. Bait Power additionally determines the chances that the Bait item will be consumed from the player's inventory. Items with higher Bait Powers will tend to last through more fishing attempts: Higher Bait Power means lower chance of consumption.
- ↑ 2.0 2.1 Moon phases are numbered according to the graphic shown on the Moon Phase page.
- ↑ Lake sizes listed here are example numbers to illustrate the lake size effect, and are not thresholds. The penalty is actually determined by an equation:
(tiles / 300) * Fishing Power. In effect, a lake n times smaller than 300 tiles (200 for honey) results in n times less Fishing Power. Any increase or decrease in total tiles between 75 and 300 will alter the lake size penalty.
Catches
 Fish
Fish
These items can be caught at any time. Most can serve as crafting material for Food and other Potions. Some can also craft other item types. Jellyfish can be used as bait. Most can be sold to NPCs.
 Quest fish
These are fish items that can be caught only when their particular quest is active, and serve no purpose other than acquiring quest rewards. Their catch chance is around 1:10. You can determine the day's quest by speaking to the Angler NPC. There are 39 distinctive variants of quest fish.
Usable Items
These items can be used directly without further crafting. Some are Tools, while others are Weapons, Accessories, Potions, or Mount- or Pet-summoning items.
Crates
Crates are grab bag-type items that can each contain random loot. They can be right-clicked from within the player's inventory, which will unload their contents. Rarer Crate types contain more valuable loot. Each Crate type can be stacked up to 99 in a single inventory slot.
Fishing Crates are grab bag-type items which can be caught while fishing, containing random loot such as ores, bars, potions, accessories, and other items. In addition, biome-specific crates can contain biome-specific loot. Their content can be unloaded by pressing the ⚷ Interact button, either on their icon in the inventory or while holding them. Some kinds of crates can be caught anywhere, while the rest can only be caught when fishing in a certain biome. Wooden Crates, Iron Crates, and Golden Crates ( Crates are caught every 1 in 10 catches, on average; with a Crate Potion, the chance is doubled to 1 in 5. The kind of crate the player obtains is dependent on their Fishing Power, with higher Fishing Power increasing the probabilities of rarer crates. As an example, fishing with a Fishing Power of 100 in a lake of at least 300 valid water tiles in the Corruption would yield crates with the following probabilities: Golden Crate: Types
CraftingRecipesNotes
Tips
History
References
Consumables:
Potions Health Potions Mana Potions Restoration Potions Teleportation Other Potions Permanent Power-Ups Power-Ups Buff Potions Defense Detection and Vision
Weapons Other Consumable Weapons Ammunition Seeds Materials Found Bought Drops Ores and Bars Ores Hardmode Bars Other Crafting Stations Themed Light Sources Placeable Suitable for housing Unsuitable for housing Storage Items Other Items Floor & Citeming
Functional
Wiring
|
Junk
These items have no use or coin value. They can each be stacked up to 99 in a single inventory slot. You will only "catch" these if a lake is too small or if your Fishing Power is too low. When a lake is at least 300 tiles (200 for honey) in size or your total fishing power is at least 50 you will no longer catch junk.
| Type | Value | Rarity | Height | Biome | |
|---|---|---|---|---|---|
| Template:Il2cn | 0 | Any | Any | ||
| Template:Il2cn | 0 | Any | Any | ||
| Template:Il2cn | 0 | Any | Any | ||
Crafting
Used in
Template:Crafts top Template:Crafts row Template:Crafts row Template:Crafts row Template:Crafts row Template:Crafts row Template:Crafts row Template:Crafts row Template:Crafts row Template:Crafts row Template:Crafts row Template:Crafts row Template:Crafts row Template:Crafts row Template:Crafts row Template:Crafts row Template:Crafts row Template:Crafts row Template:Crafts row Template:Crafts row Template:Crafts row Template:Crafts row Template:Crafts row Template:Crafts row Template:Crafts row Template:Crafts row Template:Crafts row Template:Crafts row Template:Crafts row Template:Crafts bottom |
Notes
- The bobber will move two or three times per bite, after which the fish will go away but the line will remain cast. As long as the reel-in occurs before this animation ends, the timing of the click doesn't affect the quality of the catch (the Sonar Potion shows this plainly).
- It is possible to get a day's quest fish without having asked the Angler about it, though that would be a lucky event since the player won't know where to fish for it. Taking it to him will then successfully complete the quest.
- Time must pass naturally from 04:29-04:30 (new day) before another quest begins.
- However, with an Enchanted Sundial, you can get a new quest immediately.
- Crate contents are determined upon opening them. Crates caught in normal mode can therefore yield Hardmode items when stockpiled and opened in Hardmode.
- Ocean-only catches, including the Capn' Tunabeard quest fish, cannot be obtained from a Hallowed or Corrupted Ocean shoreline, but may be obtainable further out towards the map edge, where Corrupted or Hallowed sand is farther from the water surface. When the Ocean Biome music plays, Ocean fish can be caught.
- Possible catches are determined by the biome that the player is currently within, rather than the biome the liquid body is in.
- However, the height of the bobber is what determines the height requirements of the catch, not the height of the player.
Mechanics
- Some biomes override other biomes. The biome order for fishing is:
Lava > Honey > Corruption = Crimson > Hallow > Snow > Jungle > Mushroom > Ocean > Forest(including sky, surface, underground, cavern, etc.).
- NOTE: 1. Possible catches determined by biomes have different priorities from how the music plays. The background music of Terraria is misleading because its priority for music is:
Ocean > Mushroom > Corruption > Crimson > Jungle > Snow > Hallow > Others
Because the music priority is drastically different then the fishing priority, this may explain why you could not find a quest fish in a part of the world that is playing the music for the biome that fish could be found in. (For example, you stand where Jungle and Snow overlaps, so you will hear Jungle music but harvest Tundra catches.)
2. There is inconsistency in the mushroom biome criteria. Note that 200 mushroom tiles is considered valid when it refers to fishing, while for other uses 100 is mostly enough.
- Additionally, each biome has its own list of catches that each occupy "rarity slots". Each fishing attempt yields a particular slot. When fishing in overlapping biomes the higher-priority biome's catch occupying that slot will be caught. A fish from the lower-priority biome will only be caught if the higher-priority biome(s) has no fish occupying that rarity slot.
- Most quest fish occupy the "uncommon" slot, with the exceptions of the Mirage Fish and Pixiefish, which are "rare". However, quest fish have higher priority within their native biomes than other fish.
- The Ocean overrides all lower priority biomes and defaults to catching Trout. All other biomes default to catching Bass.
Tips
- A good way to grind for Lightning Bugs is to either convert a large slab of land to Hallow, or one can dig a large hole (lined with dirt) and convert it to Hallow.
- On some nights, many fireflies will spawn in the area around NPCs; however, if several NPCs live in the hallow, the same effect can occur with lightning bugs. This seems to happen on any night when fireflies are spawning in large numbers.
- A good way to grind for Bait is to create a jungle farm, to allow and break the plants that grow, due to the high odds of getting bait per plant. Possible drops are Grubby, Sluggy or Buggy.
- The most reliable way of obtaining Bait seems to be fishing in a surface forest, at night, close to NPCs. Staying still and restricting the spawns to critters will result in a lot of Fireflies spawning, and if alternating fishing and catching it's easy to end with dozens more bait. Water Candles and Battle Potions can be used to increase the spawn rate of critters, while the NPCs still prevent enemy spawns. Alternatively, if one obtains Flower Boots from a Jungle Shrine, they can stand on grass with a yoyo or flail and have the plants spawned by the boots be constantly destroyed, generating many worms and grasshoppers.
- There are a total of 16 different fishing locations that can yield distinct catches: Surface: Forest, Ocean, Jungle, Corruption, Crimson, Hallow, Snow, Honey; Underground: Forest, Snow, Hallow, Jungle; Cavern: Snow + Hallow/Corruption/Crimson; Floating Island; Any Layer: Lava, Mushroom.
- Since quest fish cannot be fished or picked up when that same quest fish is already in the player's inventory, duplicate quest fish can be saved in Chests or other storage items, which can be useful since quests often repeat. Duplicate quest fish can however be placed in a player's inventory manually by moving them from Chests afterward.
- An easy pre-hardmode way to tell if it's a full moon, and thus an ideal night to fish, would be to use a Deathweed's blooming as an indicator. A Deathweed only blooms under either a full moon or a Blood Moon, therefore -unless a Blood Moon is currently occuring- if the plant blooms when placed in a Pot, it means the Moon is full.
- It's a good idea to save up your crates until hard mode has been activated because of their chance to drop hard mode bars this can make your character much more survivable in expert mode.
- The quest is the same for every character every day. The quest fish can also be stored in a chest - you can use one character to fish up and then piggy bank the quest fish and then fish up another and bank it over and over, then move the fish from the piggybank to a chest back in the house - and then use other characters to log in, grab the fish, then complete the quest. Rather than making different worlds to do the daily you can use different characters to drasticlly increase the number of fishing completes per in game day.
- If you have a very high fishing power (Master Bait, Golden Fishing Rod, along with fishing buffs and equipment) it is possible to have a net gain of Master Bait from the crates obtained.
Trivia
- The Neon Tetra and Golden Carp have no use, aside from their coin value. The Golden Carp is especially valuable at 10.
- The Clownfish quest description is a reference to the 2003 Pixar film, Finding Nemo.
- The Batfish quest description is a reference to the iconic Batman Theme.
History
- 1.3.0.4: Loot from fishing is now properly highlighted in highlight system.
- 1.3.0.1: Added Jungle Crate, Sky Crate, Corrupt Crate, Crimson Crate, Hallowed Crate, and Dungeon Crate. Sky quest fish can no longer be found on the surface. Reduced the number of water tiles needed to fish successfully in the sky.
- 1.2.4.1:
- Fixed bug where repeated clicks after your line broke would nevertheless produce a catch.
- Fixed bug causing Seaweed to turn into Seaweed (pet item) if in the inventory of a dying Mediumcore character (the Seaweed now simply disappears).
- 1.2.4: Introduced.
- Potions (Buff potions)
- Weapons
- Ammunition
- Seeds
- Materials
- Other
- Ale
- Apple Pie
- Bacon
- Banana Split
- BBQ Ribs
- Bowl of Soup
- Bunny Stew
- Burger
- Carton of Milk
- Chicken Nugget
- Chocolate Chip Cookie
- Christmas Pudding
- Coffee
- Cooked Marshmallow
- Cream Soda
- Escargot
- Fishing FoodFishing Food
-
 Fried Egg
 -
 Fries
Fries -
 Froggle Bunwich
 - Fruits(
- Apple
- Apricot
- Banana
- Blackcurrant
- Blood Orange
- Cherry
- Coconut
- Dragon Fruit
- Elderberry
- Grapefruit
- Lemon
- Mango
- Peach
- Pineapple
- Plum
- Rambutan
- Star Fruit
- Fruit Juice
- Fruit Salad
- Apple Juice
- Bloody Moscato
- Frozen Banana Daiquiri
- Lemonade
- Peach Sangria
- Piña Colada
- Prismatic Punch
- Smoothie of Darkness
- Tropical Smoothie
-
- Gingerbread Cookie
- Golden Delight
- Grapes
- Grape Juice
- Grilled Squirrel
- Grub Soup
- Hotdog
- Ice Cream
- Milkshake
- Monster Lasagna
- Nachos
- Pad Thai
- Pizza
- Pho
- Potato Chips
- Pumpkin Pie
- Roasted Bird
- Roasted Duck
- Sake
- Sauteed Frog Legs
- Shrimp Po' Boy
- Shucked Oyster
- Spaghetti
- Steak
- Sugar Cookie
- Teacup
Weapons
Template:Translation project